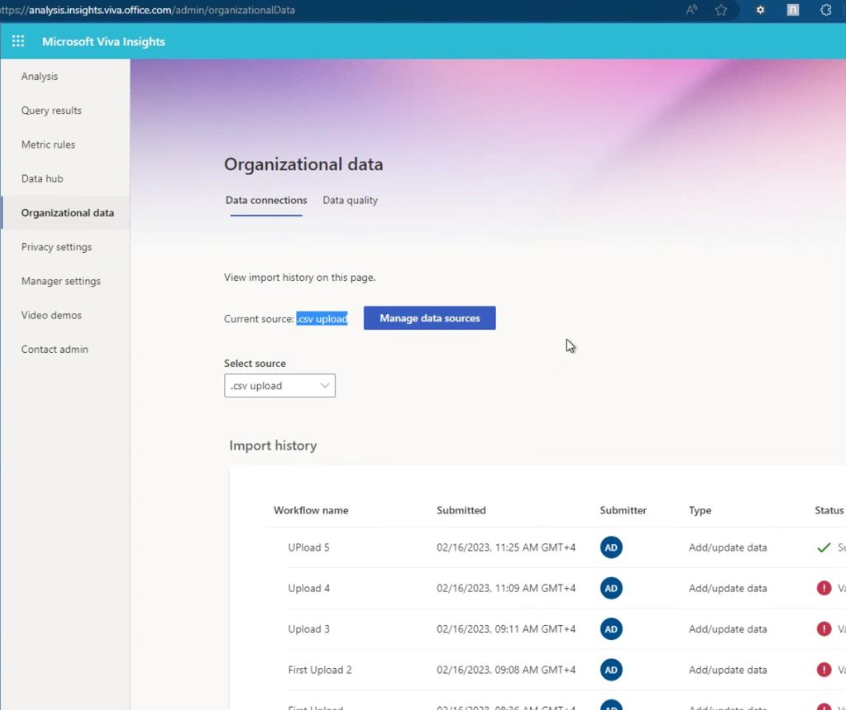
To Manage Data Sources – Azure AD is the default data source.
Microsoft provides an additional option if you wish to add other data like cost center or gender, for example, where this data is unavailable in the Azure ad or stored in ERP. But it has to be uploaded periodically and maintained. CSV is a painful option to take.
Data Sources cannot be chosen later if you use the CSV, for example. If you have an enterprise subscription, there is a chance that you can reach the product team to switch back to an Azure ad, for example. When writing this article, quickly changing it back to an Azure ad is impossible.
.
It has three roles.
Insights Administrator – Has administrative access to the Microsoft 365 Insights app. (Usually a Global and M365 admin to adjust data sources and manager size) Insights Analyst – Access the analytical capabilities in Microsoft Viva Insights and run custom queries. (For the BI guy to generate custom reports) Insights Business Leader – Can view and share dashboards and insights via the M365 Insights app. (For C Level Executives / CEO and VPs, for example)
.
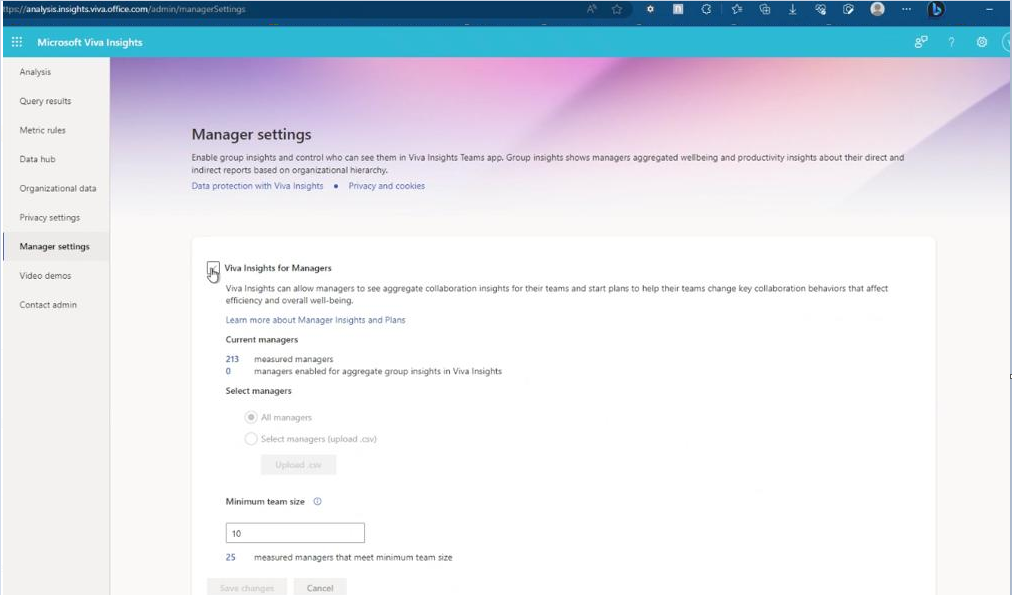
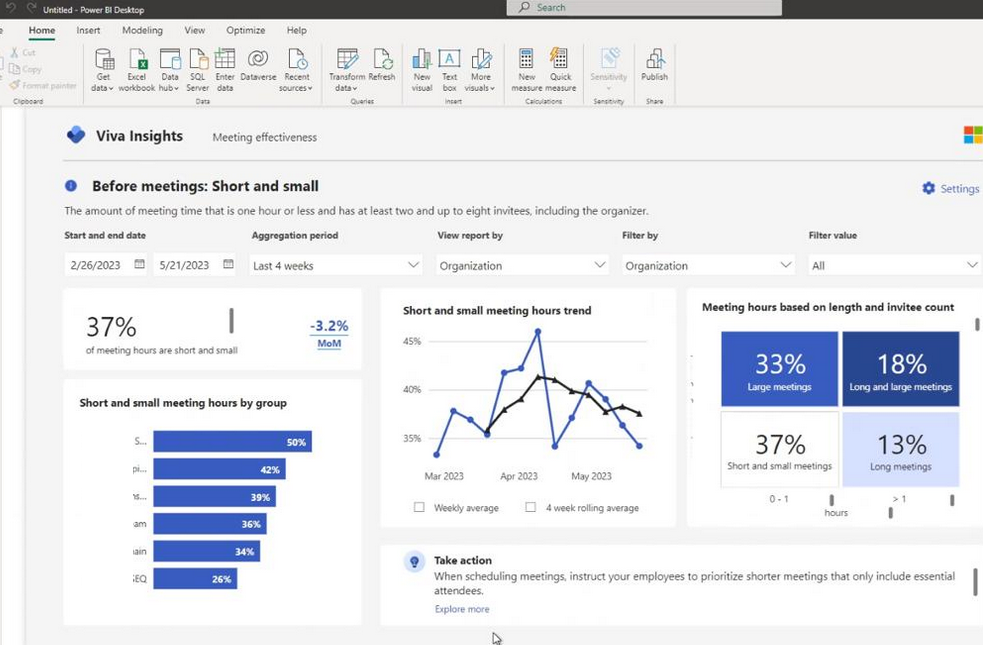
This has to be enabled – Meeting Insights for Managers for Group insights who can see them in the viva insights teams app. shows managers aggregated well-being and productivity insights about their direct and indirect reports based on organization hierarchy.
The minimum team size for this can be changed to a minimum of 10
.
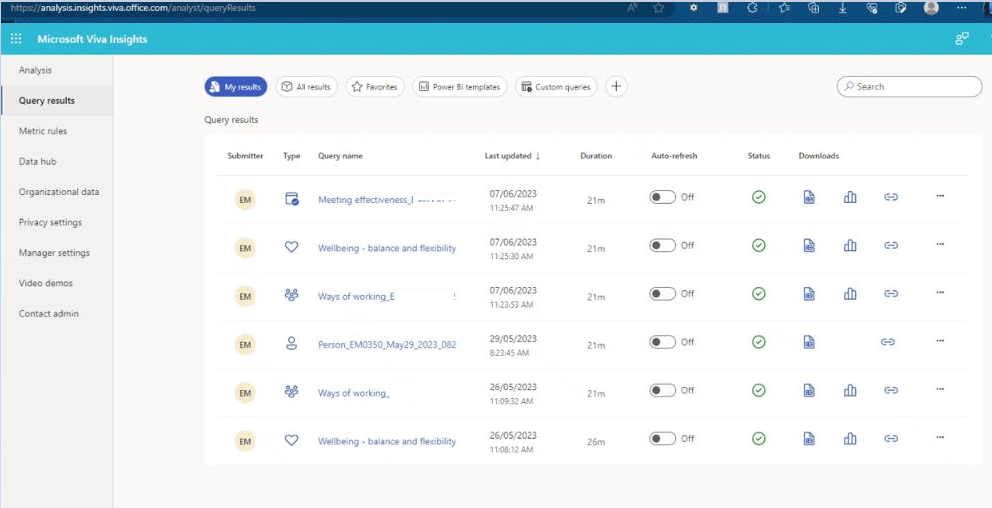
In Advance Viva insights, you have the option to generate reports using Power BI
.
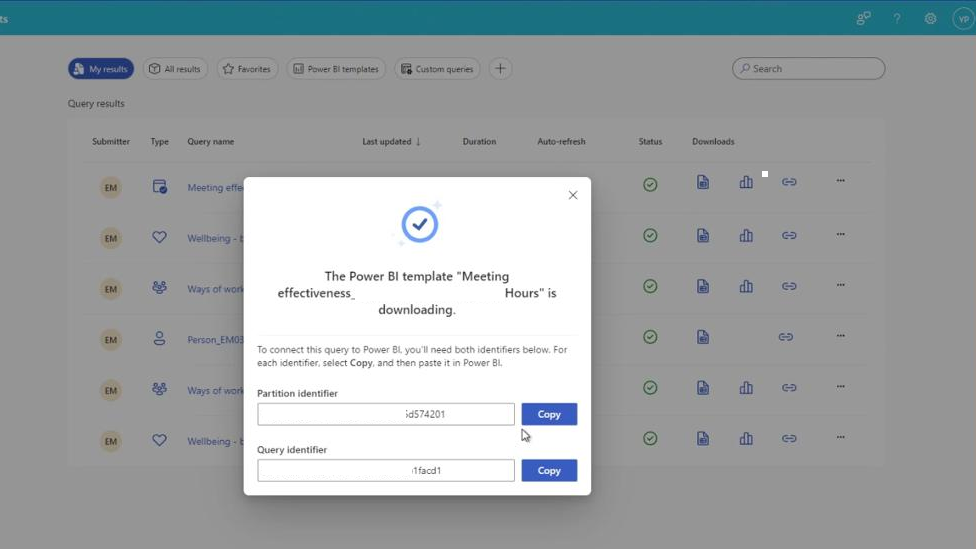
You can use the partition identifier and query identifier to connect your power bi desktop. For example
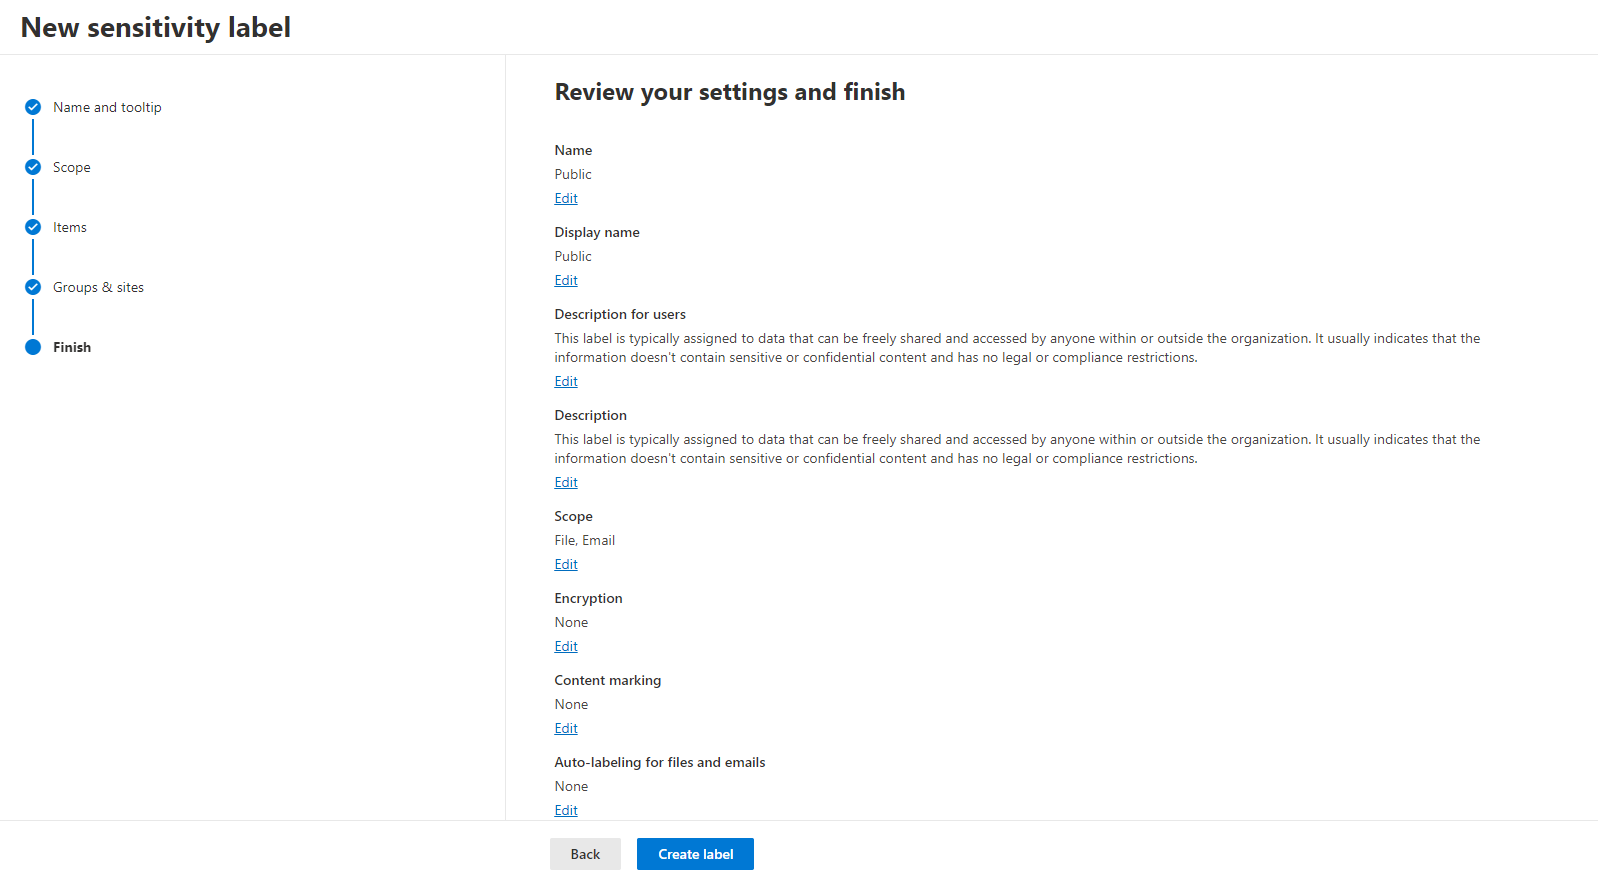
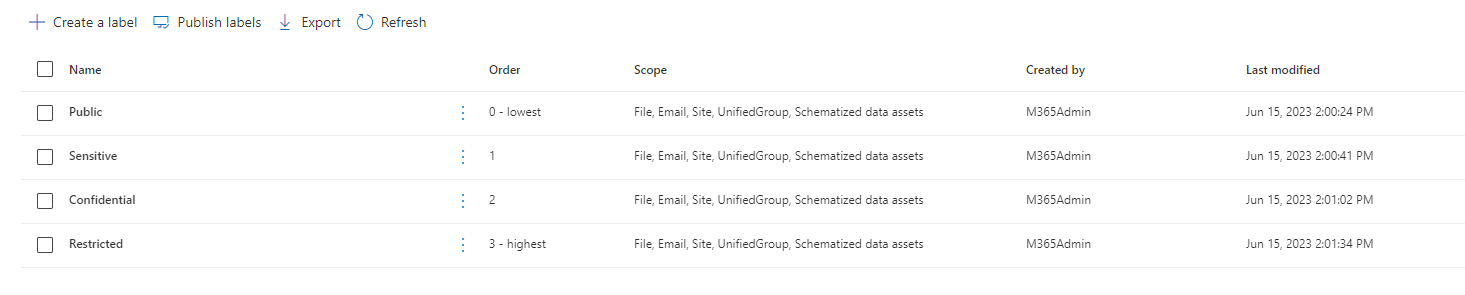
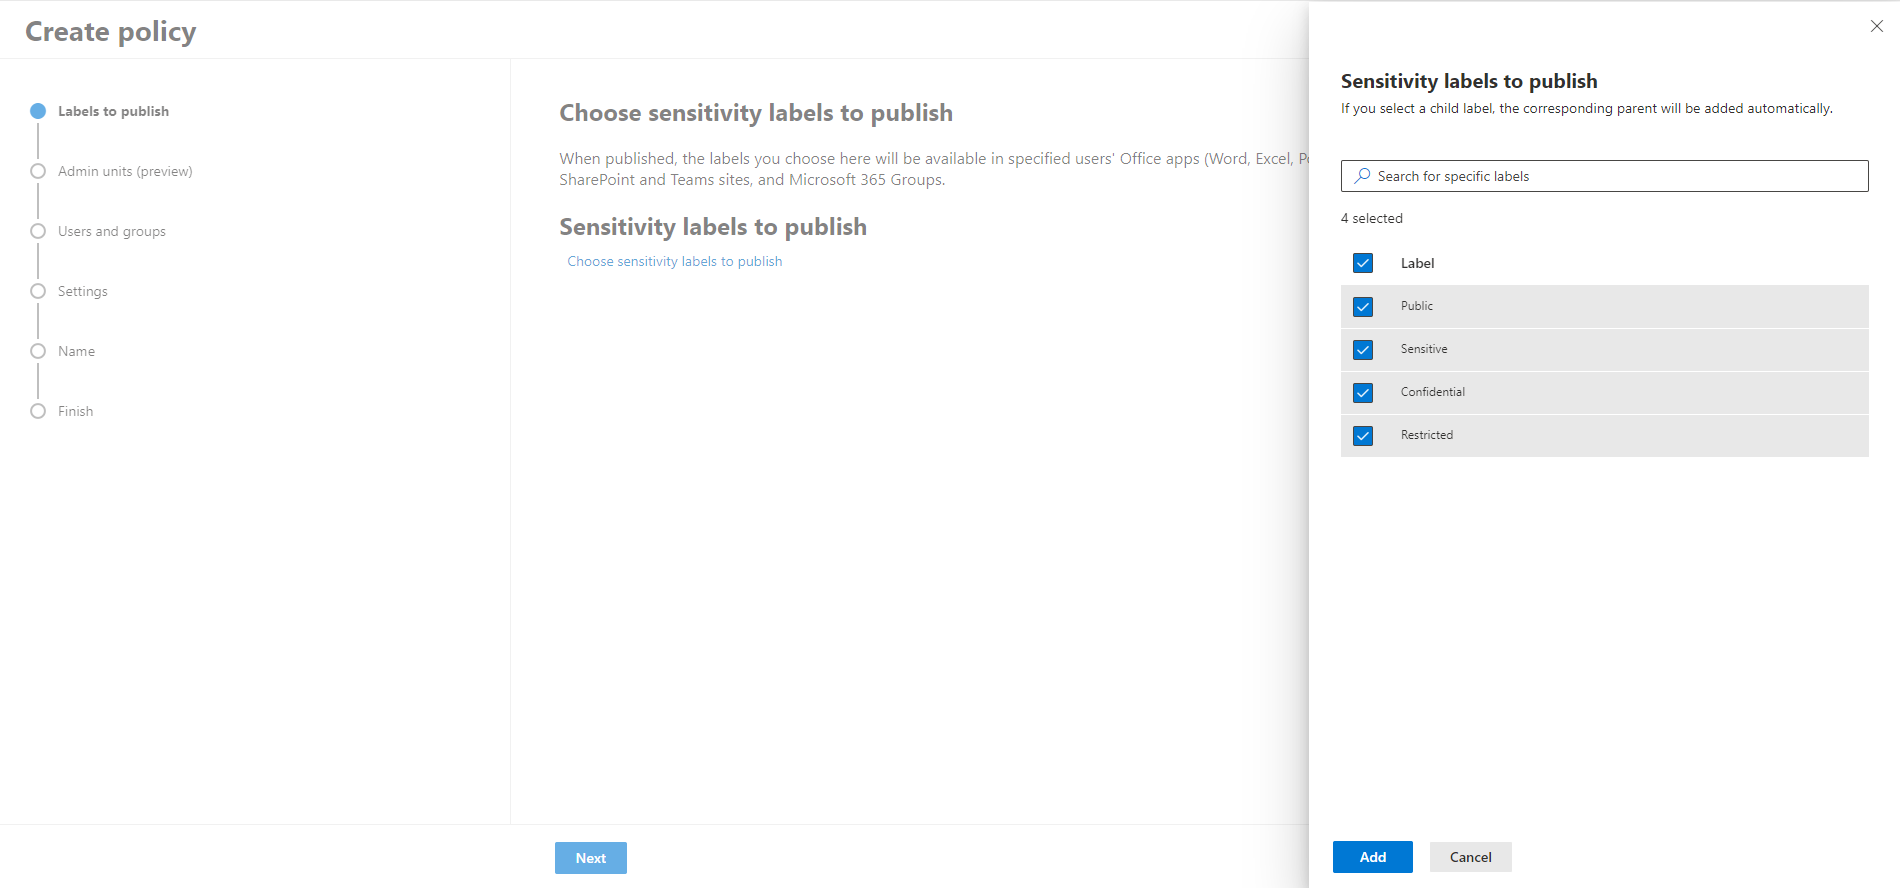
In Microsoft 365 (M365), the labels used for data classification and protection can vary depending on an organization’s specific configuration and requirements. However, the labels you mentioned—public, sensitive, confidential, and restricted—are commonly used to classify and protect data within M365.
Here’s a breakdown of these labels and their general meanings:
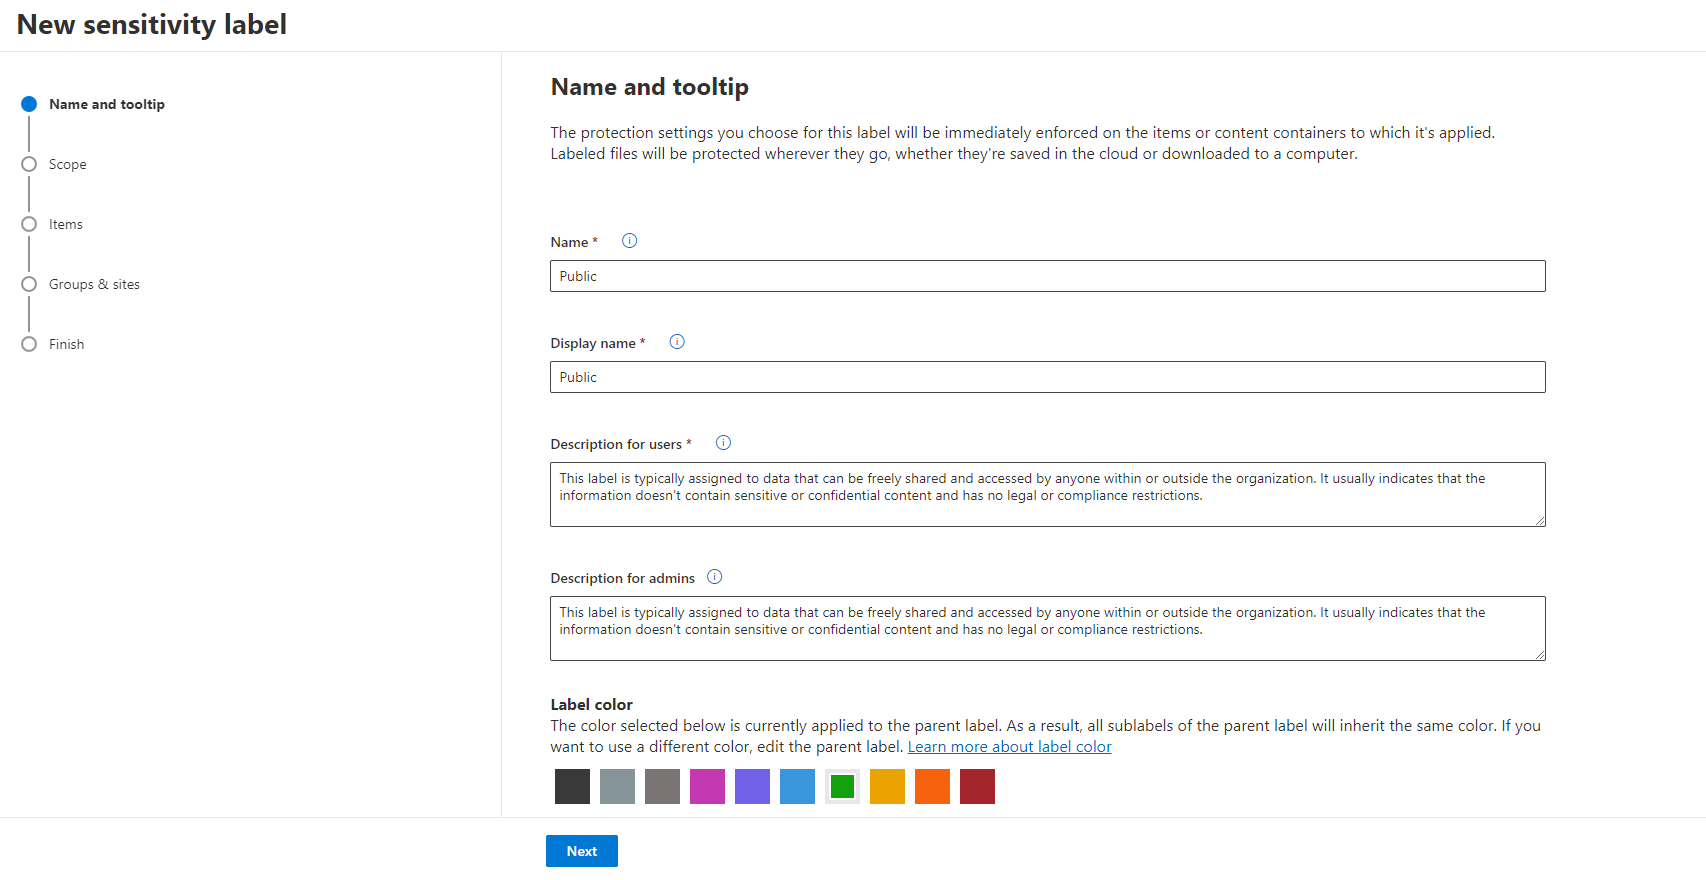
Public: This label is typically assigned to data that can be freely shared and accessed by anyone within or outside the organization. It usually indicates that the information doesn’t contain sensitive or confidential content and has no legal or compliance restrictions.
Sensitive: The sensitive label is used for data containing information requiring protection due to privacy, compliance, or business requirements. It signifies that the data should be handled cautiously and only shared with authorized individuals or groups within the organization.
Confidential: The confidential label is applied to data that contains highly sensitive information, such as trade secrets, financial data, personally identifiable information (PII), or any other information that requires strict protection. Access to confidential data is usually limited to a small group of authorized individuals or specific roles within the organization.
Restricted: The restricted label represents the highest data classification and protection level within M365. It is typically used for highly regulated data, legally protected, or subject to specific compliance requirements. Restricted data often includes classified information, intellectual property, or data related to national security. Access to restricted data is tightly controlled, and strict security measures are implemented to ensure its confidentiality and integrity.
It’s important to note that these labels are not fixed and can be customized based on an organization’s specific needs. Organizations may define additional labels or modify the existing ones to align with their data classification policies and compliance requirements. The label names and definitions can vary depending on the organization’s industry, regulatory environment, and internal guidelines.
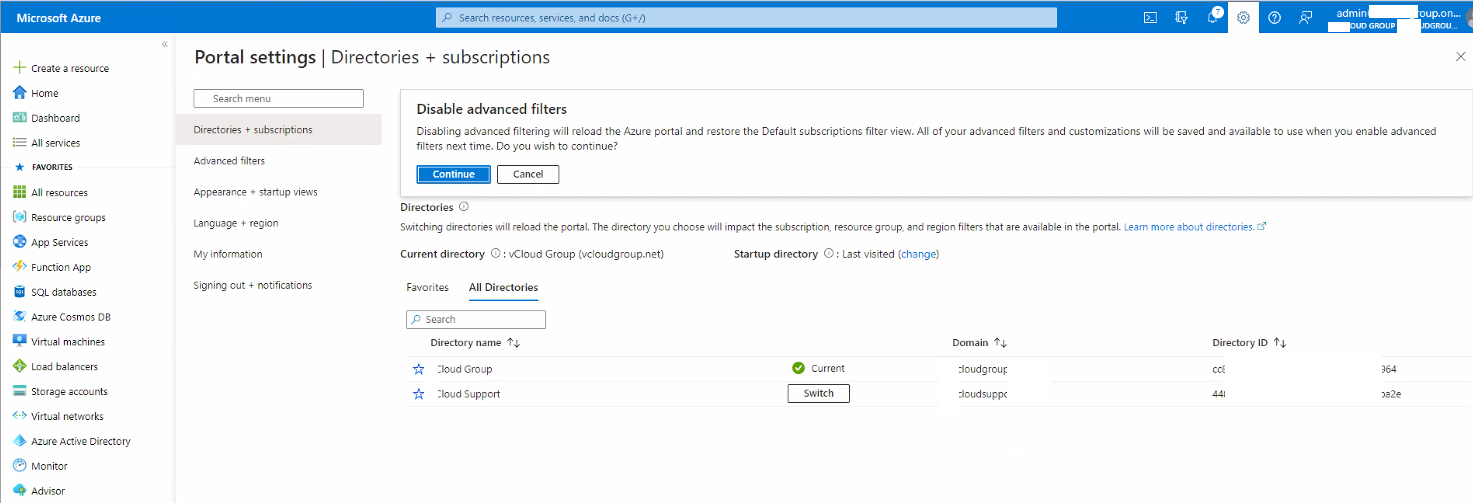
This article addresses the issue of subscriptions not appearing when attempting to move resources to another resource group. The problem can be resolved by disabling the advanced filter, ensuring that all subscriptions are displayed correctly. By following the provided instructions, you will be able to overcome this obstacle and efficiently manage your resources across different resource groups.
Disabling Advanced Filter showing all the subscriptions
In the fast-paced world of software development, the ability to deliver high-quality code rapidly and reliably is paramount. This is where Continuous Integration (CI) and Continuous Delivery/Deployment (CD) come into play. In this blog post, we will explore how we can harness the power of Azure Repos and Amazon EC2 instances to establish an efficient CI/CD pipeline for deploying static pages. So, fasten your seatbelts, and let’s dive in!
Understanding CI/CD : Before we proceed, let’s briefly understand the core concepts of CI and CD. Continuous Integration involves automatically building and testing code whenever changes are pushed to a central repository. It ensures that code integrations are seamless and conflicts are identified early. Continuous Delivery extends CI by automating the deployment of code to environments for thorough testing. Continuous Deployment, on the other hand, automates the process of releasing code to production after it has passed all tests.
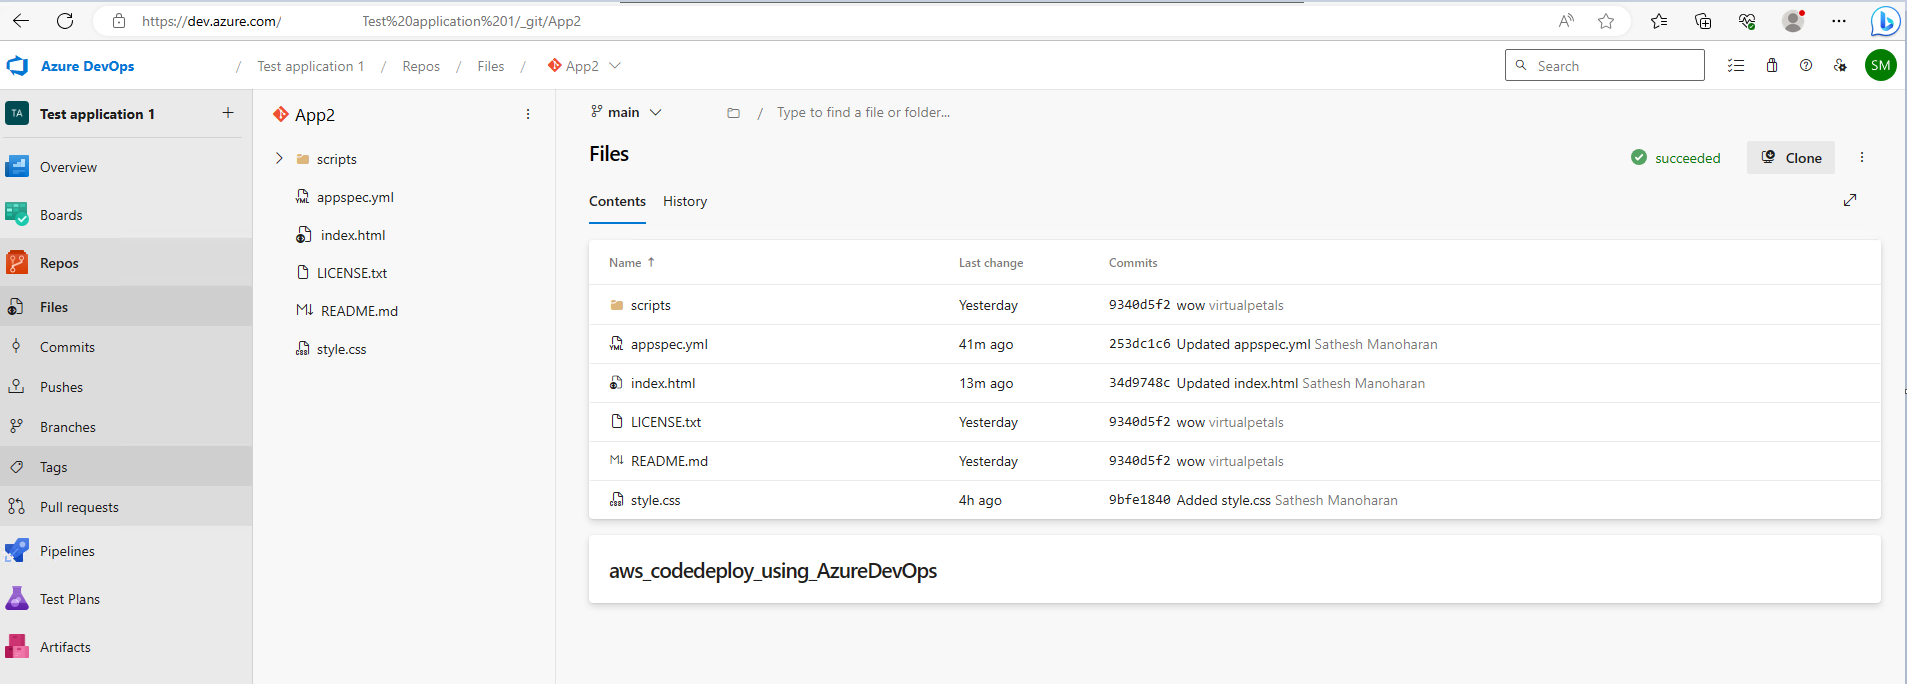
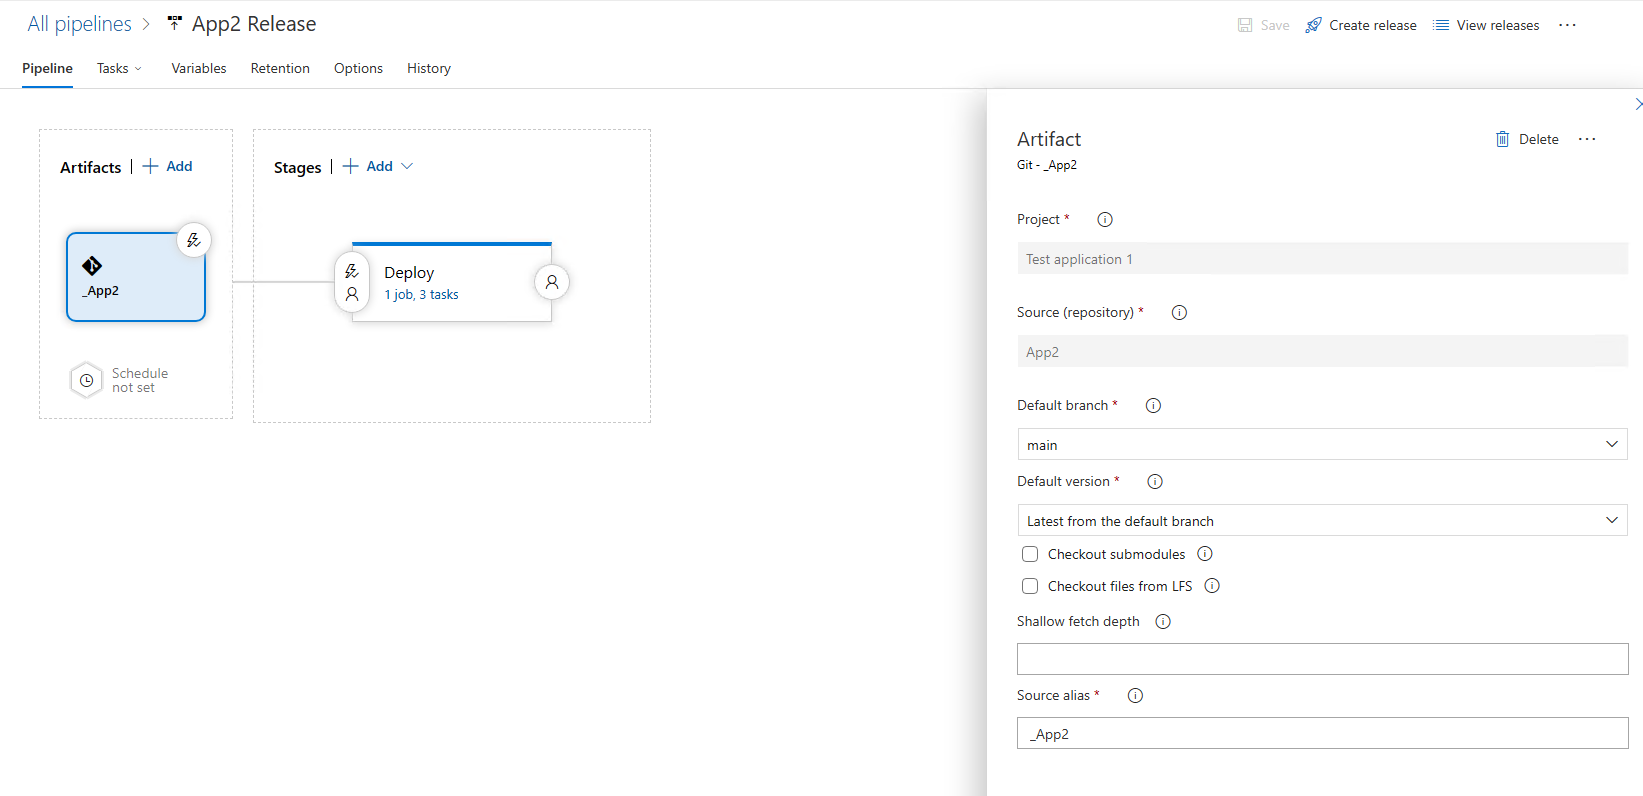
Setting the Stage: Our CI/CD journey begins with Azure Repos, a powerful source control platform offered by Microsoft Azure. Azure Repos allows us to securely manage our codebase and track changes over time. To leverage Azure Repos for our CI/CD process, we’ll be utilizing Azure Pipelines.
Building the Pipeline: Azure Pipelines acts as the engine driving our CI/CD process. Once triggered by changes in Azure Repos, the pipeline kicks into action. It begins by building and testing the code, ensuring that everything is in order before proceeding with deployment.
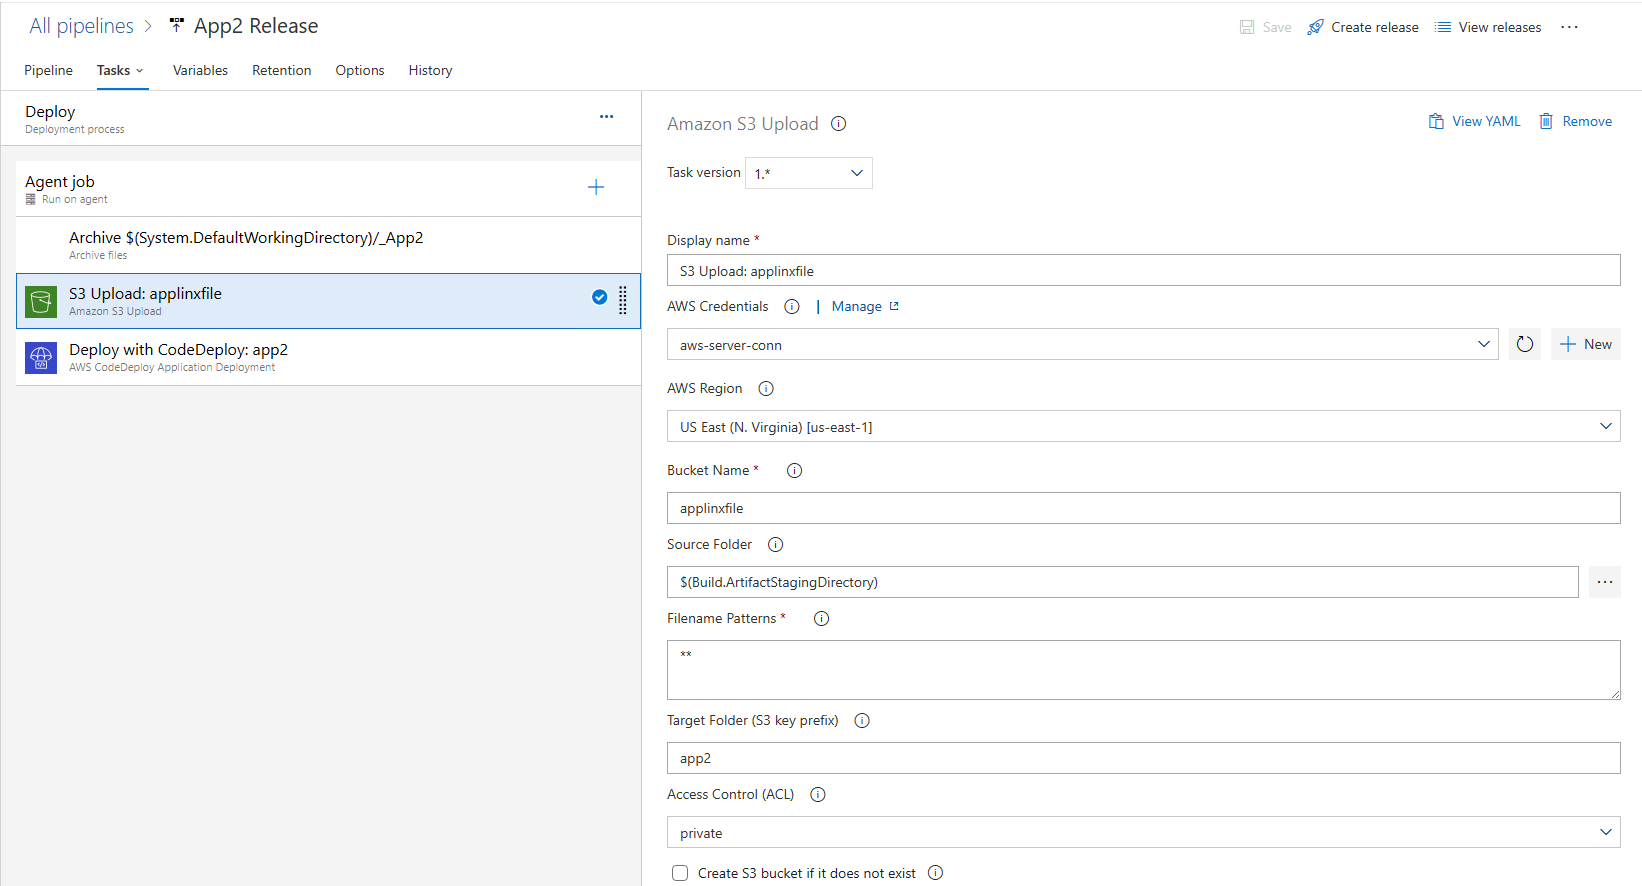
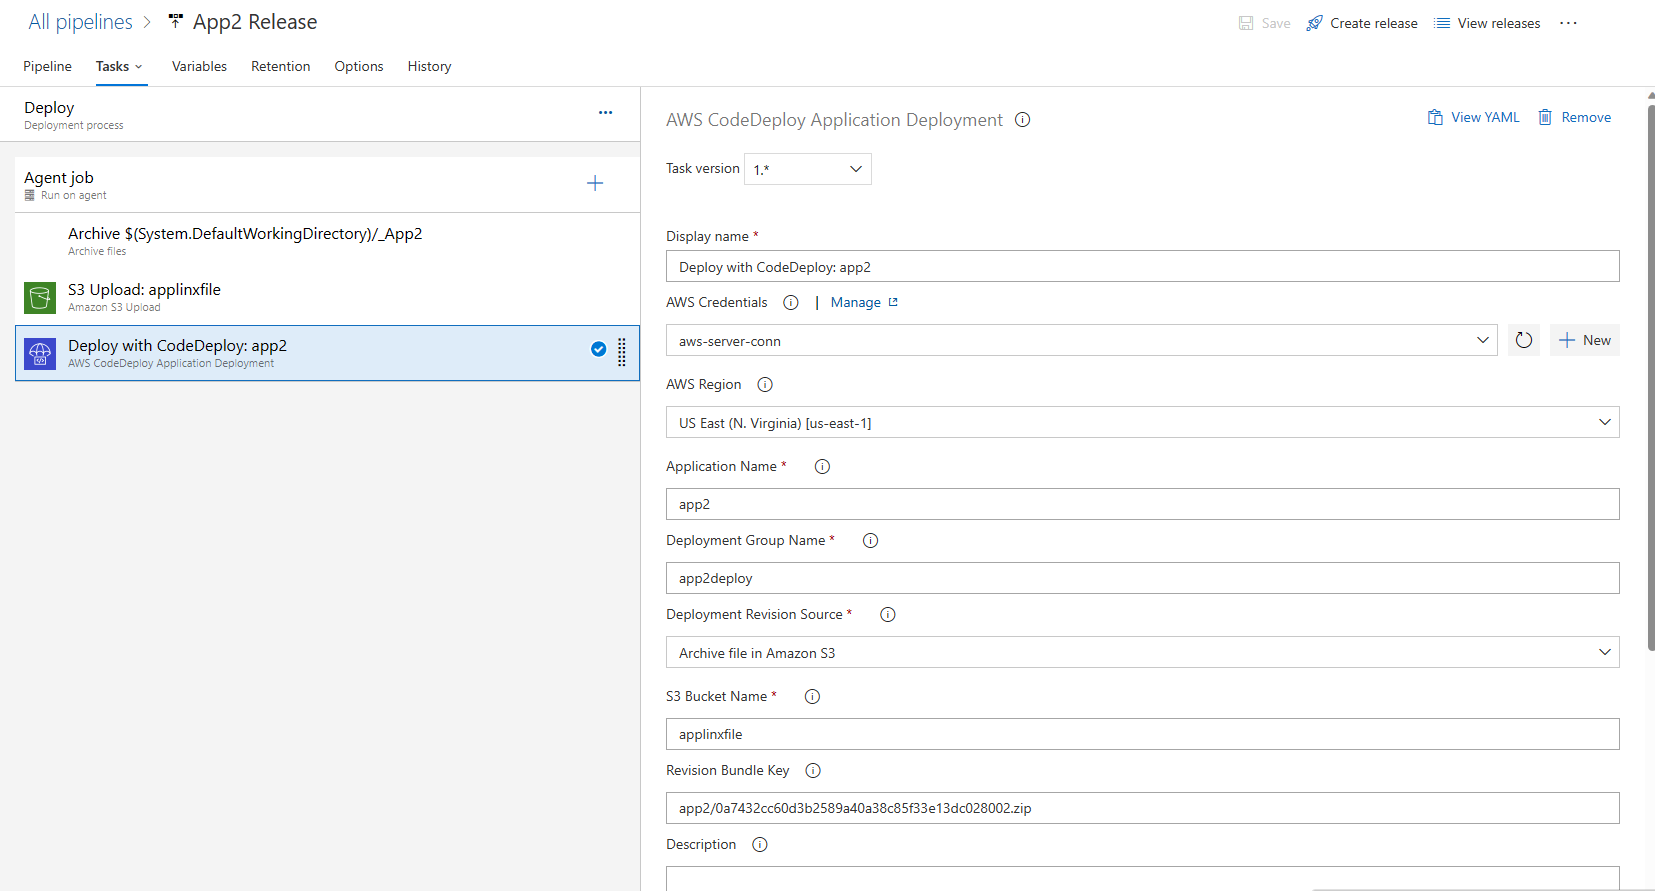
Archiving and Deploying: To prepare our code for deployment, we utilize the archives task in Azure Pipelines. This task generates ZIP files containing our static pages, encapsulating them in a portable format. These ZIP files are then uploaded to an S3 bucket on Amazon Web Services (AWS), providing a reliable storage solution for our deployment artifacts.
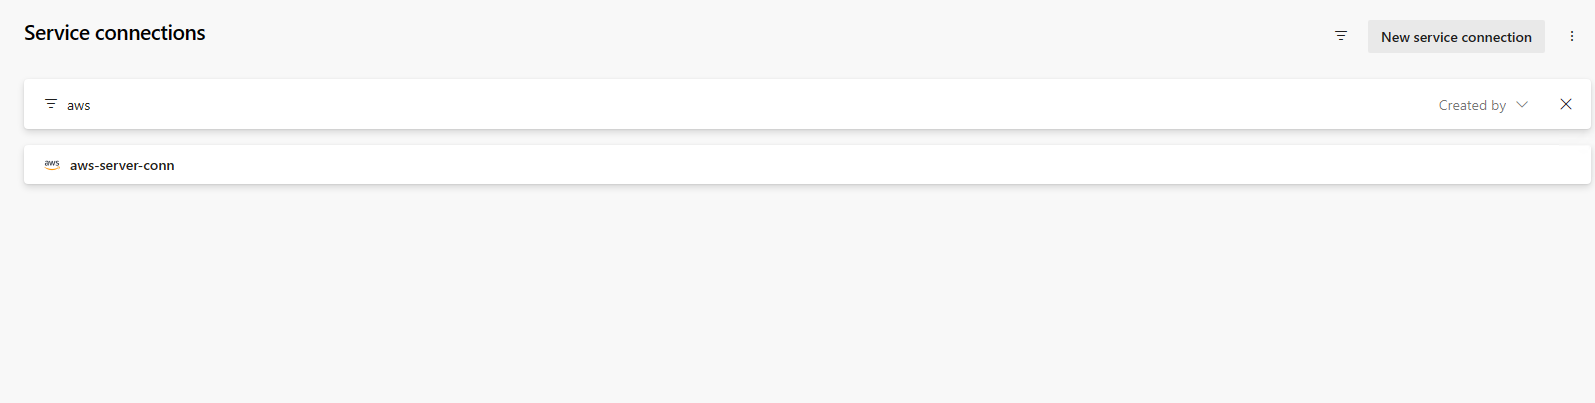
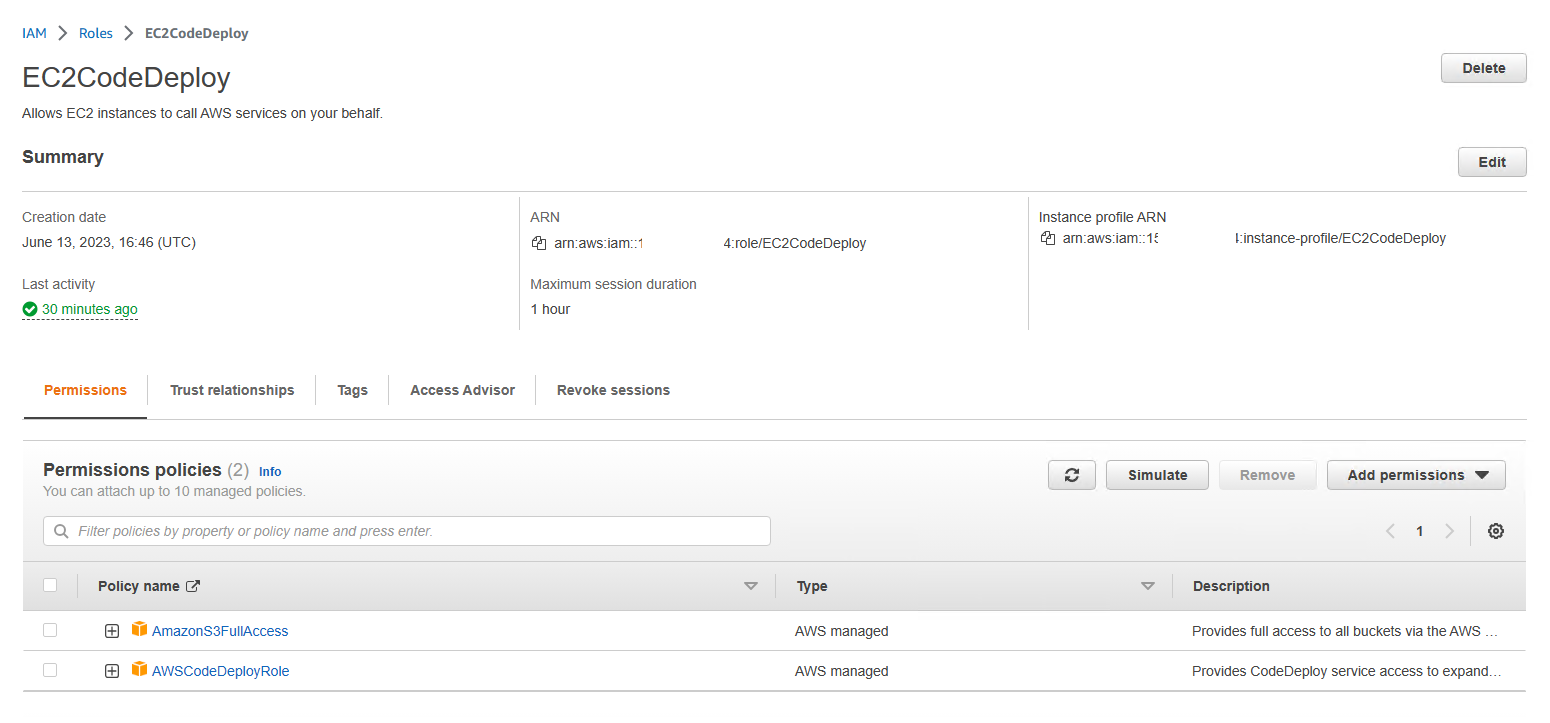
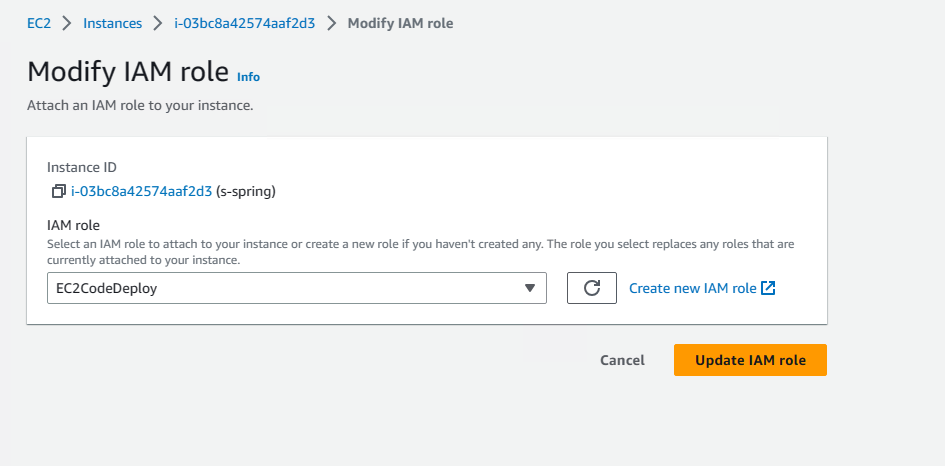
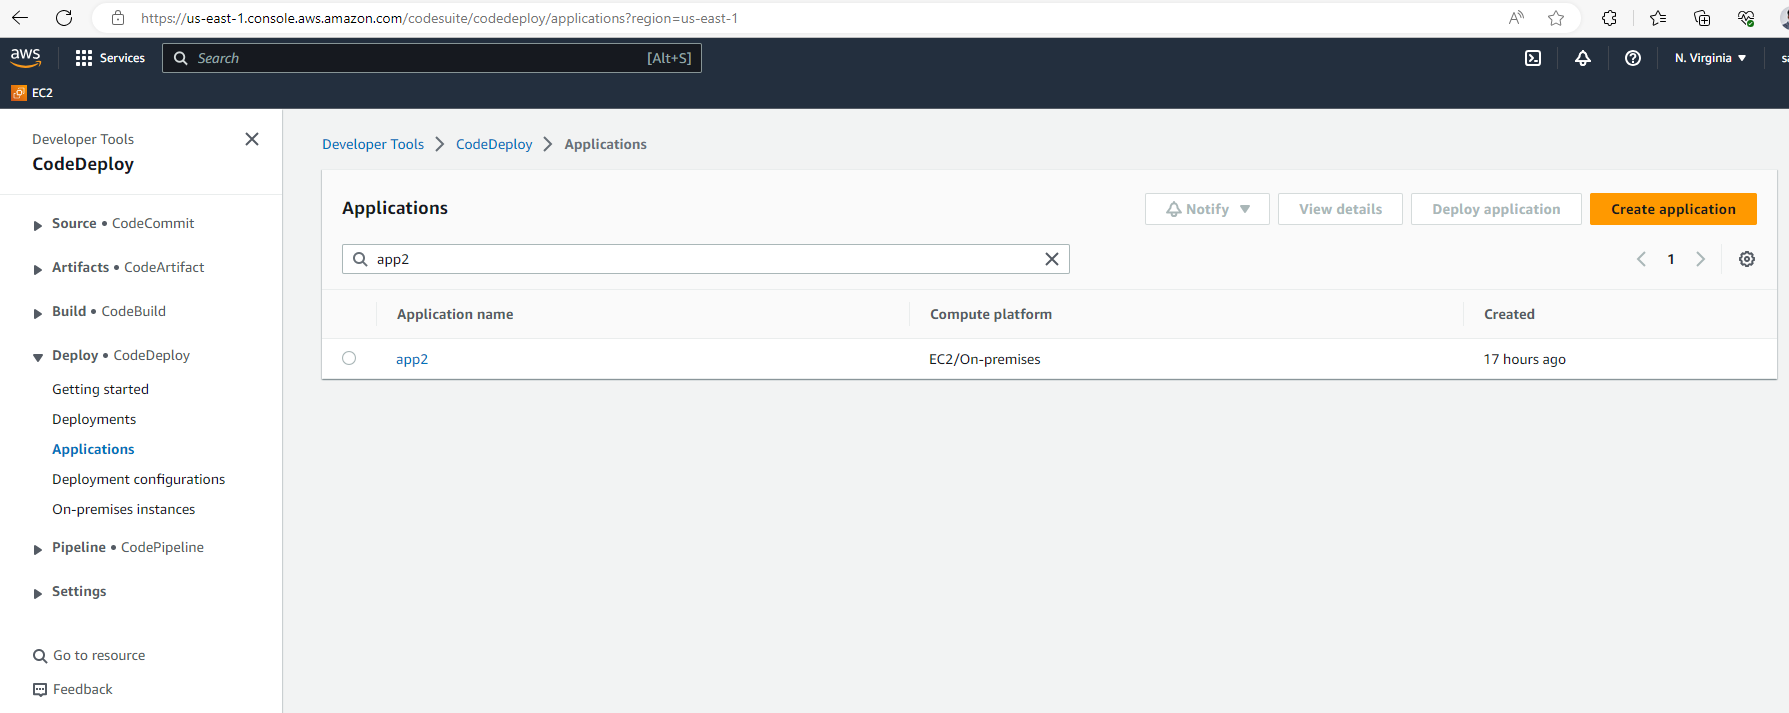
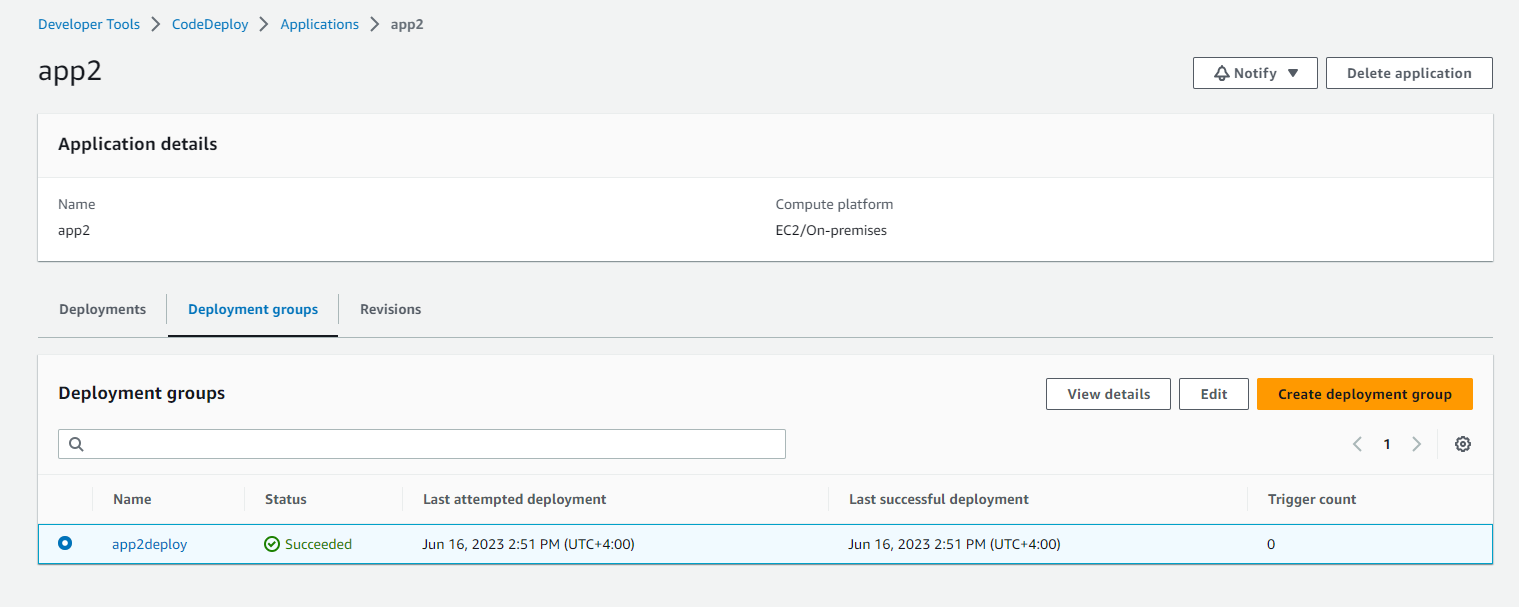
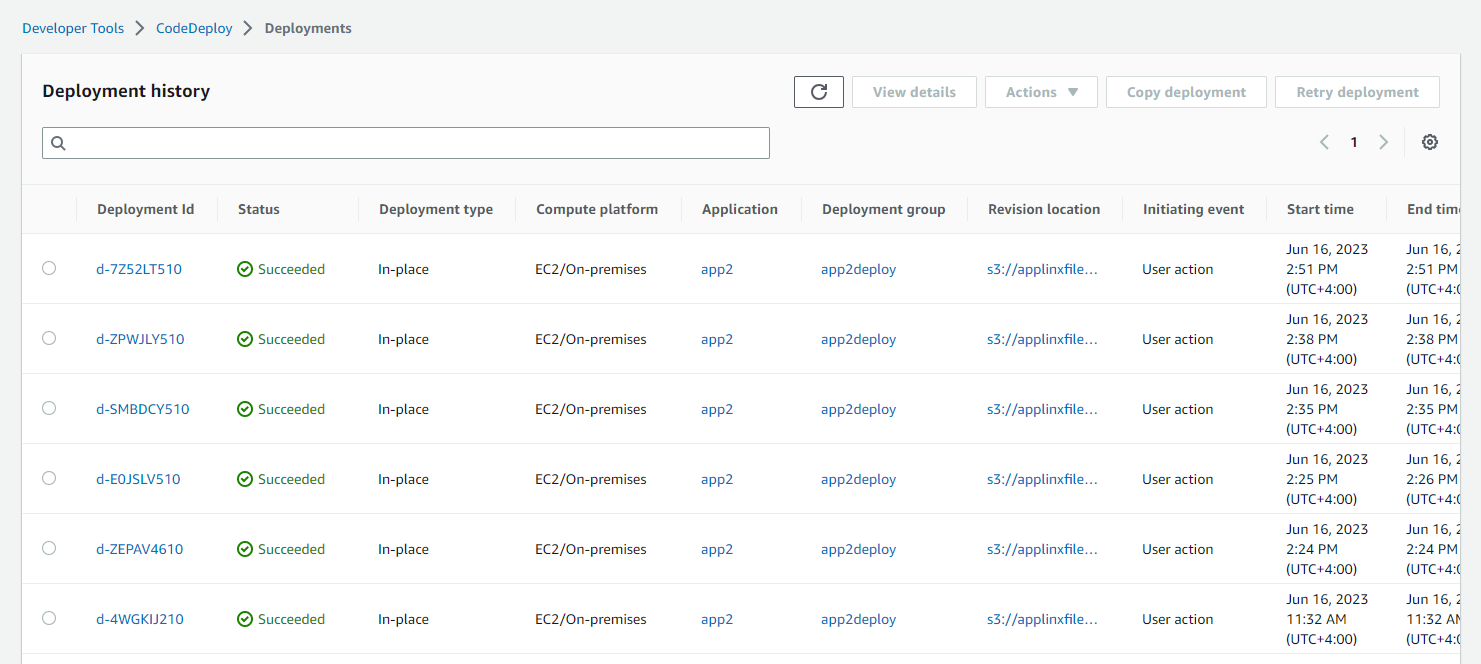
Leveraging Amazon EC2 and CodeDeploy: Now that our code is securely stored in the S3 bucket, it’s time to unleash the power of Amazon EC2 instances. We utilize AWS CodeDeploy, a service that simplifies code deployments to EC2 instances. CodeDeploy intelligently manages the deployment process, ensuring minimal downtime and efficient resource utilization.
Testing and Approval Gates: With our code deployed to the EC2 instances, it’s crucial to validate its functionality. We subject the deployed static pages to thorough testing within the EC2 environment, ensuring they meet our quality standards. To proceed with production deployment, an approval gate is triggered, allowing stakeholders to review and approve the changes.
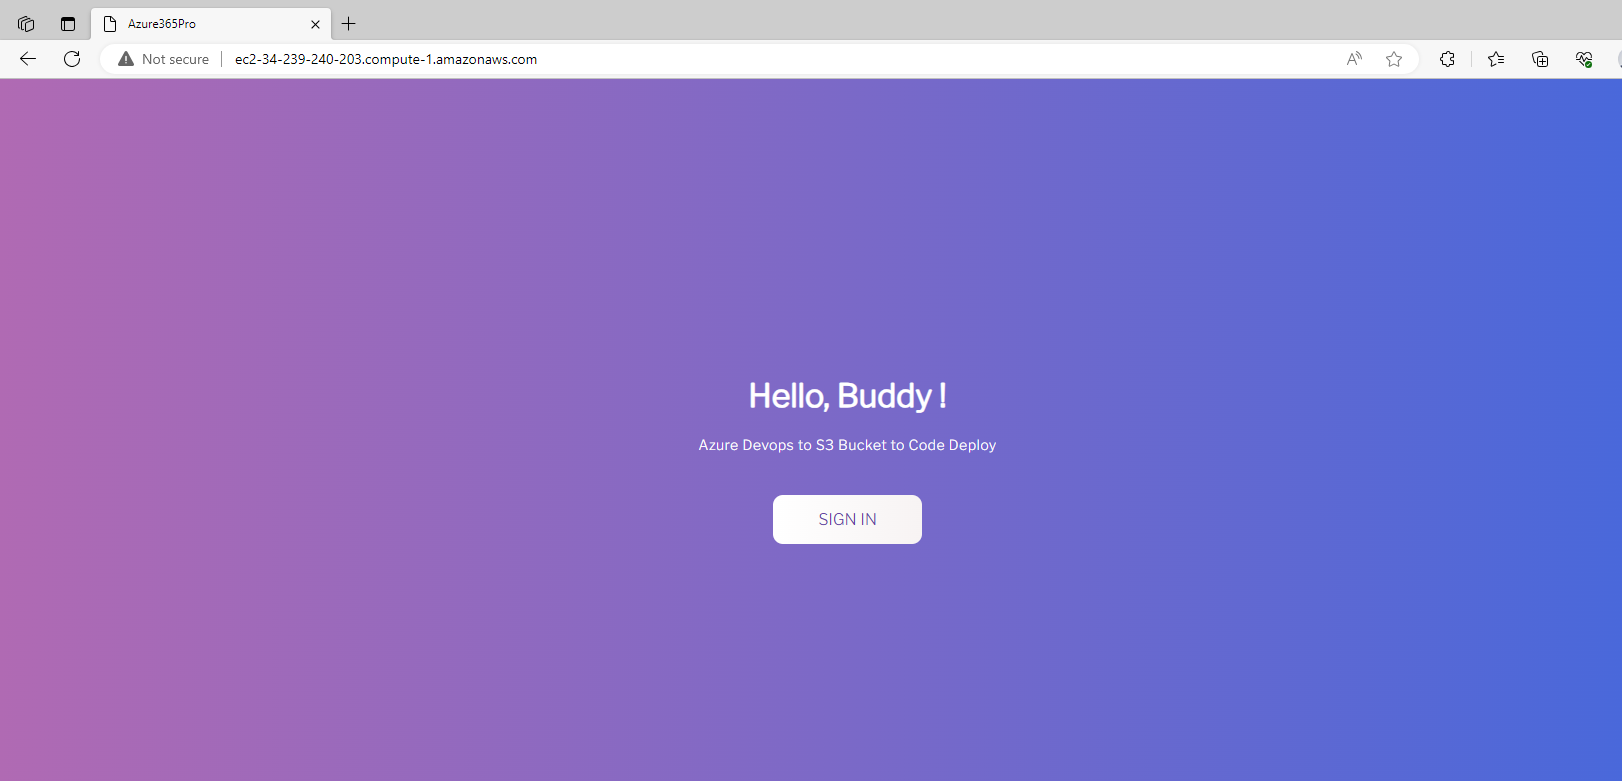
Sealing the Deal: Upon receiving the green light from the approval gate, our CI/CD pipeline confidently moves forward with the production deployment. The static pages are now available for users to experience, thanks to the seamless integration between Azure Repos and Amazon EC2.
Implementing an effective CI/CD process can be a game-changer for any software development project. By harnessing the power of Azure Repos and Amazon EC2 instances, we can establish a robust and automated deployment pipeline for static pages. Azure Pipelines orchestrates the process, while AWS CodeDeploy ensures smooth deployments to EC2 instances. Together, they enable rapid, reliable, and hassle-free delivery of high-quality code.
This article contains instructions for using PowerShell cmdlets to create and update groups in Azure Active Directory (Azure AD), part of Microsoft Entra. This content applies only to Microsoft 365 groups
Install PowerShell cmdlets
Be sure to uninstall any older version of the Azure Active Directory PowerShell for Graph Module for Windows PowerShell and install.
Open the Windows PowerShell app as an administrator.
Uninstall any previous version of AzureADPreview
Uninstall-Module AzureADPreview
Install the latest version of AzureADPreview.
Install-Module -Name AzureADPreview
Connect to AzureAD
Connect-AzureAD
Connect-AzureAD
Create settings at the directory level.
These steps create settings at the directory level, which apply to all Microsoft 365 groups in the directory. The Get-AzureADDirectorySettingTemplate cmdlet is available only in the Azure AD Powershell.
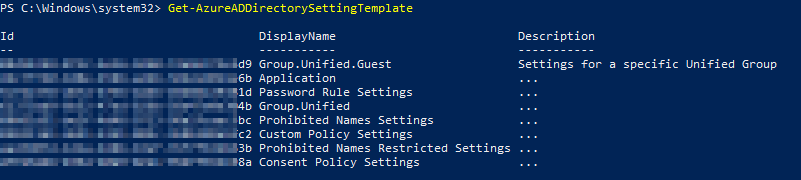
In the DirectorySettings cmdlets, you must specify the ID of the SettingsTemplate you want to use. If you do not know this ID, this cmdlet returns the list of all settings templates.
Get-AzureADDirectorySettingTemplate
This cmdlet call returns all available templates:
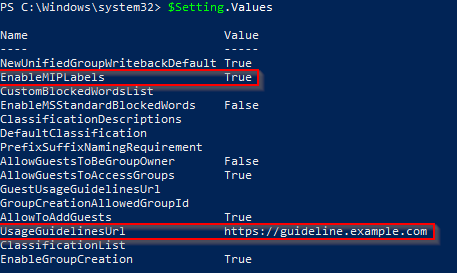
To add a usage guideline URL, first, you need to get the SettingsTemplate object that defines the usage guideline URL value: the Group. Unified template:
$TemplateId = (Get-AzureADDirectorySettingTemplate | where { $_.DisplayName -eq "Group.Unified" }).Id
$Template = Get-AzureADDirectorySettingTemplate | where -Property Id -Value $TemplateId -EQ
Next, create a new settings object based on that template:
$Setting = $Template.CreateDirectorySetting()
Then update the settings object with a new value. The two examples below change the usage guideline value and enable sensitivity labels. Set these or any other setting in the template as required:
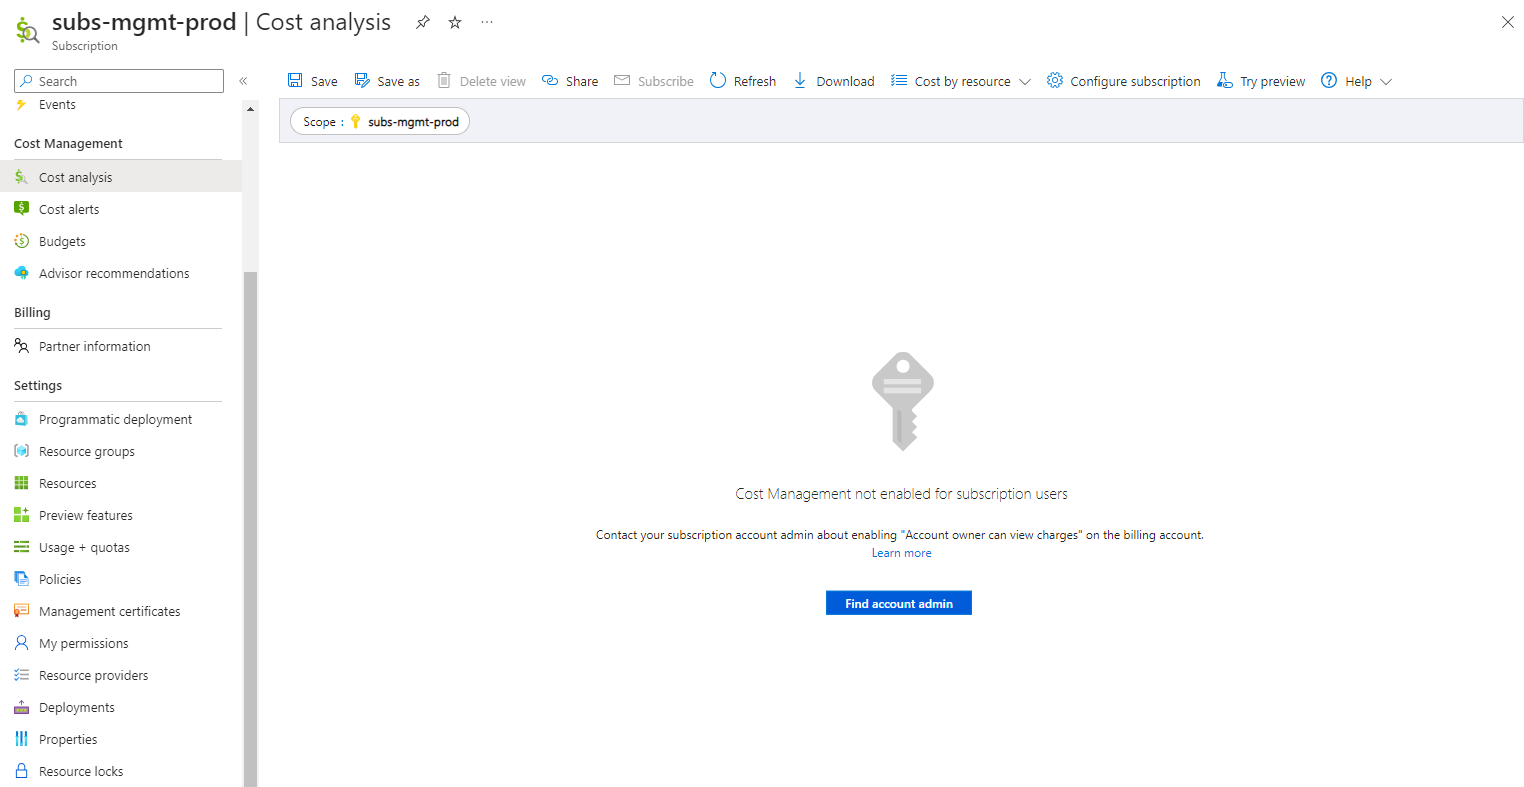
Cost Management is not enabled for subscription users. Contact your subscription account admin about enabling “Account owner can view charges” on the billing account.
.
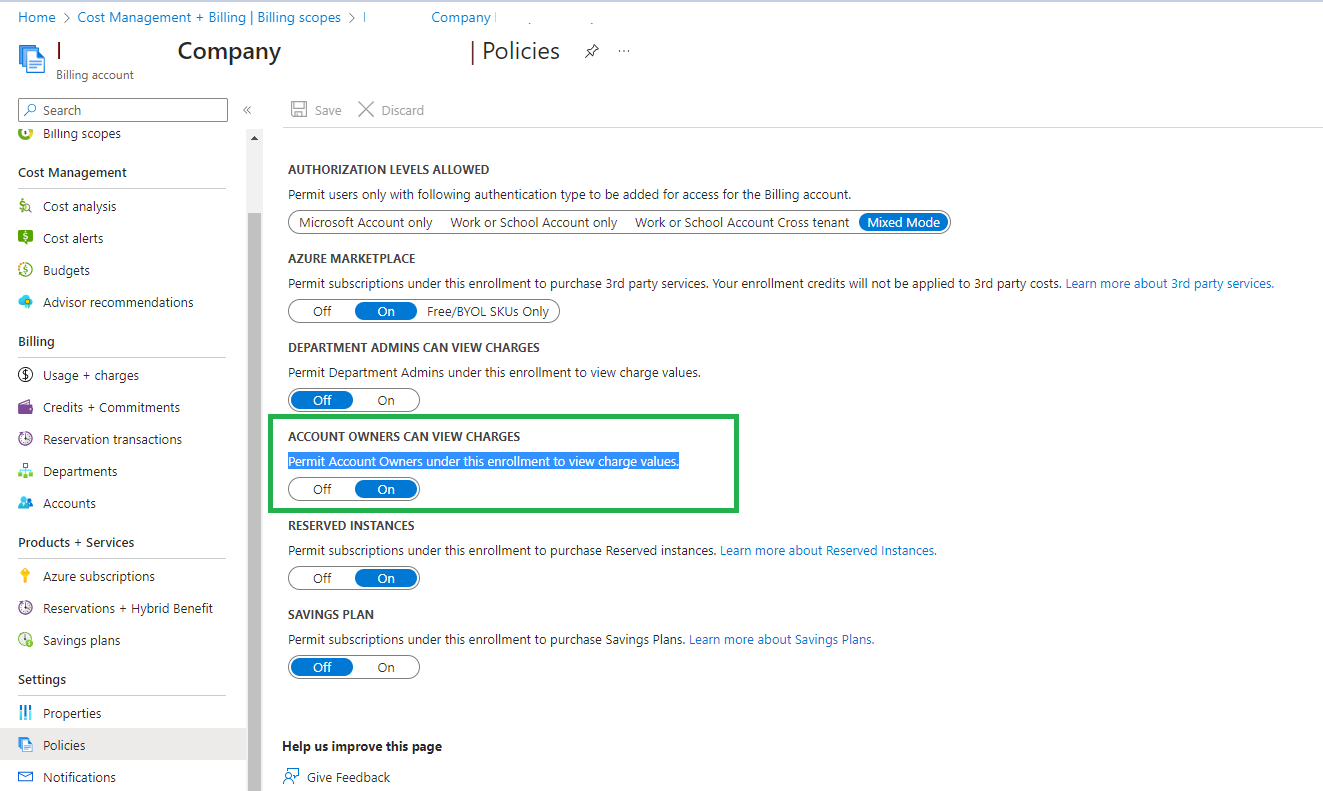
Go to billing account – Enable Account Owner can view charges