33 C
Dubai
Tuesday, April 29, 2025
Home Blog Page 110

Configuring 3rd Party Exchange Certificate in Exchange 2010

Exchange 2010 creates a self-signed SAN certificate and assigns it to the services like IMAP, POP, IIS, and SMTP.

The only drawback of this self-signed certificate is that it contains the server’s FQDN and NetBIOS names only.

Where we get certificate errors on all the Clients where we need to install the Certificates manually on all the clients , which is a hassle and no one likes it in fact . Cause installing Certificate in mobile devices becomes more complex .

To avoid any certificate related errors and use it over the internet without any problems it is highly recommended that you request and assign a certificate from a Certification Authority that can be contacted from anywhere like VeriSign , Go Daddy ,DigiCert etc.. .
To request a new certificate from a trusted CA use following format:

Step 1:

Requesting a Certificate , you can use shell or GUI

GUI is much user friendly

You can refer the link below to use GUI and Export the Certificate

https://www.azure365pro.com/how-to-use-a-self-signed-certificate-in-exchange-2010/

Mail.CareExchange.in

Autodiscover.careexchange.in

are the two Needed Entries in the SSL Cert.

Or

You can use Shell to Export the Request file – My Servers FQDN is Exchange2010.careexchange.in

Replace the values as per your requirement

Generate a Request

$Data = New-ExchangeCertificate -FriendlyName 'Exchange Cert' -GenerateRequest -PrivateKeyExportable $true -KeySize '2048' -SubjectName 'C=IN,S="MH",L="PN",O="Exchange Messaging",OU="Enterprise Messaging",CN=mail.Careexchange.in' –DomainName 'mail.careexchange.in','autodiscover.careexchange.in -Server 'EXCHANGE2010'

You need to enter this command below in order to get the request file

Export the data into a certificate request file

Set-Content -Path C:\Certreq.req -Value $Data

Step 2:

Use this request file for submission to the CA . For Example Below Uploading a CSR in digi Cert.

and download the certificate. Save the certificate to a convenient location.

image

Step 3:

Import the certificate, Give the Correct location in the command

Import-ExchangeCertificate -FileData ([Byte[]]$(Get-Content -Path "C:\Exchangecert.pfx" -Encoding byte -ReadCount 0)) -Password:(Get-Credential).password

You can refer the link below to use GUI to import the Certificate using “Step 22”

Use Step 23 to Assign Services like IMAP, POP, IIS, and SMTP.

https://www.azure365pro.com/how-to-use-a-self-signed-certificate-in-exchange-2010/

Great !

You learnt how to Export and Import and Configure Certificates in Exchange 2010

How to Use a Self Signed Certificate in Exchange 2010

Article Updated : Using a internal windows CA certificate with Exchange 2010


Using a Self Sign Certificate can Manage Owa alone, But Issuing a Internal Windows CA Certificate can serve all type of Clients

So will learn how to do it.

We can use a internal windows CA certificate with Exchange 2010 to avoid Cert Errors

Something which you need to know is , Using a Internal Windows CA Certificate you need to install the certificates on every machine you use and Mobile devices other wise you will end up in a certificate error in the IE

So that’s why people prefer going for a 3rd party certificate to overcome it.

In this article We Will Learn issuing a Internal Windows CA Certificate , for this to be used Externally you need to have a CNAME record in your public DNS pointing to your Public IP NAT to your CAS

First we will learn how to Export a Certificate request file from Exchange 2010 ,

Step 1:

image


Type a Friendly Name :


image


Wild Card is used if you are going to manage more URLs .For Example : *.Domain.com

image

Step 2:

Assign the required Services for your Exchange , Give a Tick Mark

image


You will opt for it if you are planning for Coexistence in OWA in Exchange 2003 and Exchange 2010

image

Step 3:

You will see the collection for URL’s

image

Step 4:

Fill out the Form – And set the location for the Cert Request file

image


image

Step 5:

Your request file would look like this


image

Open it via Notepad , because we need this content to generate a Certificate

image

Step 6:

You need to have this role installed to have a  Certificate Authority , It can be DC or Exchange it self

I have done this in the Exchange itself (No Harm)

image


Step 7:

Choose : Certification authority , Certification Authority Web Enrollment

image

Step 8:

Choose Enterprise

image

Step 9:

Choose Root CA

image


Step 10:

Create a new Private key

image


Step 11:

Have this Default with 2048 key Character length

image

Step 12:

Click Next

image


Step 13:

By Default Certificate is valid for 5 years , Don’t make any changes on it , Click next

image


Step 14:


image

Step 15:

Now if you Open IIS manager , you will see “CertSrv”  a Virtual Directory Created ,

Use the right side column “Browse *.443(https)

image


Step 16:

You would see a page like this , Choose Request a Certificate

image

Step 17:

Click on Advanced Certificate Request

image


Step 18:

Choose the Second one

Submit a certificate request by using a base-64-Encoded CMC

image

Step 19:

Now Copy the  Note pad  –

Choose Template : WebServer

NOTE _ BELOW SCREEN SHOT _ CHOOSE TEMPLATE _ WEB SERVER

image

Step 20:


Choose “Base 64 encoded”

image

Step 21:

Save the Certificate

image image

Step 22:

Now go to your EMC

Server Configuration – Complete Pending request

image


Choose the Certificate :


image


Step 23:

Now Assign Services to the Certificate

image


image

Now the Server Part is ready


Step 24:


Now will learn how to install the Certificate in the Client End


Double Click on the Certificate

Click Install Certificate – Click Next –


image


Choose Personal –


image


Click Next And Import will be Successful

Now Do the Same Process

Double Click on the Certificate

Click Install Certificate – Click Next – Choose Trusted Root Certification Authorities

image

Double Click on the Certificate

Click Install Certificate – Click Next – Choose Intermediate Certification Authorities

image


Step 25:


Before

image


After installing the Certificate in the Client

image


Great !!

Now you learnt how to Use a internal windows CA certificate with Exchange 2010


Regards

Satheshwaran Manoharan

Configure Receive Connector in Exchange 2010

Default receive connector needs to be configured to receive emails from internet.

To Pretty simple to do it

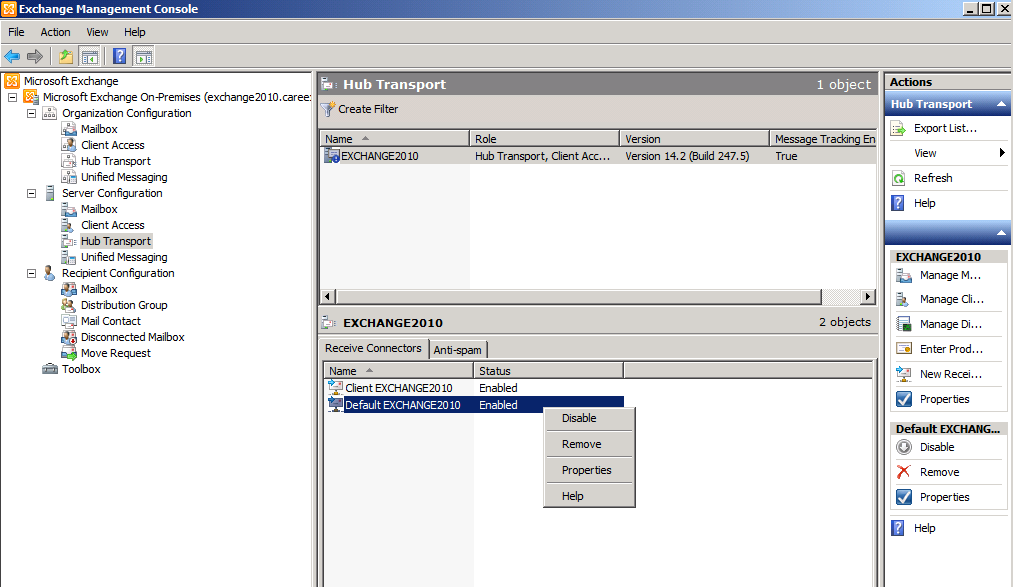
Open Exchange Management Console – Server Configuration – Hub Transport

Right click on Default connector and select Properties.

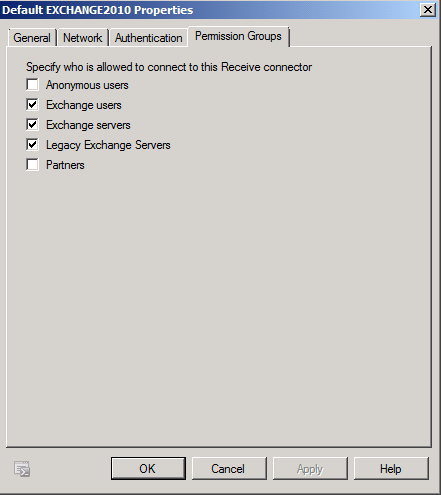
Select Permissions Groups tab and check Anonymous users permissions group

Great !!

Your Server Will receive mails from Internet now (If your Firewall Points to Exchange 2010 Server)


Moving Mailboxes from Exchange 2003 to Exchange 2010

Moving Mailboxes are much easier. Unless we don’t get any errors (Just kidding)

so Lets start on How to do it.

Just before that. if your Mailbox size is more than 2 GB it won’t allow you to move to Exchange 2010

So for the time being you can Set Database Limits to Unlimited in Exchange 2010 Database as below

Go to Organizational  Configuration > Mailbox >  Database Management > Right click on the Database > Database Properties >Uncheck the Storage Limits as below

image image

And Click on Apply and OK

mo1


You can See the mailboxes of Exchange 2003 in “Brown Color” . They are Legacy mailboxes (Exchange 2003)

or

You can See Recipient Type Details “Legacy Mailbox”

image

You can do in bulk , You can do a Local Move request

image

Browse for the Exchange 2010 Database

By Default “Skip the Mailbox” will be checked

But mostly we will have some corrupted items in Exchange 2003 mailboxes. 1 corrupted item may have the  move request failed

Caution : “Those corrupted items are not recoverable”

Now Choose “Skip the Corrupted messages”  and have value 50

If you don’t want to loose not even 1 corrupted items . you can have the default options checked

image

Now Move Requests have been Created

image


Now its not completed – They are Just requests

Now to See your Move Requests

You can see it Here

image

or You can run the Command in Exchange Management Shell

Get-Moverequest | Get-MoverequestStatistics


Now,

You got to Clear these move requests.


Unless you clear them You can’t move those mailboxes again


image


Now you can the Recipient Type Details and Color Changed


image


Great !!

Now you learnt how to move to move mailboxes from Exchange 2003 to Exchange 2010

Upgrading Email Address Policies and Address lists from Exchange 2003 to Exchange 2010

Exchange 2003 and the way Exchange 2010 work differently when they handle Address lists and Email Address Policies

Exchange 2010 does not support the LDAP filters anymore

The LDAP filters must be converted to OPATH filters

If you have custom LDAP filters implemented to configure Address Lists make sure that you convert them to OPATH filters as well.

This Upgrade has to be done using ExchangeManagement Shell.

First we can learn how to identity legacy versions of Email address Policies and Address lists.

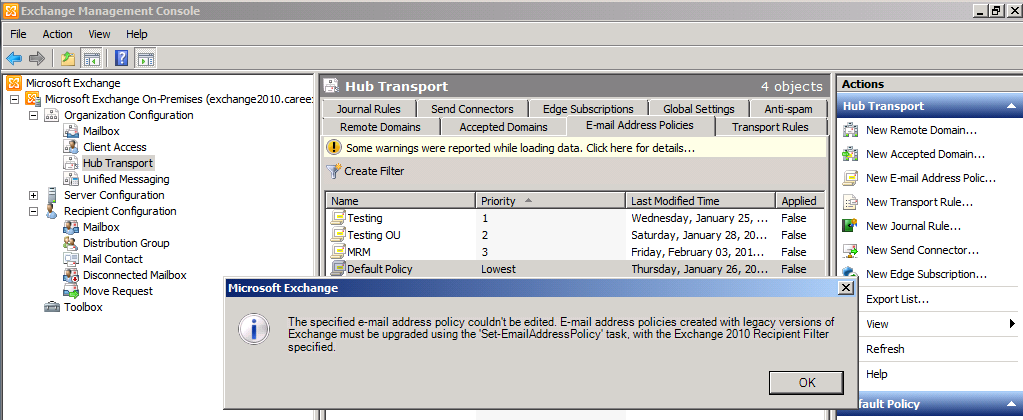
If you Try to Edit your Email Address Policies , It will Show up an Error Showing they are Legacy Versions

You can Use Exchange management Shell to Check it.

Get-EmailAddressPolicy | Format-List name,*RecipientFilter*,ExchangeVersion

 It will Show up as Legacy .


Or


You can run 


Get-EmailAddressPolicy | where {$_.RecipientFilterType -eq "Legacy"}


You can Run Set-Emailaddresspolicy to upgrade the Default Email Address Policy


Set-EmailAddressPolicy "Default Policy" -IncludedRecipients AllRecipients


Now your Upgraded Email Address Policy will show as precanned


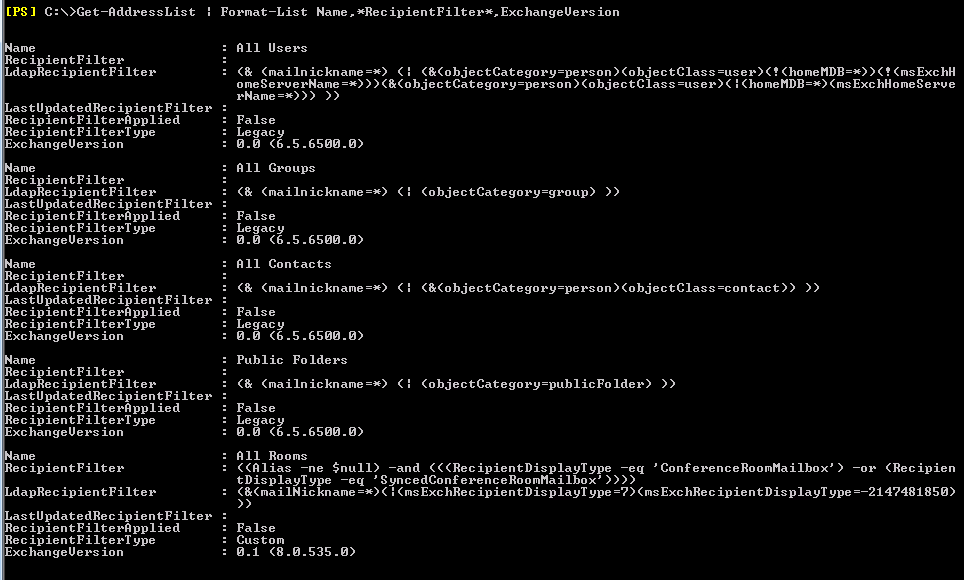
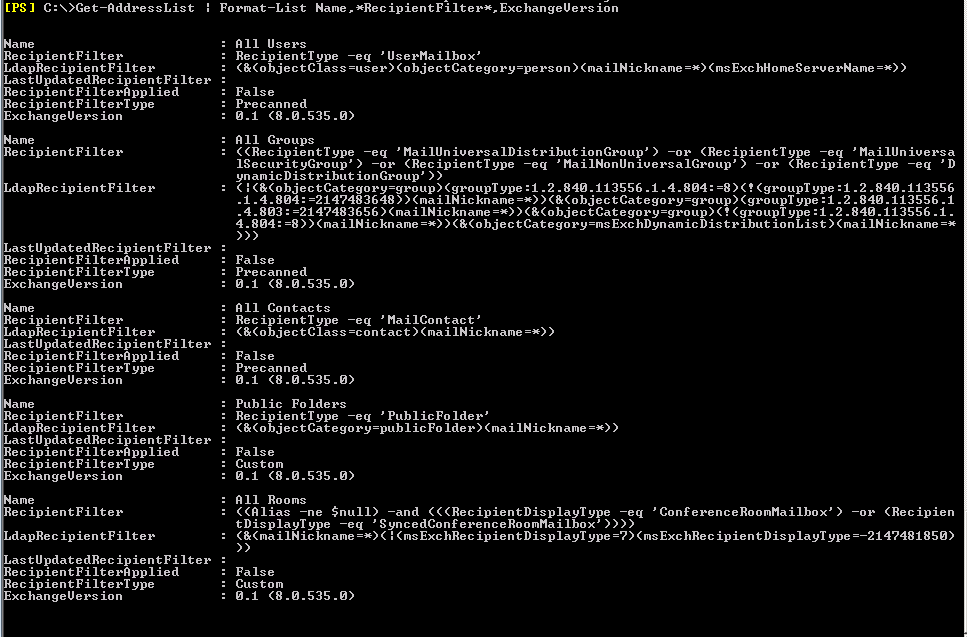
You can Run the command below to identify the legacy versions of Address lists


Get-AddressList | Format-List Name,*RecipientFilter*,ExchangeVersion


You can Run the command below to identify the legacy versions of Global Address lists


Get-GlobalAddressList | Format-List Name,*RecipientFilter*,ExchangeVersion


Now You can Run these commands to Upgrade your Address lists and Global Address list.


Set-AddressList "All Contacts" -IncludedRecipients MailContacts

Set-AddressList "All Groups" -IncludedRecipients MailGroups

Set-AddressList "All Users" -IncludedRecipients MailboxUsers

Set-AddressList "Public Folders" -RecipientFilter { RecipientType -eq 'PublicFolder' }

Set-GlobalAddressList "Default Global Address List" -RecipientFilter {(Alias -ne $null -and (ObjectClass -eq 'user' -or ObjectClass -eq 'contact' -or ObjectClass -eq 'msExchSystemMailbox' -or ObjectClass -eq 'msExchDynamicDistributionList' -or ObjectClass -eq 'group' -or ObjectClass -eq 'publicFolder'))}

——————————————————-


Now you can Run


Get-AddressList | Format-List Name,*RecipientFilter*,ExchangeVersion

to Verify it has been upgraded


Now you can Run


Get-GlobalAddressList | Format-List Name,*RecipientFilter*,ExchangeVersion

to Verify it has been upgraded


If you have Customer LDAP filters the blog would help you to understand things even more better.


http://blogs.technet.com/b/exchange/archive/2007/01/11/3397719.aspx

Great !!


You learn How to Upgrade Email Address Polices and Address lists from Exchange 2003 to Exchange 2010


Removing Recipient Update Services using Adsiedit.msc

We need to remove Recipient Update Services using Adsiedit.msc in the process of migration to Exchange 2010

Exchange 2010 no more uses Recipient Update Services to Stamp the Email Address

So We don’t need to rehome the Recipient Update Services

Where we can Delete it

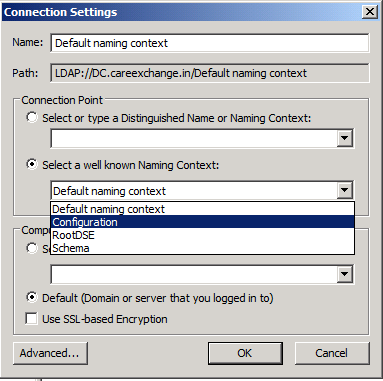
You can Open Adsiedit.msc

Right Click – Connect to –

Chooose Configuration Partition

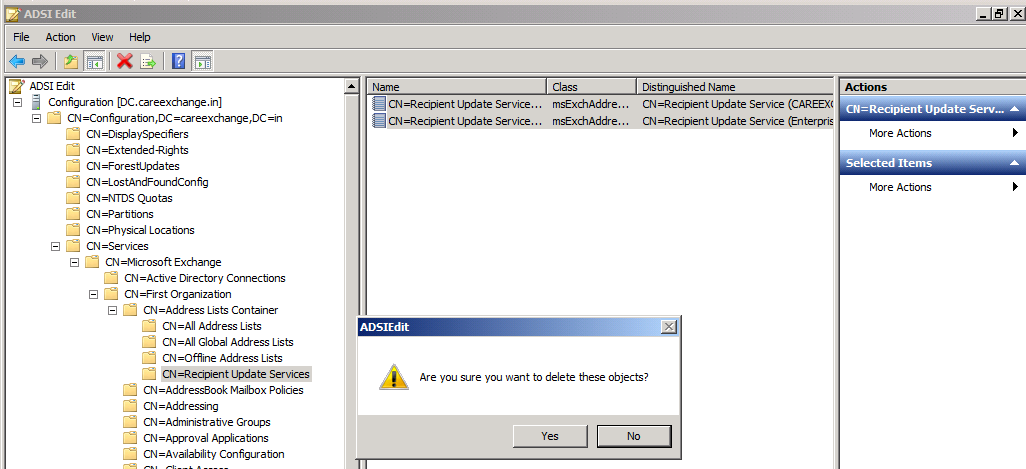
Configuration – Services – Microsoft Exchange – First Organization (Default ORG name) -Address lists Container — Recipient Update Services – You can Remove the RUS

Enterprise RUS and Domain RUS (You can Delete it )

Great !

You Learn  to remove Recipient Update Services


× How can I help you?