40 C
Dubai
Tuesday, April 29, 2025
Home Blog Page 111

How to Install AntiSpam Agents in Exchange 2010

Installing Antispam agents is more Simpler and Easier In Exchange 2010

Step 1 :

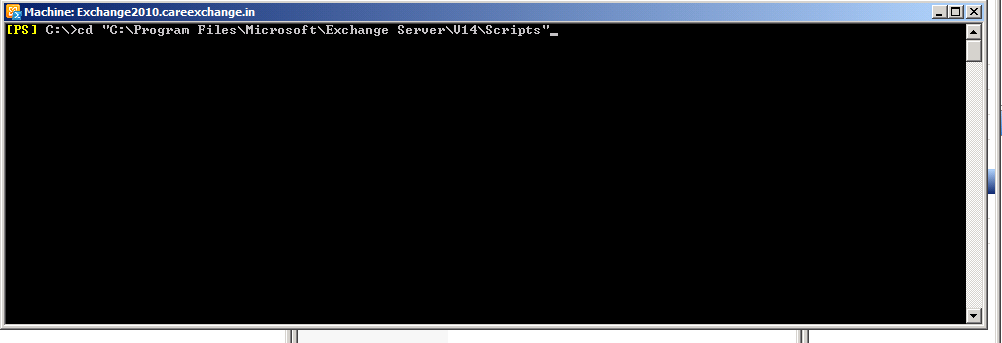
Open Exchange Management Shell

Browse Into The Scripts Folder

By Default It will be in the Installation Location

C:\Program Files\Microsoft\Exchange Server\v14\Scripts

Step 2 : 

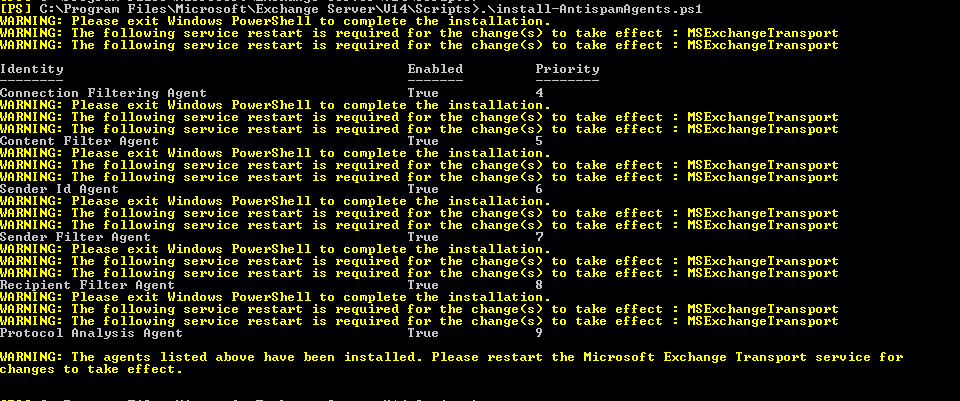
Script is already available in the Scripts folder by default

.\install-AntispamAgents.ps1

Type it and Press Enter

Step 3 :

You can see this.

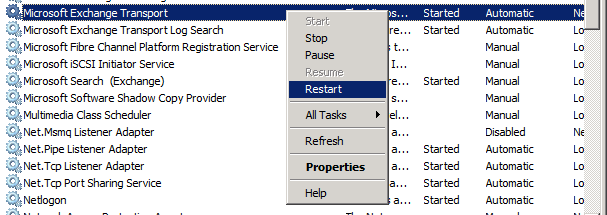
To Finish the Installation

Restart Microsoft Exchange Transport Service

Step 4 :

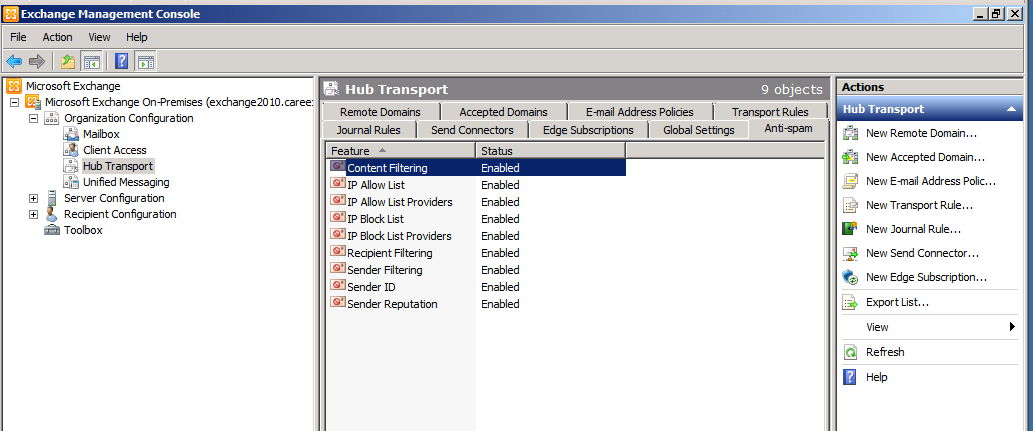
You can view Anti Spam Option Now in your Hub Transport Server

Great !!

You learnt how to Install AntiSpam Agents in Exchange 2010

Reference Link :

http://technet.microsoft.com/en-us/library/bb201691.aspx

How offline Address books works in Exchange 2010

For Users where Outlook is in Cache mode, They got to have their Outlook Address book when they are offline.

If Outlook is left running constantly in Cached Exchange Mode, it updates the Offline Address Book automatically about once a day, depending on Address Book updates on the server running Exchange. To initiate these updates manually, do the following:

  1. On the Tools menu, point to Send/Receive, and then click Download Address Book.
  2. Under Information to download, click Full Details or No Details.

So that they can use their updated address book when they are offline.

Earlier Exchange Versions Outlook Connects to the Mailbox Server for MAPI Connectivity.

But From Exchange 2010 Outlook Connects only to the Client Access Server for MAPI Connectivity.

Offline Address book Generation Server will be a Mailbox Server.

Where You can See Below the Generation Server (If all roles are installed on the Same box) The work flow remains the same
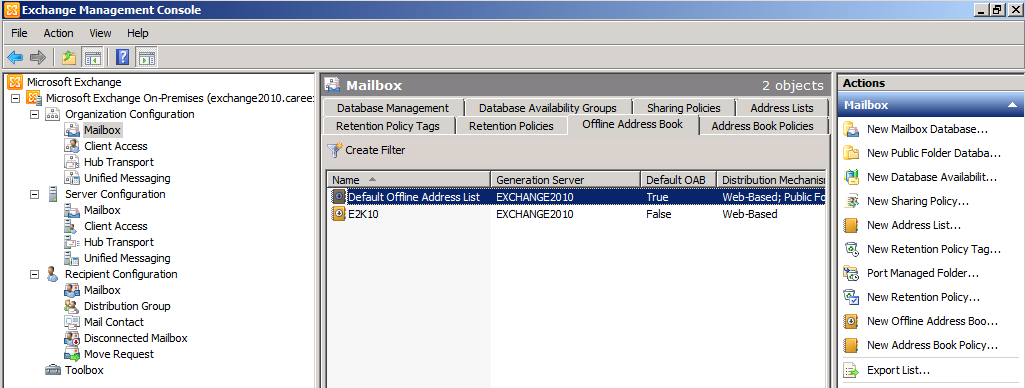
 

Offline Address book has Two Methods of Distribution.

For Outlook 2010, Outlook 2007, and Outlook 2003 SP2 clients it uses OAB version 4
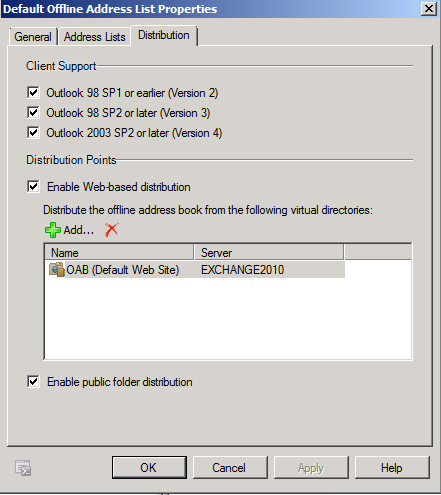
1 .Web-Based distribution

2. Public Folder distribution

Earlier Version Like Outlook 2003, Offline address book are Downloaded via Public Folders ,

So If you don’t have Outlook 2003 In your Environment , you can go ahead and disable Public Folder Distribution

From Outlook 2007 , Outlook Downloads Offline Address book using the OAB Url from the IIS Manager(Web-Based Distribution)

Offline Address book Updates its self Depends on the update Scedule

** This Updates the Items only on th Mailbox Server ** Where Users Download offline address book from the Client Access Server
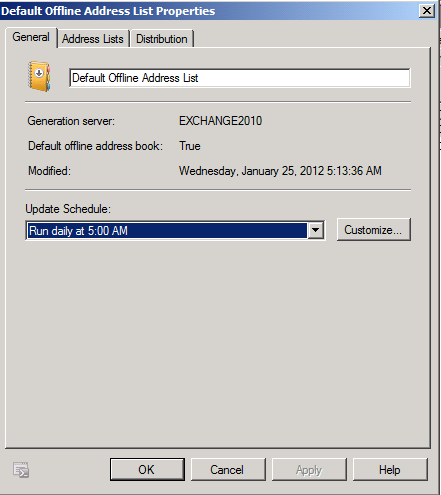
Now Depends on the Update Time LZX files will get updated on the Mailbox Server.

**Offline Address book data are saved in the form of LZX files**

They are located at

By Default – C:\Program Files\Microsoft\Exchange Server\V14\ExchangeOAB


Every OAB will have their own GUID value,

To Find the GUID Value of the Default Offline address book,

You can Customize the name of the oab as per your requirement

When Right Click on the Offline Address book if you Click on Update , The LZX files should get updated on Mailbox Server

** Data Modified Changes to Recent Date – Lzx files are updating **
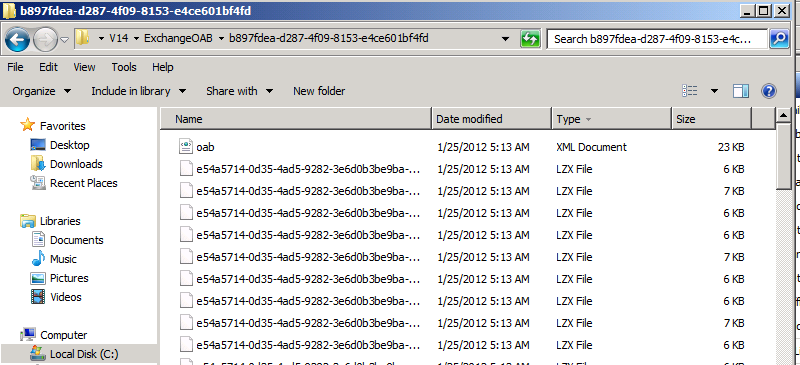
Now Outlook 2003 Users should be able to download their Offline address books from Public Folders

Now here Goes the Web-Based Distribution much efficient and must faster.

Now These Files are Copied to the Client Access Server where Clients can download from the Client Access server

For that Reason this Folder is Shared where Client Access Server can access it and Copy it.
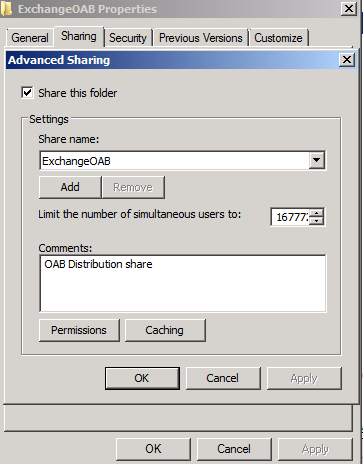
 

* Background Intelligent Transfer Service does this Job

They are not Copied much frequently, They Copy the LZX files to the Client Access server depends on the Polling Interval

You Can Find the Settings for the  Polling Interval as shown below –
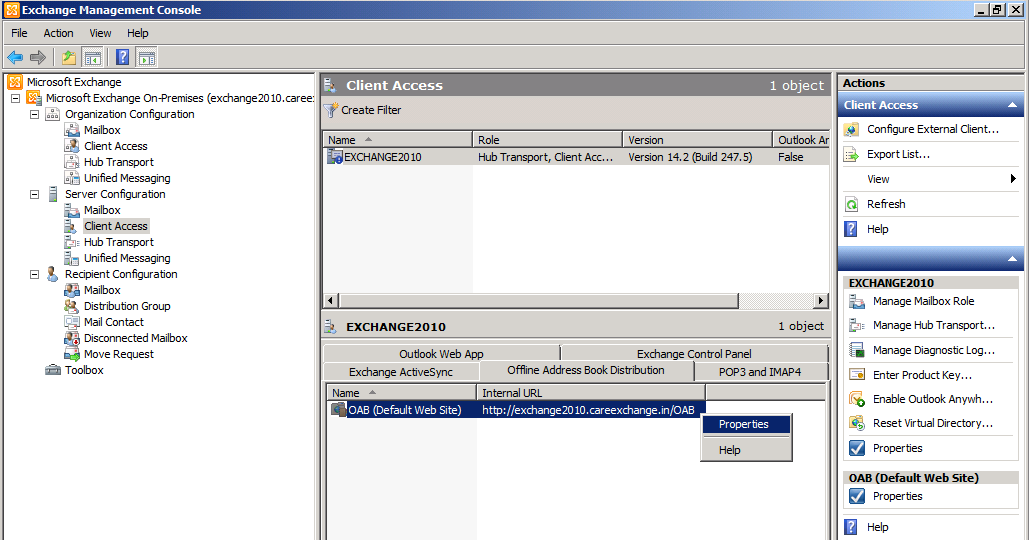
 

By Default – The polling interval is 480 minutes
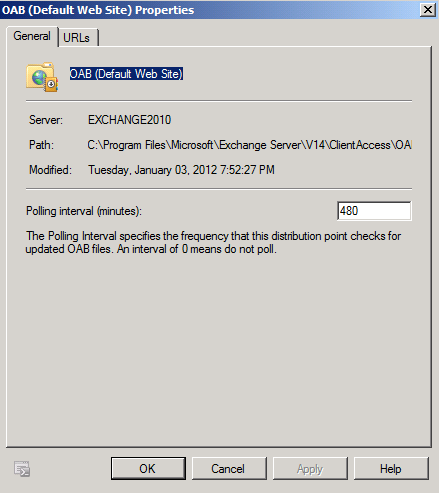
You can find the OAB url , which is used for web based Distribution. in the URLs tab

By Default internal URL doesn’t use HTTPS.
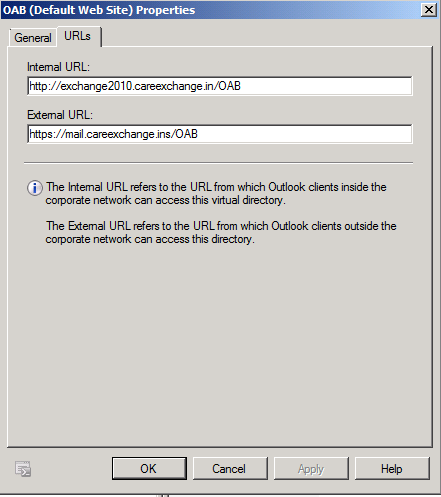
Microsoft Exchange File Distribution Services does this job in the Client Access Server

Now the Same Set of Offline address book files copies over to the Client Access Server

They are located at

By Default – C:\Program Files\Microsoft\Exchange Server\V14\ClientAccess\OAB


As Now Offline address book are web based You can find a OAB Virtual Directory in IIS
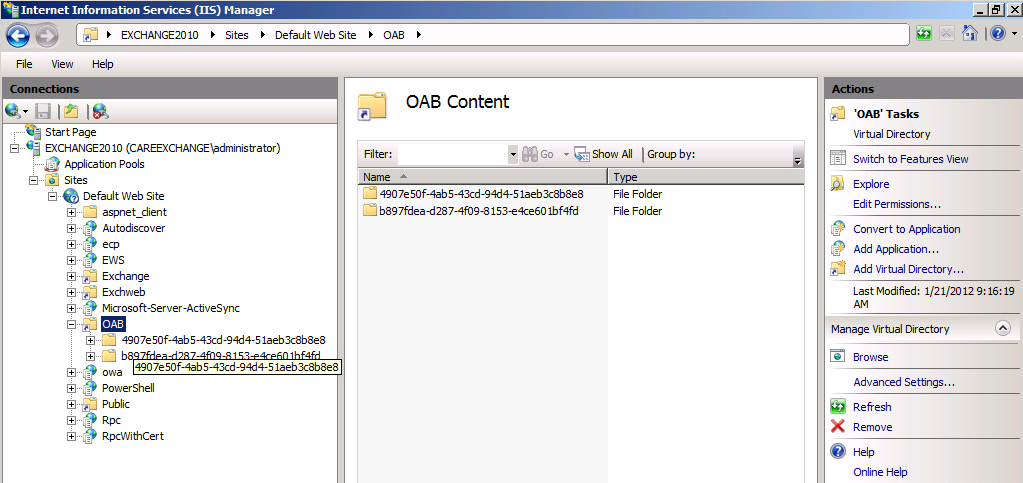
 

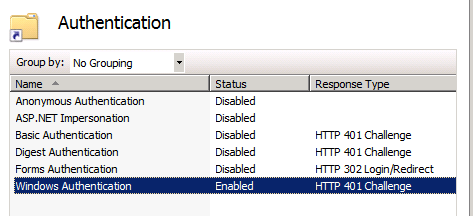
It Uses Windows authentication by Default.
To Confirm That Outlook 2007 and Outlook 2010 Clients are using Web Based Distribution

Hold your Ctrl Key and Right Click on the Outlook icon – Click on Test Email AutoConfiguraion
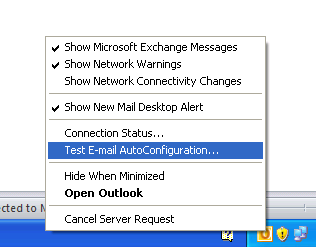
Now Using AutoDiscover , You can see the Offline Address book URL as listed below with the Correct Guid Value
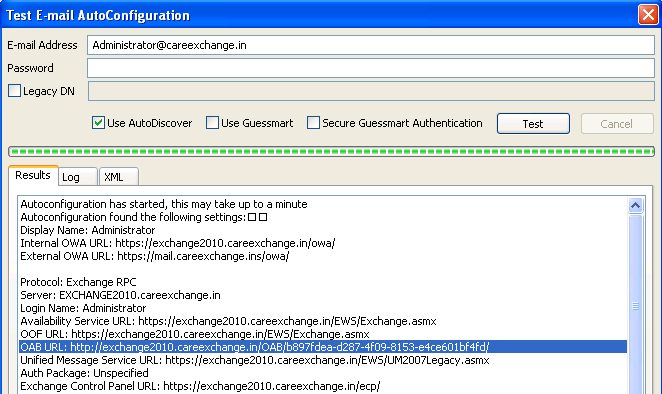
 

Client will Download their Own OAB depends upon their “Client Settings in Database Properties”

By Default it will be empty – It means its downloading the Default offline address book  –

You can choose one. Cause at times it fixes the OAB download issue
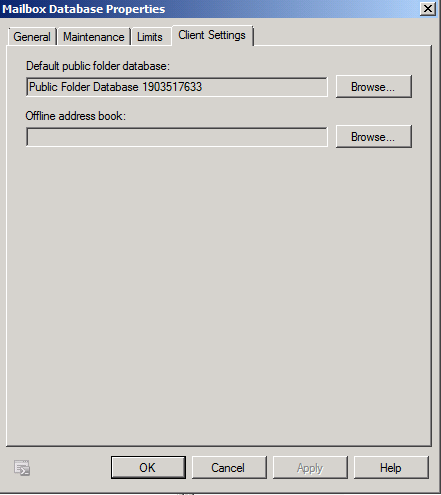
Or

If they have address book policies applied They would Dowload their own OAB


Great !!

You Learn’t How Offline Address book works in Exchange 2010

It applies to Exchange 2010 RTM,SP1,Sp2

How to remove default database in Exchange 2010 in a recommended way

Most of the Administrators wants to have a new database created and Remove the Default Databases in Exchange 2010

Where we can rename the Databases and change the location of the databases.

But still Administrators wants to remove the default databases and Start Fresh.

So Lets Start how we can remove the default Mailbox Databases in Exchange 2010

We got to Think 4 Things inorder to Remove the Default database in Exchange 2010

1. Moving Arbitration Mailboxes (How to recreate System Mailbox , FederatedEmail)

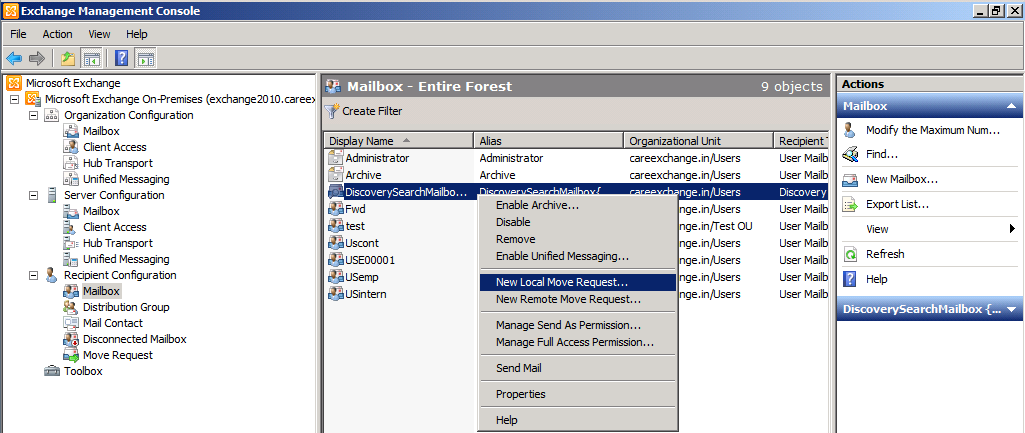
2. Moving Discovery Mailbox (DiscoverySearchMailbox)

3. Moving User Mailboxes

4. Moving Archive Mailboxes

If you miss out anything and if you try to remove the Default Database you might face a popup with an Error
——————————————————–
Microsoft Exchange Error
——————————————————–
The mailbox database ‘Mailbox Database 0089743213’ cannot be deleted.

Mailbox Database 0089743213
Failed
Error:
This mailbox database contains one or more mailboxes, mailbox plans, archive mailboxes, or arbitration mailboxes. To get a list of all mailboxes in this database, run the command Get-Mailbox -Database <Database ID>. To get a list of all mailbox plans in this database, run the command Get-MailboxPlan. To get a list of archive mailboxes in this database, run the command Get-Mailbox -Database <Database ID> -Archive. To get a list of all arbitration mailboxes in this database, run the command Get-Mailbox -Database <Database ID> -Arbitration. To disable a non-arbitration mailbox so that you can delete the mailbox database, run the command Disable-Mailbox <Mailbox ID>. To disable an archive mailbox so you can delete the mailbox database, run the command Disable-Mailbox <Mailbox ID> -Archive. Arbitration mailboxes should be moved to another server; to do this, run the command New-MoveRequest <parameters>. If this is the last server in the organization, run the command Disable-Mailbox <Mailbox ID> -Arbitration -DisableLastArbitrationMailboxAllowed to disable the arbitration mailbox. Mailbox plans should be moved to another server; to do this, run the command Set-MailboxPlan <MailboxPlan ID> -Database <Database ID>.
——————————————————–
OK
——————————————————–


1. Moving Arbitration Mailboxes (System Mailboxes , FederatedEmail)

&

2. Discovery mailbox

if you run (Specify your Default Database name ,Number Differs)

Get-Mailbox -Arbitration -Database "Database name"

Now moving my Arbitration Mailboxes to the new Mailbox Database .

In my case Am moving my Arbitration Mailboxes (From:”Mailbox Database 0089743213″) to “Mailbox Database”

Hence Running this Command – Modify your Default Database name if your gonna use it

Get-Mailbox -Arbitration -Database "Database name" | New-MoveRequest -TargetDatabase "Database Name"

Moving Discovery Mailbox – We can Use Exchange Management Console

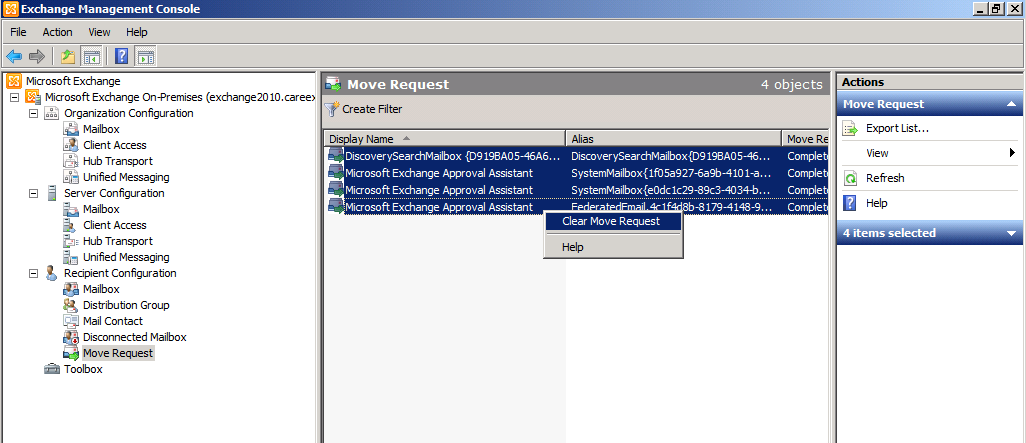
Now once its completed you got to Remove the Move Request once Completed

You can view that using the Exchange management Console and Once its completed , you can remove it

Recipient Configuration – Move Request

3. Moving User Mailboxes

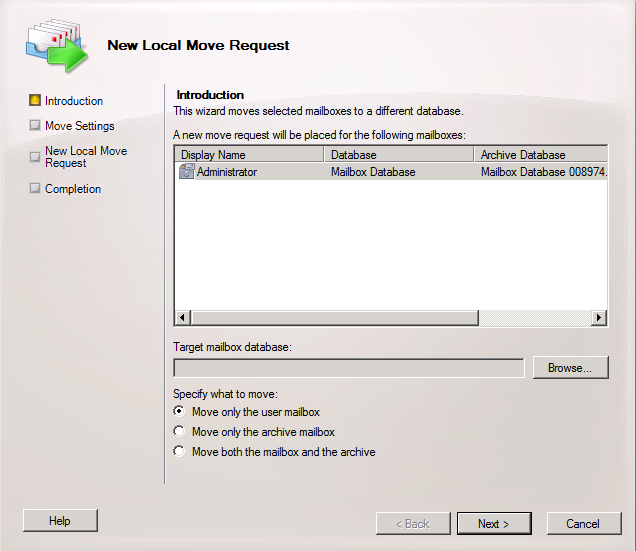
Moving User Mailboxes going to be real simple . Use Exchange management Console

For Fresh People – you can create a Filter for the database and Move Everything to the New Database


One last thing – In newer Versions of Exchange archive mailboxes can be placed in any database

So most of them miss out on that

For Example when you move an mailbox which has an Archive mailbox as well

It would ask you Three options –

Move only the user mailbox , Move only the archive mailbox , Move both the mailbox and archive

So you got to move the archive mailbox as well

If people miss out moving the archive mailboxes

4. Moving Archive Mailboxes

You can view the archive mailboxes

Get-mailbox -archive

but if you need find where they are residing

Get-mailbox -archive | fl identity,database

Moving archive mailboxes You can use Exchange managment Console like above or Using Shell am moving all the archive maiboxes to the new database

Get-Mailbox -Archive | New-MoveRequest -ArchiveTargetDatabase 'Database Name' -ArchiveOnly

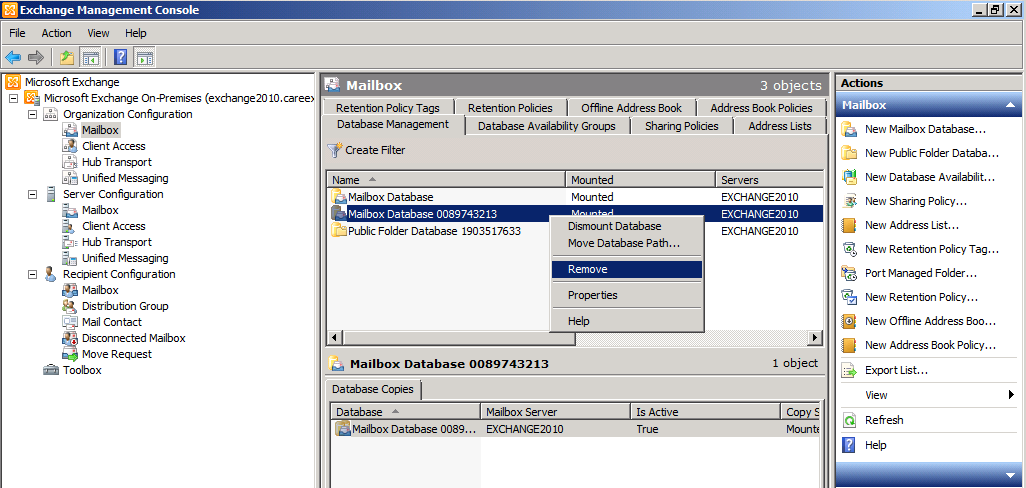
Now Go ahead and remove the default database


Great !!

You learnt how to remove a Default Database in Exchange 2010


How to Move offline address book from Exchange 2003 to Exchange 2010

In the Process of migration from Exchange 2003 to Exchange 2010

We got to Move your Offline address book.

So that Clients can Download From your Client Access Server

**Note : OAB Generation Server will be a Mailbox Server

If you have all the Roles installed on the same server don’t confuse yourself , Its all the Same

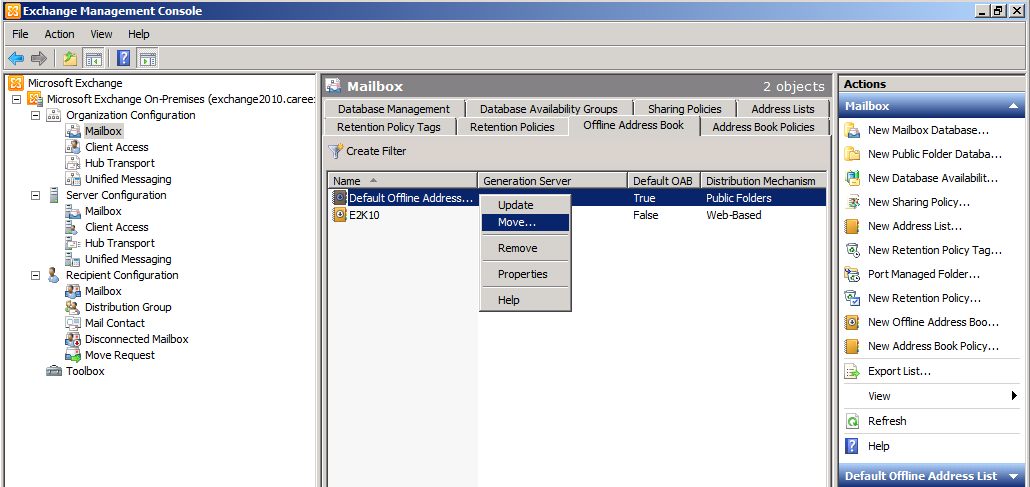
Open your Exchange Management Console (EMC) – Organization Configuration – Mailbox – Offline address book – Right click (Move)

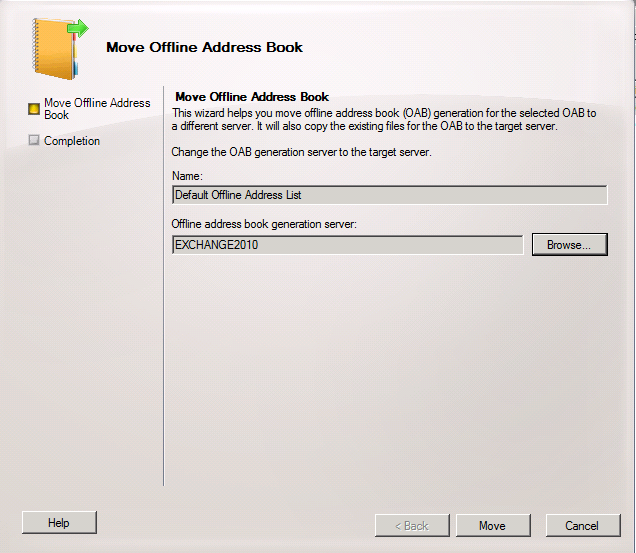
Now Choose your Offline address book generation Server to your Exchange 2010 Server

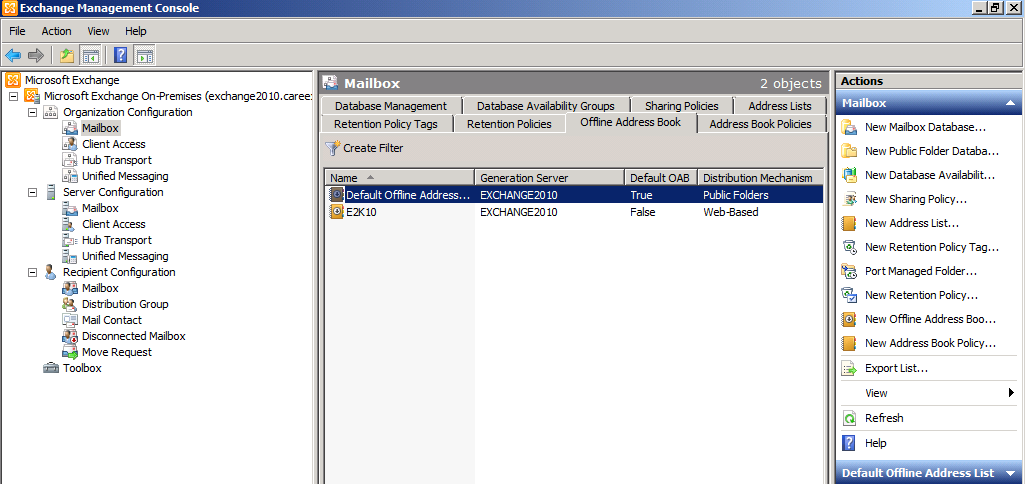
Now your Generation Server would be Exchange 2010

Great !! you moved it successfully

One more setting you need to change

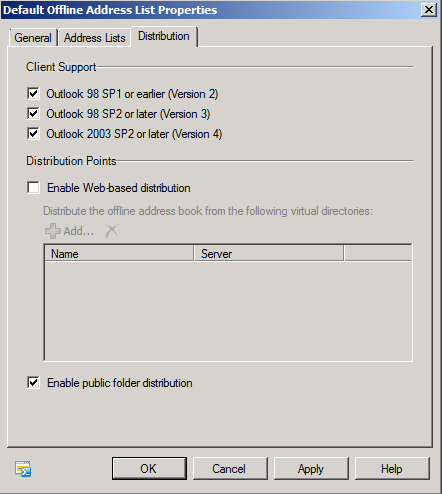
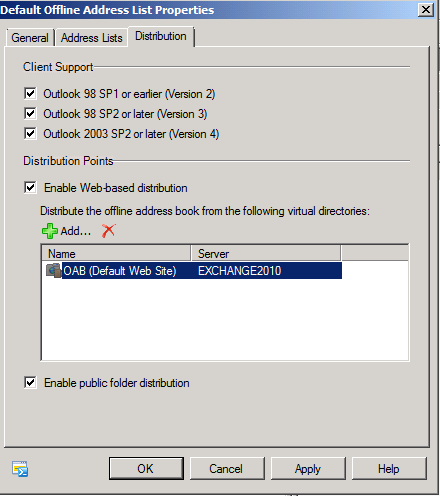
Go to the Properties of your Offline address book and Click on Distribution

As you Moved from Exchange 2003 , There is no web based distribution was available in Exchange 2003

Now In Exchange 2010 , All Outlook Clients from Outlook 2007 till date OAB dowloads are based on Web based distribution

So we got to enable them,

Apply Ok

Now your Offline address book migration is complete


How to use OWA Mini In Exchange 2010 SP2

Owa Mini and is designed to use in mobile phones.

Released with Exchange 2010 Sp2.

In Laymans Term to open OWA in Light weight Browsers (In a Simple HTML page)

For example, my OWA url is https://exchange2010.careexchange.in/owa

OWA Mini url will be https://exchange2010.careexchange.in/owa/oma

How to recreate System Mailbox , FederatedEmail & DiscoverySearchMailbox in Exchange 2010

When we recreate — System Mailbox , FederatedEmail & DiscoverySearchMailbox in Exchange 2010 ?

  • DC crashes
  • If the Default Database is Deleted these maiboxes will go Orphaned
  • System mailboxes go Corrupted

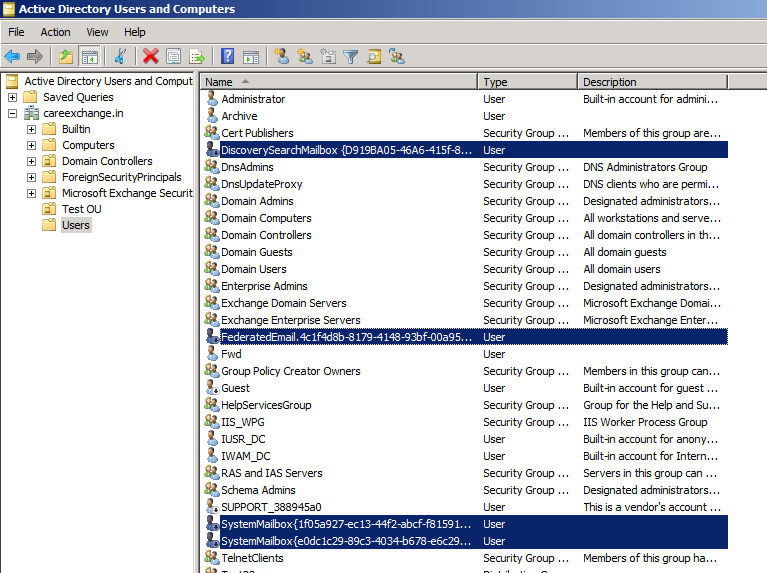
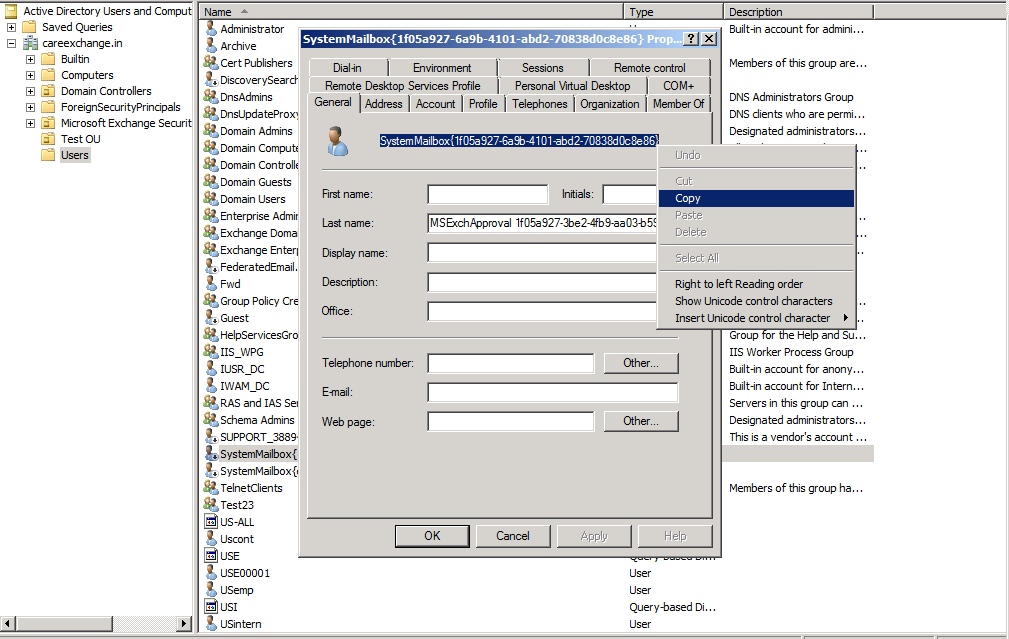
You Could See these  (System Mailbox , FederatedEmail & DiscoverySearchMailbox) in Active Directory Users Container  by Default

System mailboxes are created by Exchange in the root domain of the Active Directory forest during installation. Users or administrators can’t log on to these mailboxes. System mailboxes are created for Exchange 2010 features such as message approval and Multi-Mailbox Search. This table lists information about system mailboxes as they’re displayed in Active Directory.


How to Verify these mailboxes are available and its active or not

Running in Exhcange Management Shell

Get-mailbox -arbitration

Should Show up SystemMailbox and FederatedEmail

If your not Seeing this , It means they are not enabled

Now Let us learn how to recreate them and Enable them

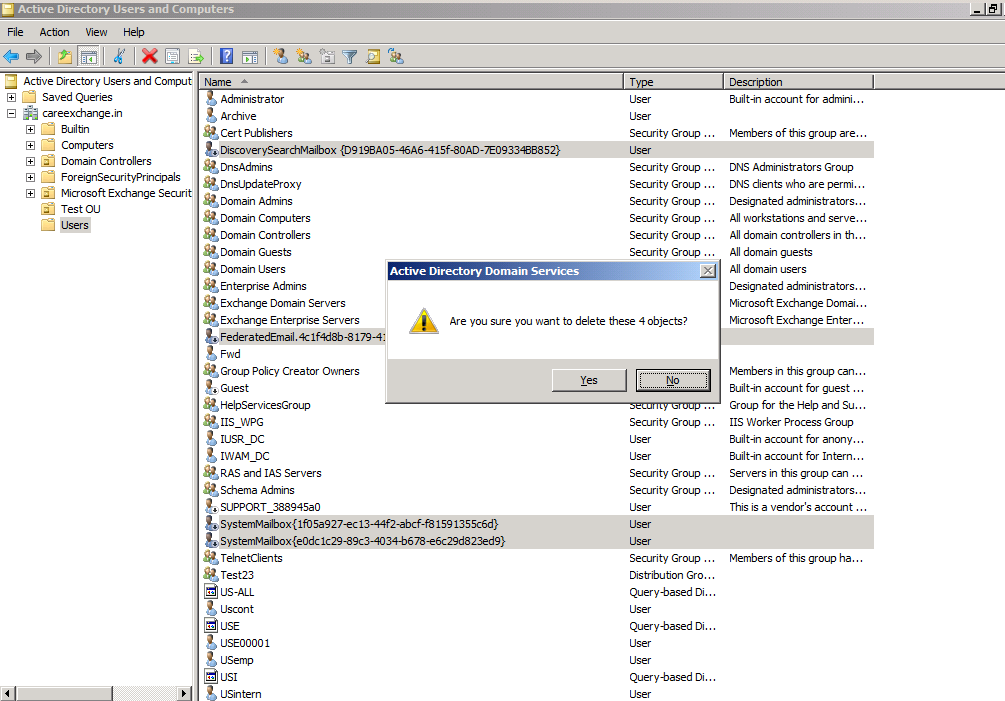
For Example I would Delete this Mailboxes from Users Container – in Active Directory Users and Computers

Now We need the Setup CD inorder to recreate them  “Same Version of Setup ”

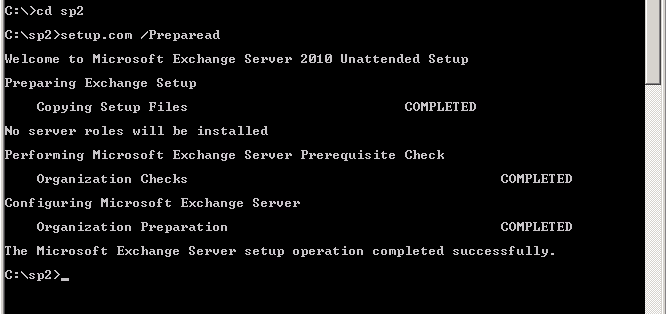
Open Command Prompt

Browsed into the Setup location , Run

Setup.com /prepareAd

This would Create System Mailboxes , FederatedEmail & DiscoverySearchMailbox

Running

Setup.com /Preparead 

It should create them .But Until you Enable them, They won’t work

Now we got to Collect the SystemMailboxe and FederatedEmail and DiscoverySearchMailbox Exact GUID names inorder to Enable them

Now I have the values my my Environment

For Example –

System Mailbox GUID values

SystemMailbox{1f05a927-6a9b-4101-abd2-70838d0c8e86}
SystemMailbox{e0dc1c29-89c3-4034-b678-e6c29d823ed9}

FederatedEmail GUID values

FederatedEmail.4c1f4d8b-8179-4148-93bf-00a95fa1e042

DiscoverySearchMailbox GUID values
DiscoverySearchMailbox {D919BA05-46A6-415f-80AD-7E09334BB852}

Now We Got to Enable them –  (Real time you got to use your own GUID value)

Enabling System Mailboxes

Enable-Mailbox –Arbitration "SystemMailbox{Guid Value1}"
Enable-Mailbox –Arbitration "SystemMailbox{Guid Value2}"
Enable-Mailbox –Arbitration "FederatedEmail.Guid Value"
Enable-Mailbox - Discovery "DiscoverySearchMailbox {Guid Value}"

For Example I ran-

Enable-Mailbox –Arbitration "SystemMailbox{1f05a927-6a9b-4101-abd2-70838d0c8e86}"
Enable-Mailbox –Arbitration "SystemMailbox{e0dc1c29-89c3-4034-b678-e6c29d823ed9}"
Enable-Mailbox –Arbitration "FederatedEmail.4c1f4d8b-8179-4148-93bf-00a95fa1e042"
Enable-Mailbox - Discovery "DiscoverySearchMailbox {D919BA05-46A6-415f-80AD-7E09334BB852}"

Now to Verify If you Did the Right thing

Running this – It should show up your System Mailboxes , FederatedEmail

Great !!

You learnt how to recreate System Mailbox , FederatedEmail & DiscoverySearchMailbox in Exchange 2010 Server

× How can I help you?