42 C
Dubai
Tuesday, April 29, 2025
Home Blog Page 33

Convert IMCEAX NDR to X500 Value with Reference Table

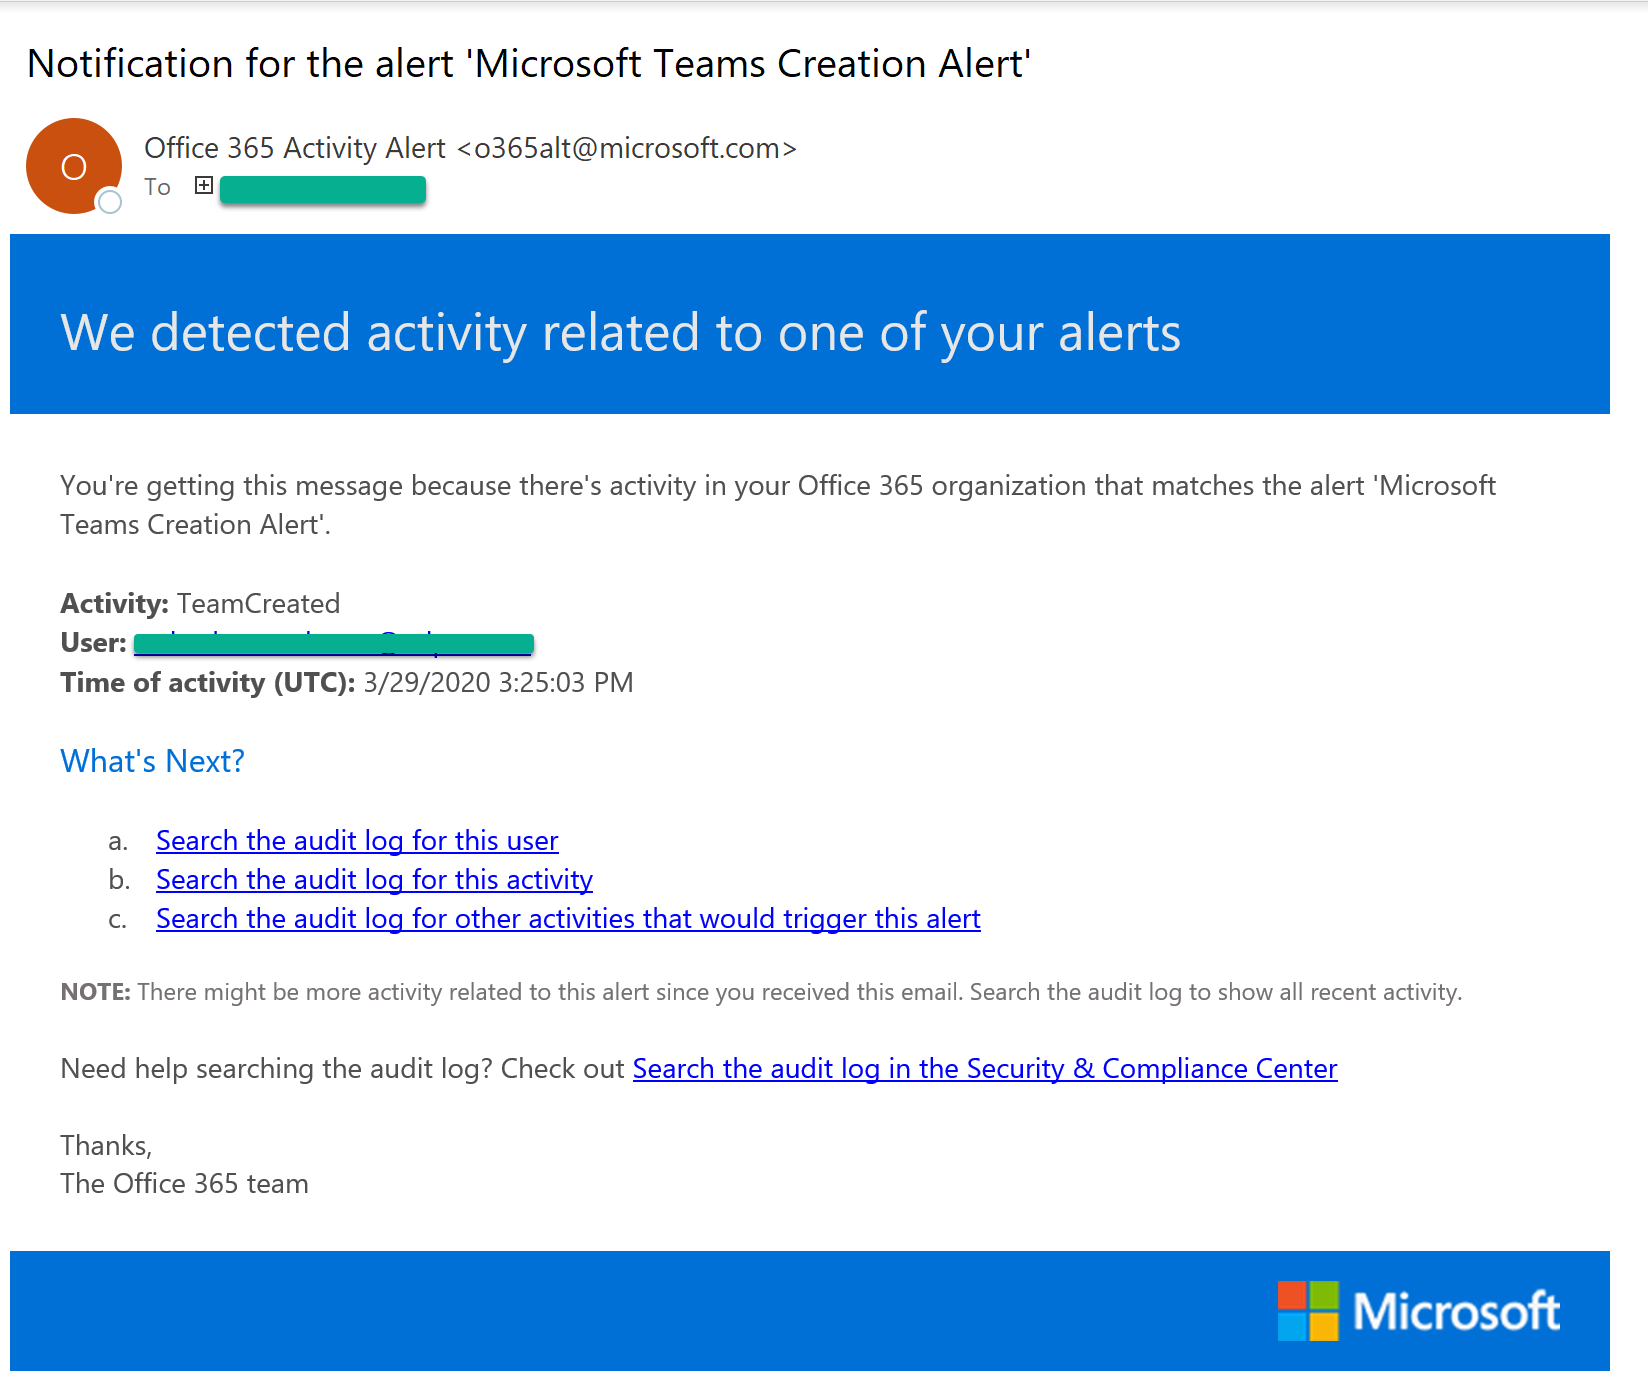
Issue Happens after PST import or Office 365 Group renaming primary smtp address in a hybrid environment

Delivery has failed to these recipients or groups:

“Deleted User/Re created user/Click on it to get the Custom Address
The email address you entered couldn’t be found. Please check the recipient’s email address and try to resend the message. If the problem continues, please contact your helpdesk.

Diagnostic information for administrators:

Generating server: HSEXC0022.AZURE365PRO.COM

IMCEAEX-

_o=HOSTING_ou=Exchange+20Administrative+20Group+20+28FYDIBOHF23SPDLT+29_cn=Recipients_cn=6cc028b24cc44923a56cf0a89d4857ca-pradeep+40careexc@HOSTING.LOCAL

Remote Server returned ‘550 5.1.1 RESOLVER.ADR.ExRecipNotFound; not found’


Original message headers:


Received: from HSEXC0022.AZURE365PRO.COM (10.129.150.20) by


HSEXC0022.AZURE365PRO.COM (10.129.150.21) with Microsoft SMTP Server (TLS) id


15.0.847.32; Sun, 12 Jul 2015 10:12:19 +0400


Received: from HSEXC0012.AZURE365PRO.COM ([fe80::425:f61f:d5c9:3fb7]) by


HSEXC0012.AZURE365PRO.COM ([fe80::425:f61f:d5c9:3fb7%15]) with mapi id


15.00.0847.030; Sun, 12 Jul 2015 10:12:20 +0400


Content-Type: application/ms-tnef; name=”winmail.dat”


Content-Transfer-Encoding: binary


Reference IMCEAX to X500 –


IMCEAEX-


_o=HOSTING_ou=Exchange+20Administrative+20Group+20+28FYDIBOHF23SPDLT+29_cn=Recipients_cn=d8d4ee95a3bc4778a40wbeb269c518dfb-Ramakrishna+20Redd@HOSTING.LOCAL

Converted Value –


X500:/o=HOSTING/ou=Exchange Administrative Group (FYDIBOHF23SPDLT)/cn=Recipients/cn=d8d4ee95a3bc4778a40beb269c518dfb-Ramakrishna Redd

Reference X500 – VALUE
_ /
+20 Blank Space
+28 (
+29 )
@domain.com To be removed
+40 @
+2E .
+2C ,
+5F _
%3d =

Here is the scenario – I had to remove 200 Mail Contacts and get them created as Mailboxes in 1000 User Environment. As soon as i delete the contacts its going to throw me an IMCEAX error, To Overcome this situation i had to export all them in advance, Had the X500 addresses ready, and Added them to the mailboxes created.


via Powershell


To Export the CSV –


 Get-MailContact -ResultSize Unlimited -OrganizationalUnit "Azure365pro.com/Emps" | Select-Object Name,Alias,PrimarySmtpAddress,LegacyExchangeDN | Export-Csv C:\legacyDN.csv 
 

Format the CSV into below format using Excel-


Name,Alias,PrimarySmtpAddress,LegacyExchangeDN
Melissa Melora ,Melissa,melissa@Azure365pro.com,X500:/o=HOSTING/ou=Exchange Administrative Group (FYDIBOHF23SPDLT)/cn=Recipients/cn=5a186ad20a2b4aaeb44258a723a95054-Melissa Melora


Import it


Import-csv c:\Scripts\legacyDN.csv | foreach { set-mailbox -identity $_.PrimarySmtpAddress -EmailAddresses @{Add= $_.legacyexchangeDN}} 

Name,Alias,PrimarySmtpAddress,LegacyExchangeDN
Melissa Melora ,Melissa,melissa@Azure365pro.com,X500:/o=HOSTING/ou=Exchange Administrative Group (FYDIBOHF23SPDLT)/cn=Recipients/cn=5a186ad20a2b4aaeb44258a723a95054-Melissa Melora


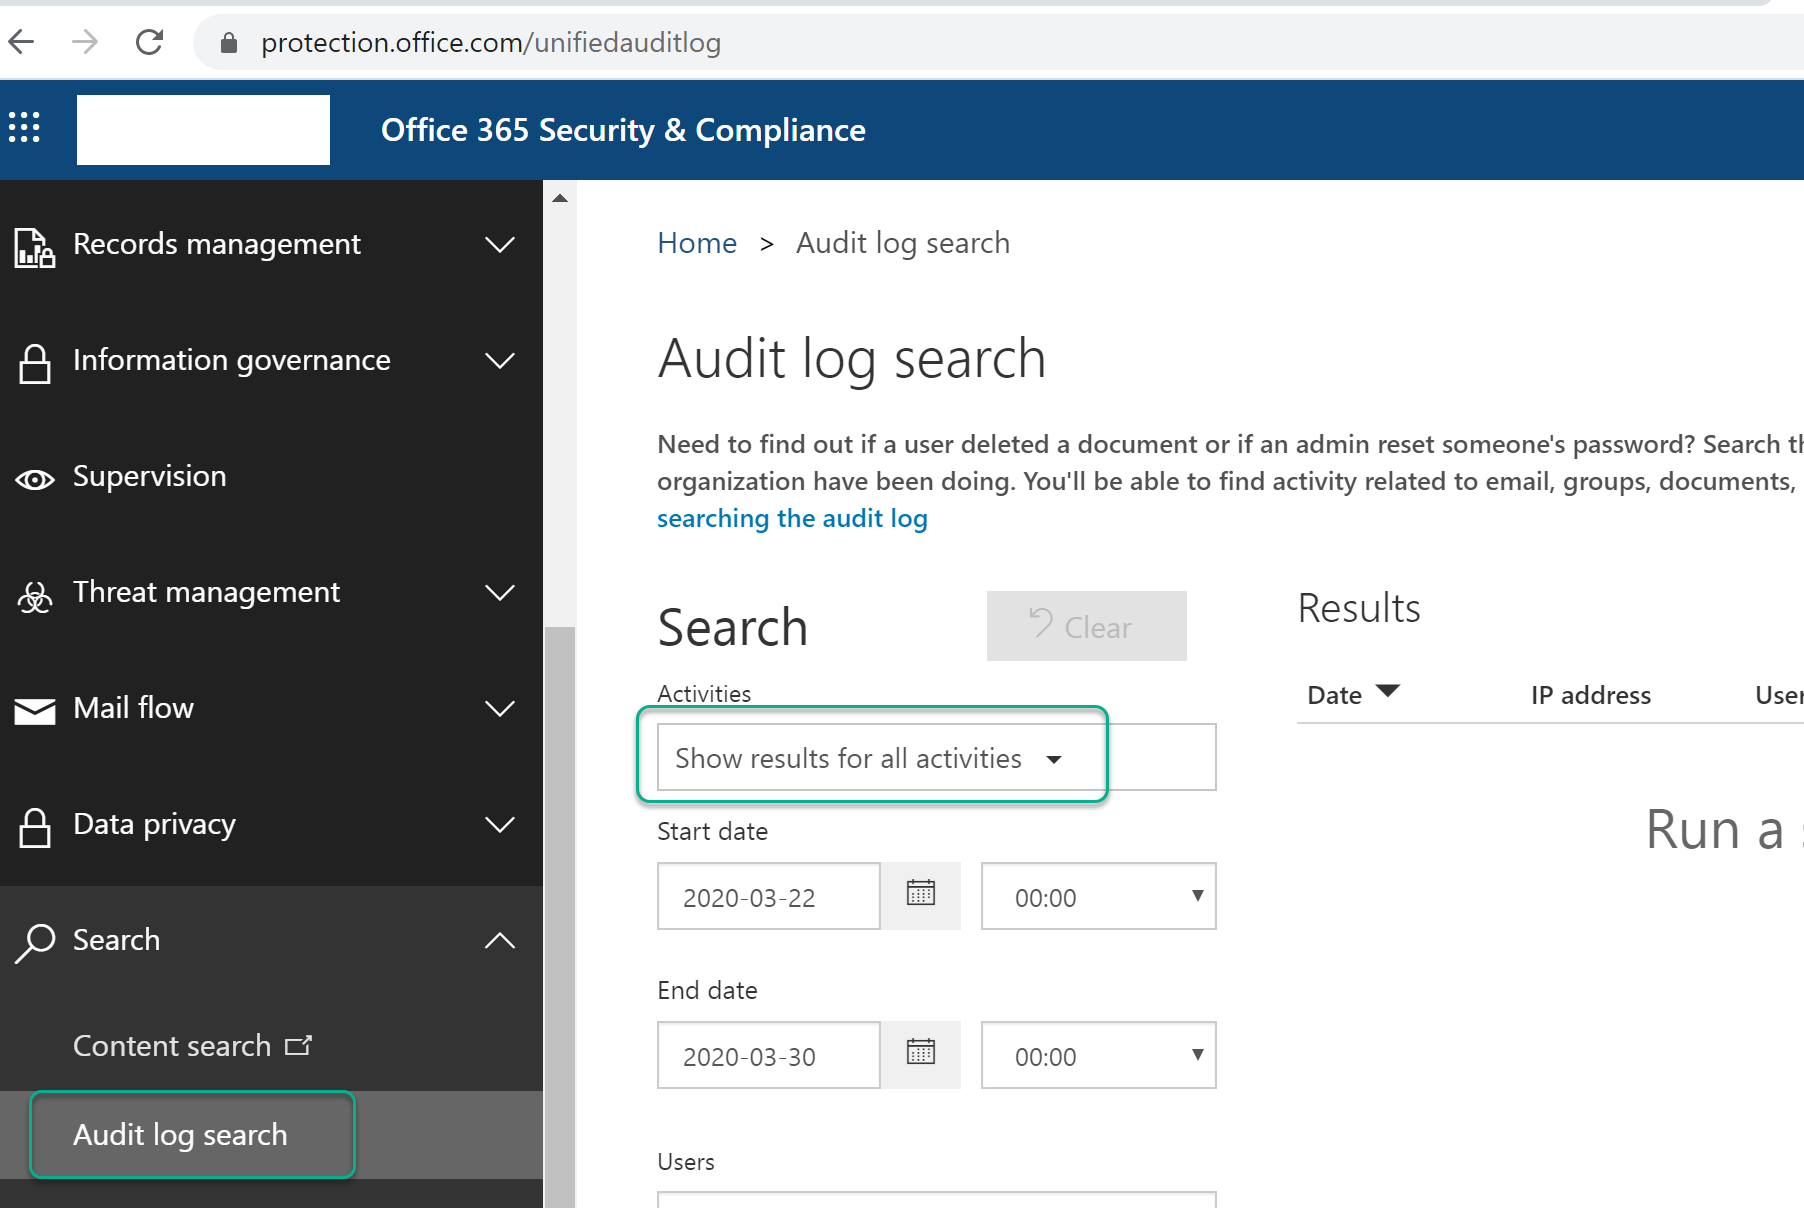
To Add it via ADUC – Using Attribute Editor


Open Active Directory Users and Computers – View – Advanced Features


image

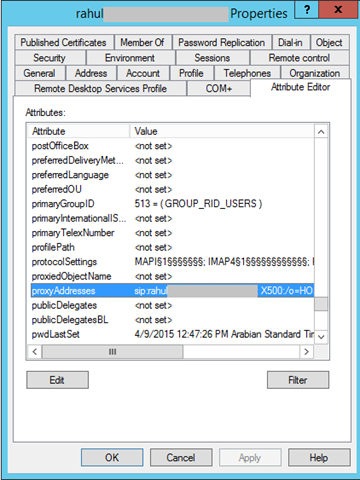
Add the X500 Address address which is converted.


image

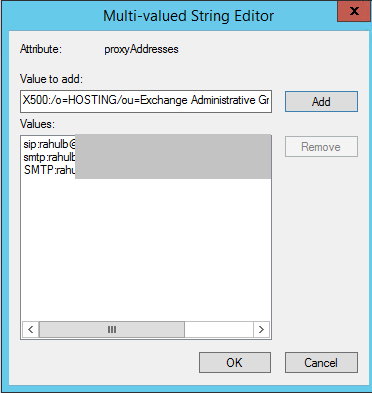
Click Ok, Apply , OK,


Powershell Sample to Convert


$x = "enter IMCEAEX full value"

$x = $x -replace "IMCEAEX-_", "X500:/" -replace "\+20", " " -replace "\+28", "(" -replace "\+29", ")" -replace "_", "/" -replace "\+2E","." -replace '@.*'


$x


If you have this with an office 365 group – (In my case users on-prem with group writeback having this issue. So added below waited for group writeback to give out this value)

Set-UnifiedGroup -Identity "test@localhost" -EmailAddresses @{add="X500:/o=NT5/ou=00000000000000000000000000000000/cn=CCE74E2284B1CF4CADDDDDD14FFDF9"}
                

Using Exchange Modern Hybrid Topology with Hybrid Agent

Have you used autodiscover ? we always used check name and configured outlook. Do you have a SSL Certificate ? We always used internal CA all these years.Adding to it using DynDNS A record pointing to exchange server.

We wish to migrate to Office 365 and we run exchange 2010.Exchange Modern Hybrid methodology with Hybrid Agent Comes to the rescue to migrate the mailboxes.

It answers some of the key things . You don’t have to retain a public IP, SSL and autodiscover pointing to onPrem Servers. Where Small and medium customers who migrated the mailboxes to the cloud most of them doesn’t wish invest on SSL for hybrid servers.or keep having the public IPs pointing to the exchange servers.  Its simple and easy to configure and migrate. lets see how to do it.

Download Hybrid Agent using below link.

https://aka.ms/hybridagentinstaller

You can download the installer and run it or you can let the hybrid wizard run it. Sometime you don’t get the option “use exchange modern hybrid methodology” if customer ran the classic topology already in the environment you don’t see the modern methodology option in the wizard. To overcome it . I did this work around of implementing a new windows server which will be by Hybrid agent server. Installed the hybrid agent and ran the hybrid wizard on the same server. which gave me the option to choose between two.  if you don’t have that hassle run the hybrid wizard and the wizard installs you the hybrid agent.

image

Once you install the hybrid agent on the server. you can see the Microsoft Hybrid service.

image

Make sure MRS Proxy is Enable on the internet facing client access server.

Set-WebServicesVirtualDirectory -Identity "EWS (Default Web Site)" -MRSProxyEnabled $true

Make sure required ports are opened.

  • Outbound ports HTTPS (TCP) 443 and 80 must be open between the computer that has the Hybrid Agent installed and the Internet.
  • Ports HTTPS (TCP) 443, 80, 5985 and 5986 must be open between the computer that has the Hybrid Agent installed on the CAS that’s selected in the Hybrid Configuration wizard.

image

Choose the local server which is in my case and choose use an existing agent.

image

  • Download Hybrid Updater agent.
  • Install Hybrid updater agent.
  • Download Hybrid agent.
  • Register Hybrid Agent.
  • Validate Hybrid Agent for Exchange usage.

image

Configure my client Access and Mailbox servers for secure mail transport (typical)

image

Choose the optimal internet facing client access server.

image

Choose the public IP address to receive email

image

Choose the transport certificate.

image

Choose the FQDN or the public ip to send smtp traffic to onPrem servers.

image

Now Initialize Hybrid Environment.

image

Configure Organization Relationship failed. which is ok for use. as we don’t need free busy on this project.

image

We pointed the autodiscover of the domain directly the cloud and migrated all the mailboxes.

image

You can see the MRS Proxy as Hybird Migration Endpoint – EWS (Default Web Site)

image

We realized the migration speed was slow comparatively with the traditional method. But migration without additional tools was possible just because we had the hybrid agent working.  Its just an another step moving forward to remove dependencies from on prem environment.

Automate Changing UPN equals Email with a simple script

For Autodiscover to work properly in On premises and Exchange Online , We need email and User principal name to match. In the start of the project we have to do it once.

But for new users every time administrators cannot keep checking if its equal or not. it would be tiring to do it manually everytime. So if require you can run it on a task scheduler so that it maintains the UPN and Email to be same for the ones which is not matching.

Supported on Exchange 2013 or above | Premise or Exchange Hybrid Server

NOTE : Before running the script run below commands to check which are the mailboxes it will apply to

Get-Mailbox -ResultSize Unlimited | Where-Object {$_.Primarysmtpaddress -ne $_.UserPrincipalname}

To Check its running with Whatif

Get-Mailbox -ResultSize Unlimited | Where-Object {$_.Primarysmtpaddress -ne $_.UserPrincipalname} | ForEach-Object {Set-Mailbox $_.identity -UserPrincipalName $_.Primarysmtpaddress -whatif}

To Apply

Get-Mailbox -ResultSize Unlimited | Where-Object {$_.Primarysmtpaddress -ne $_.UserPrincipalname} | ForEach-Object {Set-Mailbox $_.identity -UserPrincipalName $_.Primarysmtpaddress}

Download Change_UPN_equals_Email.ps1

Task Scheduler

image

Create Basic Task

Choose Daily

image

Set a time

image

Start a Program

image

  • Powershell
  • C:\Scripts\Change_UPN_equals_Email.ps1

Download Change_UPN_equals_Email.ps1

image

Made to stop the task if it exceeds 4 hours

image

Download Change_UPN_equals_Email.ps1


# NOTE : Before running the script run below commands to check which are the mailboxes it will apply to
# Get-Mailbox -ResultSize Unlimited | Where-Object {$_.Primarysmtpaddress -ne $_.UserPrincipalname}
# Get-Mailbox -ResultSize Unlimited | Where-Object {$_.Primarysmtpaddress -ne $_.UserPrincipalname} | ForEach-Object {Set-Mailbox $_.identity -UserPrincipalName $_.Primarysmtpaddress -whatif}

# Include Exchange Powershell Module
Add-PSSnapin Microsoft.Exchange.Management.PowerShell.SnapIn

#Lists All Mailboxes
#Checks Email and UPN are same
#Lists which are not email
#Applies UPN Matching email

Get-Mailbox -ResultSize Unlimited | Where-Object {$_.Primarysmtpaddress -ne $_.UserPrincipalname} | ForEach-Object {Set-Mailbox $_.identity -UserPrincipalName $_.Primarysmtpaddress}

# Exit Exchange Powershell Module
Remove-PSSnapin Microsoft.Exchange.Management.PowerShell.SnapIn

Download Change_UPN_equals_Email.ps1

Known Errors –  On Exchange 2010 it cannot take two pipelines together.


Pipeline not executed because a pipeline is already executing. Pipelines cannot be executed concurrently.
+ CategoryInfo : OperationStopped: (Microsoft.Power...tHelperRunspace:ExecutionCmdletHelperRunspace)
PSInvalidOperationException
+ FullyQualifiedErrorId : RemotePipelineExecutionFailed

To Avoid two pipelines. Save to variable and run the same.

$a = Get-Mailbox -ResultSize Unlimited | Where-Object {$_.Primarysmtpaddress -ne $_.UserPrincipalname}
$a | ForEach-Object {Set-Mailbox $_.identity -UserPrincipalName $_.Primarysmtpaddress -whatif}
$a | ForEach-Object {Set-Mailbox $_.identity -UserPrincipalName $_.Primarysmtpaddress}

Some users are not showing in Teams Admin Center

Some users are not showing in Teams Admin Center. Its a night mare to figure out the issue. The issue happened to be some users had lync / skype for business attributes enabled and disabled in the past. Even thought it was decommissioned gracefully one of the attribute was enabled with a value of SRV: was causing the issue.

How to quickly test you are in the same boat . Check for RTC attributes for working and not working user.

Get-ADUser vaishika -Properties * | FL Samaccountname,*rtc*

Please note that i don’t have lync or skype for business deployment in the environment so i cleared all the attribute for the not working users.

Never run this on a Lync or skype for business working user. It will screw their lync or skype for business credentials

Just took a backup of the values am going to clear.

Get-ADUser -Filter * -Properties * -SearchBase "OU=01 Users,DC=azure365pro,DC=com" | Select-Object Samaccountname,msRTCSIP-DeploymentLocator | Export-Csv BackupAttribute.csv

Clear the attribute for all users –

Get-ADUser -Filter * -Properties * | Set-ADUser -Clear msRTCSIP-DeploymentLocator

Specific Organizational Unit –

Get-ADUser -Filter * -Properties * -SearchBase "OU=01 Users,DC=azure365pro,DC=com" | Set-ADUser  -Clear msRTCSIP-DeploymentLocator

or

Take the CSV Filter the accounts and Clear the Attribute for specific users –

Import-Csv clear.csv | ForEach-Object{Set-ADUser $_.samaccountname -Clear msRTCSIP-DeploymentLocator

For me msRTCSIP-DeploymentLocator was causing the issue but it could be any of the below attributes causing the issue. Still the lync and skype for busines legacy links is following Teams . Nothing can’t be done.

  • msRTCSIP-DeploymentLocator
  • msRTCSIP-FederationEnabled
  • msRTCSIP-InternetAccessEnabled
  • msRTCSIP-Line
  • msRTCSIP-OptionFlags
  • msRTCSIP-PrimaryHomeServer
  • msRTCSIP-PrimaryUserAddress
  • msRTCSIP-UserEnabled

After 60 minutes

Notification Alert on New Teams Creation and Deletion

Alert Policies helps us on quite a lot of things. but create and delete team activity alert helps to watch the number of Office 365 Groups Created because of teams also unauthorized deletion by mistake.To limit the Office 365 groups and number of teams creation only a few members can create teams. so that we limited the number of teams as 1 per departments and departments can go with any number of channels. So that we limit the number of office 365 groups we manage. Also we would like to be alerted if other admins create teams to a common distribution list to gain more visibility. Office 365 Security and compliance Center makes it more easy to create this type of alerts. but they are not extremely reliable at this point. As there is a delay in receiving these emails for a period of 30 minutes. sometime no emails at all. But its good to have configured it works most of the time.

Login to Office 365 Security and Compliance

https://protection.office.com/homepage


Type Team

Choose Created Team/Deleted Team

Choose Name – Team Creation and Deletion Alert

Choose the recipient which the alert has to be sent.


You can see the Created Alerts – For more Specific Subject on the alert emails , you can split the alerts one for Creation and one for deletion as well.

It takes few hours to take Effect.

you can see the below sample email for Microsoft TeamsCreated Alert

if you wish to see the history of alerts to create specific alerts audit log search is the best place to start.

Search -> Audit Log Search

Sign in Issue on Teams Windows Client

Windows Client stopped working all of a sudden. User can work on a different computer , Web App works and mobile app works.

We’re Sorry – We’ve run into an issue.

Try again

if that doesn’t work try signing out and back in.

image

We need you to Sign in ! Either your password changed or the server needs your sign-in info again.


image

We weren’t able to connect. Sign in and we’ll try again. Sign in.

image

Same Solution for users showing a unknown user in Windows thick client

Solution –

Tried Quitting the application

Tried restarting the computer

Web https://teams.microsoft.com works.

Start – run –

%AppData%\Microsoft\

image

Rename

Teams Folder to Teams.old

image

Restart Teams client.

× How can I help you?