42 C
Dubai
Tuesday, April 29, 2025
Home Blog Page 35

Admin Take over in Office 365

We recently added a domain to our office 365 tenant and it was throwing an error that it was used by someone else. We couldn’t find who is having access to the office 365 account. Even though we know we are the sole owner of this domain not sure who has access to it.

That’s where the trick on Admin Take over comes in. Go to https://powerbi.microsoft.com/en-us/landing/signin/

Signup for a free account . use the domain you wish to take over.

Now login to the account and click on Admin Tab.

image

Click on “Yes I want to be the Admin”

image

Add the txt record show to prove ownership of the domain.

image

Now you are the admin of this domain.


image

Now got access to their existing Office 365 tenant went to admin portal. Removed the domain.

Waited for the domain to be completely removed from the tenant. Added the domain to our primary tenant.

Same time it shows the power of having access to the dns of a domain.

image

Upgrading Exchange Servers with Cumulative Updates

Am upgrading my Exchange server from CU9 to CU15 with Security Patch a Critical Exchange Control Panel ECP Vulnerability. If you run Cumulative 15 on Exchange 2016 . Download the appropriate patch for your running version. Run as administrator is quite important .as it may cause issues if you don’t run the patch with elevated prompt.

CVE-2020-0688 is a static key vulnerability in Microsoft Exchange Control Panel (ECP), a component of Microsoft Exchange Server. The use of static keys could allow an authenticated attacker with any privilege level to send a specially crafted request to a vulnerable ECP and gain SYSTEM level arbitrary code execution.
Microsoft rates this flaw as important, but notes that exploitation is more likely, according to its exploitability index.

https://portal.msrc.microsoft.com/en-US/security-guidance/advisory/CVE-2020-0688

  • CVE-2020-0692 | Microsoft Exchange Server Elevation of Privilege Vulnerability
  • CVE-2020-0688 | Microsoft Exchange Memory Corruption Vulnerability

Performing Maintenance on an Exchange Servers , Usually i kill Client Access Connections to the Node from Load Balancer for 443 (Client Connectivity) and Port 25 (SMTP Connections)

To Drain the Existing Mail Queue

Set-ServerComponentState EXCH1 -Component HubTransport -State Draining -Requester Maintenance
Restart-Service MSExchangeTransport

if you have UM – To Drain Calls

Set-ServerComponentState EXCH1 -Component UMCallRouter -State Draining -Requester Maintenance

.\StartDagServerMaintenance.ps1
.\StopDagServerMaintenance.ps1
.\RedistributeActiveDatabases.ps1

.\StartDagServerMaintenance.ps1 will set the Exchange server into maintenance mode, which will prevent that other servers in the DAG, attempt a database failover onto the maschine where you are currently performing maintenance work. Also all active databases will be moved to the other nodes. And after the maintenance work is done, you will be able to automatically redistribute database with the RedistributeActiveDatabases.ps1 script based on the configured activation preference.

Those scripts are located in the Exchange scripts folder. In Exchange PowerShell the path to this folder is preloaded in the variable $exscripts.


cd $exscripts
.\StartDagServerMaintenance.ps1 -ServerName EXCH1 –OverrideMinimumTwoCopies

image

To redirect messages pending delivery in the local queues to the Exchange server specified by the Target

Redirect-Message -Server EXCH1 -Target EXCH2

To place the server into maintenance mode

Set-ServerComponentState EXCH1 -Component ServerWideOffline -State Inactive -Requester Maintenance

Verify the server has been placed into maintenance mode

Get-ServerComponentState EXCH1 | Format-Table Component,State -Autosize

verify the server is not hosting any active database copies

Get-MailboxDatabaseCopyStatus -Server EXCH1

Verify DatabaseActivationPolicy is Blocked

Get-MailboxServer EXCH1 | Format-List DatabaseCopyAutoActivationPolicy

verify that the cluster node is paused

Get-ClusterNode EXCH1 | Format-List

Verify Queue is 0

Get-Queue

Now run the Upgrade Steps

image

image

Error:
A reboot from a previous installation is pending. Please restart the system and then rerun Setup.
For more information, visit: http://technet.microsoft.com/library(EXCHG.150)/ms.exch.setupreadiness.RebootPending.aspx

Error:
This computer requires .NET Framework 4.8 (https://support.microsoft.com/kb/4503548).
For more information, visit: https://docs.microsoft.com/Exchange/plan-and-deploy/system-requirements?view=exchserver-2016

Downloaded .NET 4.8 https://support.microsoft.com/en-us/help/4503548/microsoft-net-framework-4-8-offline-installer-for-windows

image

Error:
Setup can’t continue with the upgrade because the mscorsvw (14848) has open files. Close the process, and then restart Setup.
For more information, visit: http://technet.microsoft.com/library(EXCHG.150)/ms.exch.setupreadiness.ProcessNeedsToBeClosedOnUpgrade.aspx

image

Close and Reopen Setup

Open cmd Prompt

Run as Administrator

Browse for the .msp file and Click Enter.

image

image

To Exit the server from maintenance mode

Set-ServerComponentState EXCH1 -Component ServerWideOffline -State Active -Requester Maintenance

if you use UM – Set Server Component to Active

Set-ServerComponentState EXCH1 -Component UMCallRouter -State Active -Requester Maintenance

To Set HUB Component to Active

Set-ServerComponentState EXCH1 -Component HubTransport -State Active -Requester Maintenance

To Resume Transport Activty

Restart-Service MSExchangeTransport

Remove the restriction using below script

Resumes the node in the cluster.
Sets the value of the DatabaseCopyAutoActivationPolicy to Unrestricted.
Runs the Resume-MailboxDatabaseCopy cmdlet for each database copy on the node.

.\StopDagServerMaintenance.ps1 -ServerName EXCH1

We have to do the same process for all DAG members once is done,all database copies are active on EXCH1 for example and we need to redestribute them back to servers . For that purpose you can execute the following script. Otherwise Exchange 2016 Servers redistribute automatically in 60 minutes with native configuration.

.\RedistributeActiveDatabases.ps1 -DagName DAGNAME -BalanceDbsByActivationPreference

-OverrideMinimumTwoCopies – By default Script makes sure that there are at least 2 available copies of data available, before it attempts to move a database. if you have only one copy you have to use this switch

.\RedistributeActiveDatabases.ps1 script you will be asked to confirm every database move. If you are working in a large production evironment were you can have 50+ databases per server, this can be a bit annoying. There is however a posibility to change that within the script:

[switch] $Confirm = $true

Prompts on every move

[switch] $Confirm = $false

Moves without prompts (Don’t do this unless you are confident on the environment)

Verify all ok

Verify the server has been exited maintenance mode

Get-ServerComponentState EXCH1 | Format-Table Component,State -Autosize

Verify DatabaseActivationPolicy is Unrestricted

Get-MailboxServer EXCH1 | Format-List DatabaseCopyAutoActivationPolicy

verify that the cluster node is Resumed

Get-ClusterNode EXCH1 | Format-List
Get-MailboxDatabaseCopyStatus -Server Exch1
Get-MailboxDatabaseCopyStatus -Server Exch2
Test-ReplicationHealth

Reference _ Manual Steps Without Scripts _ Without HUB Maintenance _ Test Environments

If Servers on DAG – Move all your Active Databases

Move-ActiveMailboxDatabase Database0 -ActivateOnServer EXCH2

Set your Database Activation to Blocked

Set-MailboxServer -Identity EXCH1 -DatabaseCopyAutoActivationPolicy Blocked

Run the upgrade steps. Remove the restriction

Set-MailboxServer -Identity EXCH1 -DatabaseCopyAutoActivationPolicy Unrestricted


Microsoft Teams PowerShell

Poweshell is simply amazing , it saved more than 3000 hours in my life. It made the impossible possible to work with Microsoft Products seamlessly. when it comes to managing large data sets or user base. It makes life simply easy. Microsoft Teams dynamic membership can happen only on the team level with Azure P1 license . But if you wish to have channels with large user base. PowerShell is your savior.  Otherwise your fingers are going to pain clicking it.  i have made as simple as possible using the existing cmdlets . if you wish to add any additional cmdlets please feel free to leave on comments.

Installing Teams Module

Find-Module MicrosoftTeams
Find-Module MicrosoftTeams | Install-Module

image

Using pre-Release Modules _ For Example Some Commands Available are only at pre-release

Before using pre-release modules make sure PowerShellGet Runs the latest version

Install-Module PowerShellGet -RequiredVersion 2.2.4.1

To use pre-release version – (Get-TeamChannelUser is available only on pre release version for now)

Install-Module -Name MicrosoftTeams -RequiredVersion 1.1.3-preview -AllowPrerelease

To use Production version –
Install-Module MicrosoftTeams –RequiredVersion 1.1.4

Production Versions – https://www.powershellgallery.com/packages/MicrosoftTeams

Connect-MicrosoftTeams

image

To List all Teams

Get-Team

image

To Get Channels within Team

Get-Team -DisplayName "Information Technology" | Get-TeamChannel

image

1. Copy Channel Members to another Channel

You can collect the GroupID of the team from the previous command

Get-TeamChannelUser -GroupId "50e33be9-GROUPIDOFTHETEAM4706544ab1a4" -DisplayName "ChannelName"

Now Save it to a Variable from Channel1

$SaveAllMembers = Get-TeamChannelUser -GroupId "50e33be9-GROUPIDOFTHETEAM4706544ab1a4" -DisplayName "ChannelName"

image

Now Add Same Set of Members to Channel2

$saveallmembers | ForEach-Object{Add-TeamChannelUser -GroupId "50e33be9GROUPIDOFTHETEAM706544ab1a4" -DisplayName "CHANNEL NAME" -User $_.user}

image

Removing Specific Channel user

Remove-TeamChannelUser -GroupId "50e33be9GROUPIDOFTHETEAM-4706544ab1a4" -DisplayName "Channel name" –User "zulqar@localhost"

image

Export Channel Members to CSV –

Get-TeamChannelUser -GroupId "50e33be9GROUPIDOFTHETEAM-4706544ab1a4" -DisplayName "Channel Name" | Select-Object User | Export-Csv TeamsChannelMembers.csv

image

Removing Members from Channels using CSV

Import-Csv .\TeamsChannelMembers.csv
Import-Csv .\TeamsChannelMembers.csv | ForEach-Object{Remove-TeamChannelUser -GroupId "50e33be9-GROUPIDOFTHETEAM-4706544ab1a4" -DisplayName "SD - NET" -User $_.User}

image

Adding Channel Members using CSV

Import-Csv .\TeamsChannelMembers.csv | ForEach-Object{Add-TeamChannelUser -GroupId "50e33be9GROUPIDOFTHETEAM-4706544ab1a4" -DisplayName "Channel Name" -User $_.User}

Adding Team Members using CSV

Import-Csv .\TeamsMembers.csv | ForEach-Object{Add-TeamUser -GroupId "000faf41-7fa8-0000-ac2d-2c180000af77" -User $_.User}}

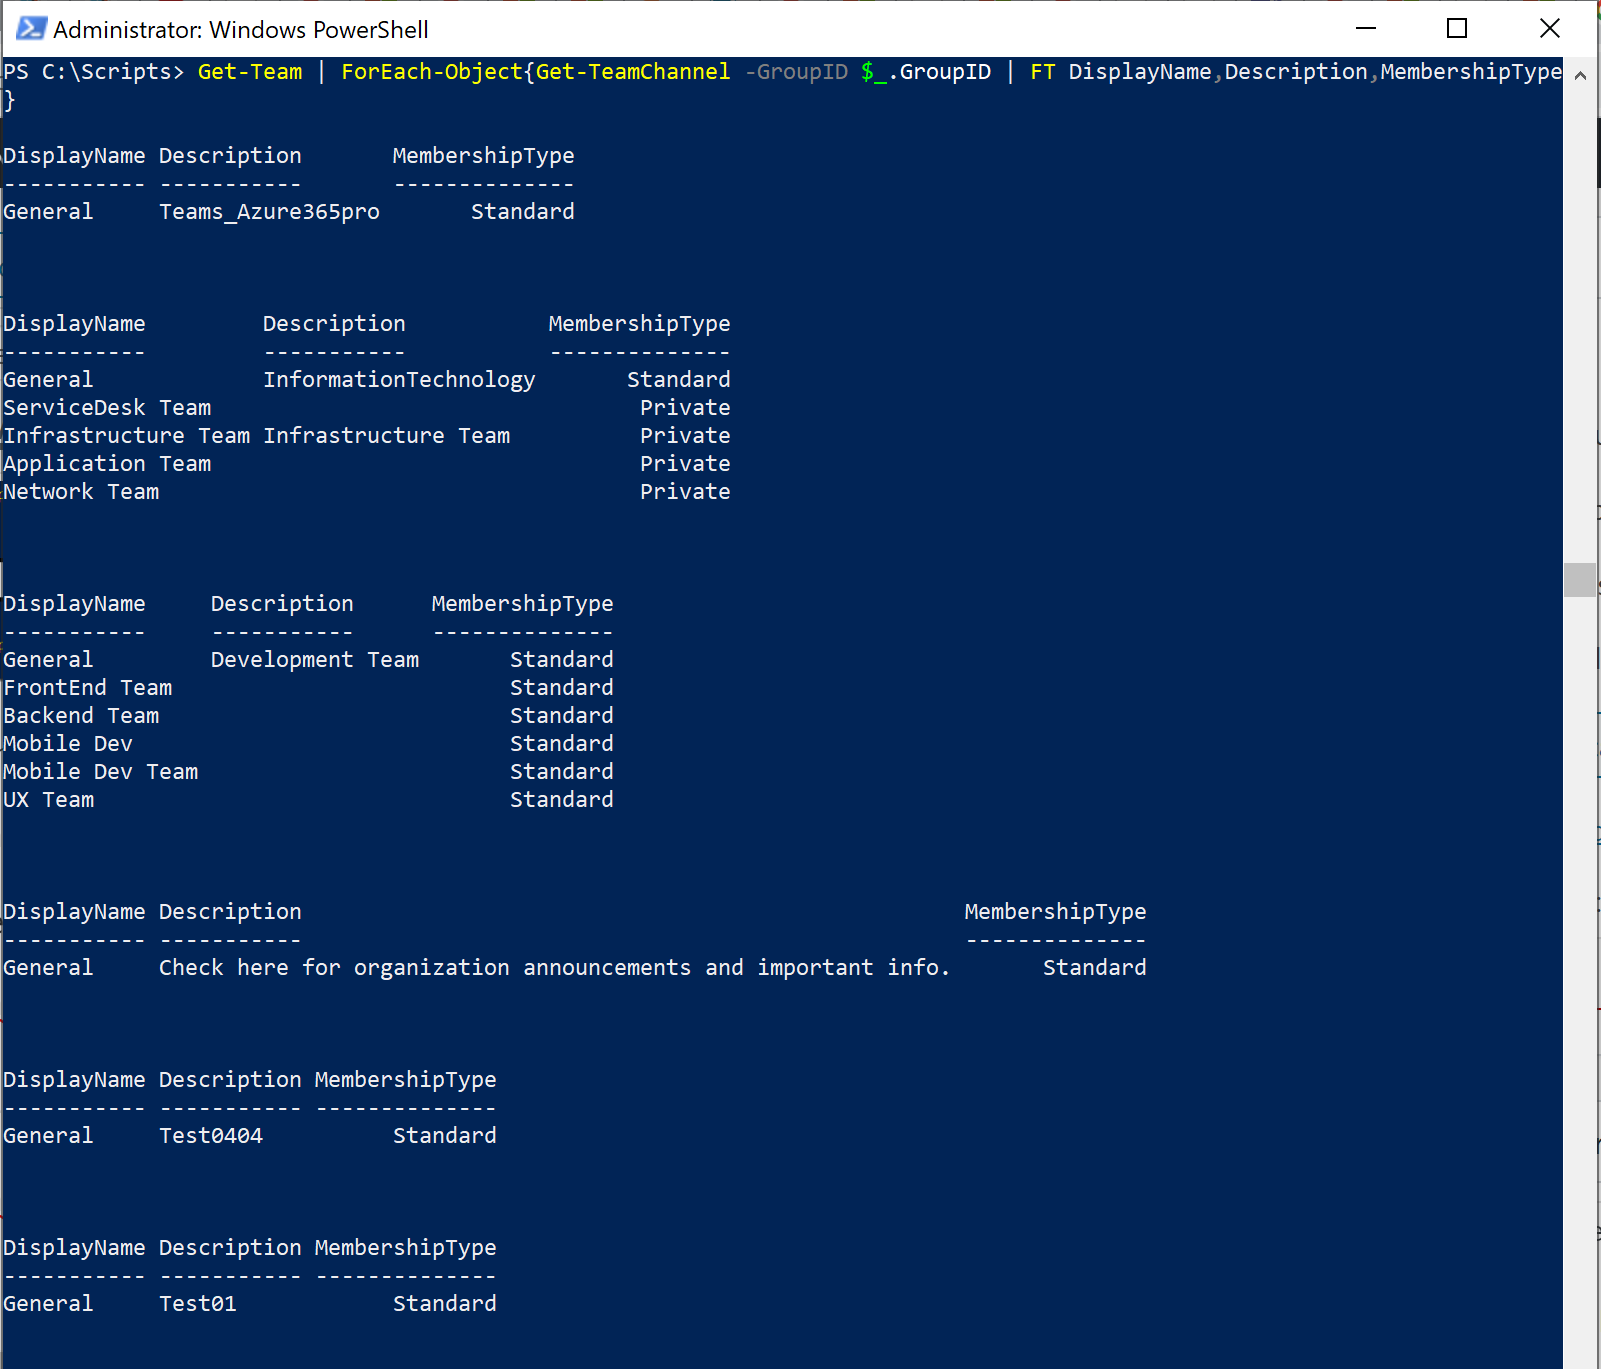
To Display All Teams and Channels

Get-Team | ForEach-Object{Get-TeamChannel -GroupID $_.GroupID | FT DisplayName,Description,MembershipType}


Good to have – To Use Different Repositories –

Register-PSRepository –Name '_TempTestRepo' –SourceLocation 'https://www.poshtestgallery.com'

To List Registered Repositories –

Get-PSRepository | Fl 
Microsoft Remove - Pre-Release Versions from below Location - https://www.poshtestgallery.com/packages/MicrosoftTeams

If you hit below error - Update PowershellGet and Restart Powershell
PS C:\Scripts> Install-Module -Name MicrosoftTeams -RequiredVersion 1.1.3-preview -AllowPrerelease
Install-Module : Cannot process argument transformation on parameter 'RequiredVersion'. Cannot convert value
"1.1.3-preview" to type "System.Version". Error: "Input string was not in a correct format."
At line:1 char:54
+ ... ll-Module -Name MicrosoftTeams -RequiredVersion 1.1.3-preview -AllowP ...
+ CategoryInfo          : InvalidData: (:) [Install-Module], ParameterBindingArgumentTransformationException
+ FullyQualifiedErrorId : ParameterArgumentTransformationError,Install-Module

Exchange Server couldn’t find Enterprise Organization Container

Customers who did cutover or migrated their mailboxes to the cloud removed all the exchange servers environment then they think about bringing a new exchange server later point of time may end up with this error and there are some left over objects in the Active Directory environment. They quickest solution we found is to check which exchange server version was there in the environment lastly. Run PrepareAD with that setup once and re run the exchange server 2016 setup. Then the setup worked seamlessly. In my case the last exchange server was 2010. so ran preparead with exchange 2010

First Ran Exchange Server 2016 _ Error _

Couldn’t find the Enterprise Organization container.

clip_image001

Error:
A reboot from a previous installation is pending. Please restart the system and then rerun Setup.
For more information, visit: http://technet.microsoft.com/library(EXCHG.150)/ms.exch.setupreadiness.RebootPending.aspx

Error:
Setup encountered a problem while validating the state of Active Directory: Couldn’t find the Enterprise Organization container.  See the Exchange setup log for more information on this error.
For more information, visit: http://technet.microsoft.com/library(EXCHG.150)/ms.exch.setupreadiness.AdInitErrorRule.aspx

Warning:
Setup will prepare the organization for Exchange Server 2016 by using ‘Setup /PrepareAD’. No Exchange Server 2013 roles have been detected in this topology. After this operation, you will not be able to install any Exchange Server 2013 roles.
For more information, visit: https://docs.microsoft.com/Exchange/plan-and-deploy/deployment-ref/readiness-checks?view=exchserver-2016

Warning:
Setup will prepare the organization for Exchange Server 2016 by using ‘Setup /PrepareAD’. No Exchange Server 2010 roles have been detected in this topology. After this operation, you will not be able to install any Exchange Server 2010 roles.
For more information, visit: https://docs.microsoft.com/Exchange/plan-and-deploy/deployment-ref/readiness-checks?view=exchserver-2016

image

A reboot from a previous installation is pending. Please restart the system and rerun setup or clear the below attribute and continue

Took backup of the key and Cleared attribute _ PendingFileRenameOperations instead of rebooting the server.

HKEY_LOCAL_MACHINE\SYSTEM\CurrentControlSet\Control\Session Manager\PendingFileRenameOperations

image

With Exchange 2010 SP3 Setup

.\setup.com /PrepareAD /OrganizationName:”First Organization”

image

Ran Exchange 2016 Setup it worked seamlessly.

image

Designing Dynamic Teams with Private Channels

A group of people in a large team wants a focused space to collaborate without having to create a separate team. It reduces the number of teams created and slice them into channels. Also private channels is not visible to anyone unless you are a member of it or you own it.

Firstly we wanted to limit the users who can create teams. So we created a security group and only members of the specified group can create Teams.  Before getting into Private channels lets see how to create dynamic membership to Teams. See how you can create Office 365 Groups with Dynamic membership now Create a similar Office 365 Group with Dynamic Membership (Requires Azure Premium P1). Microsoft 365 Business Premium customers have Azure Premium P1 in the package now as well.

https://aad.portal.azure.com/


image

If you don’t have Azure Premium P1 license or any equivalent license , you can see membership type is greyed out like below.

image

Once the Group is Created . if you have P1 license you can create Dynamic Membership rules based on department in my case.

image

Now you use teams client to create from Office 365 Group.

Choose Create from

image

Choose Office 365 Group

image

Choose Information Technology (The Office 365 group we created earlier) and click on create

image

Now the membership of the teams is dynamic using Department Attribute and new members are added automatically and members who are changing departments will be removed from the Team instantly as the department attribute changes. “This Team has membership settings that prevent you from adding or removing members” which shows membership is managed on the azure active directory which gives greater control when you manager large teams.

image

  • The Advantages of this is One or Many Owners of the Department can create as many channels they want but they have to reach out if they wish to create a team across departments as we have limited teams creators based on my previous post.
  • Owners of the Teams and Teams Creators (Based on a Group) can be managed by Azure Active Directory Admin Center. https://aad.portal.azure.com/

image

Owners of the Teams can be managed from Teams Admin Center as well  https://admin.teams.microsoft.com/ As you can see below you can add a owner or promote a member to be a owner anytime where he gets access to create channels within teams. (As we have limited members to create unlimited channels)

image

  • Channel owner cannot add members out of his team (In my case user cannot add out of information technology team) because membership is limited to based on department.

Now in the Channel updates like below , Team can receive updates instantly when users change departments in my case or any new joiners. (When department attribute changes in On-premises – Azure AD Connect Synchronizes to the cloud – Office 365 Groups takes care of the seamless dynamic membership. ) As this moment teams cannot hide these notifications.

image

As per the requirement from teams admin center.

Turned off – Adding New Channels and editing existing ones

Turned off – Adding,Editing and removing tabs

Turned off – Adding,Editing and removing Connectors

Turned off – Adding,editing and removing apps

image

Now

Disabled – Allow members to create and update channels.

Disabled – Allow members to delete and restore channels.

image

Now Added Channels as per the Structure

image

Good Part of Private channels is it shows only when you are member or owner of the channel.So instead of creating multiple teams we can use channels which is a perfect replacements of whats app groups

when infrastructure team member logs in it shows like below

image

For Application Team member

image

I couldn’t think of using teams without private channels. its serves a lot of use cases . We are limiting few things so that we don’t end up 100’s of office 365 groups in the backend. Freedom of creating teams and channels in a controlled manner it will help us govern on what’s happening. Group expiration and naming policy is the next level of optimization. For small business I don’t think of limiting anything if you are 200 user base. if you are 2000 userbase or above. Controlling these things definitely helps you on the audit day.  As office 365 groups used provide permissions for documents and so on.

Few organizations have went on full fledge without group naming policy or group expiration . now they ended up with 100’s of groups with no clue where they are mapped to. if you are green field environment take some time to plan it. Every environment is different. So plan accordingly.

Implementing DKIM in IronPort

Lets see how to Implement DKIM Signing using IronPort. You need to enable signing for all domains. In my case i had to do it one by one. So that I can have smooth implementation of DKIM and DMARC

I have a lot of business units with a lot of domains. We really don’t want to have different signing keys for each and we want to share the keys with the primary domain. Other wise you can keep creating signing keys and assign them on each domain . Still its going to work the same.To Share the same domain keys you need to create a CNAME of every other domain to the primary domain.

see Implementing SPF DKIM DMARC BIMI Records for more details. Lets see how to generate other records before getting into the article.

Mail Policies – Signing Keys
Click Add Key
Using 1024 Bit key length

Submit and Commit. It will not affect anything as we haven’t created signing profile yet.

image

Go to mail Policies – Signing Profiles (Don’t commit anything as it may bring your mail flow down if your Domain Key (DKIM) dns is not propagated yet it happens when your RELAYED connector signing is Turned ON already)
In the Domain Signing Profiles section, click Add Profile

Make sure

  • DKIM Signing of System Generate Messages – ON
  • Use From header for DKIM Signing – ON
image

Enter a name for the signing profile
Select DKIM as the Domain Key Type
Enter the domain name
Use s1 as the selector (Always use selectors good for key rotation)
Select relaxed for the header canonicalization (This allows for variations in whitespace)
Select relaxed for the body canonicalization (This allows for variations in whitespace)
Select the signing key
Header to Sign – Standard . This configures the gateway to only sign the
following headers, so that DKIM will still pass when other mail systems add other, non-standard
headers in transit (e.g. debugging headers)

Specify Whole Body Implied for body signing
Uncheck all tags to include in the signature
Leave the users field blank
Click Submit

image

Now for the primary domain. My TXT Record shows like below.

s1._domainkey.azure365pro.com TXT v=DKIM1; k=rsa; p=MIGfMAGGCSqGSIb3DQEBAQUAA4GNADCBiQKBgQC9ymGGGGf4tkKeTYO3OakAdgR94QcuvYhFqIvC7qngxG32c71dX9kdGWGGGG0d7zfL0ifFdhtCsnhdokOv5PLLTQYl3cU0cwFSMP1iv+7SJAxXhD/xNs1Yd/VWm6vgO7GnGjxQ0xFFicj6D8+2CEcONkZm0mWwokSBZ5/b2cFBwIDAQAB

For my other domains pointing to root domain –

 s1._domainkey.careexchange.in CNAME s1._domainkey.azure365pro.com 
image

Create a Signing Profile

DKIM Signing of System Generated Messages: ON

Use From Header for DKIM Signing: ON

image

I have always leave the DNS records created for 1 to 2 days and start signing the domains on the live environment.

Click on Test to verify – Published public key matches domain profile.

image

Enable signing for outgoing mail ( It will sign only for the domains configured in the signing profiles other domains will stay without signing(unaffected))

1. Go to Mail Policies> Mail Flow Policies
2. Click on the RELAYED (Outgoing) mail flow policy (or create it if it does not exist)
3. In the Security Features section, set Domain Keys/DKIM Signing to On
4. Click Submit

image

Enable signing for bounce and delay messages

1. Go to Network> Bounce Profiles
2. Edit the bounce profile associated with the public listener where you will send signed outbound
messages (e.g. Default)
3. Set Enable Use Domain Key Signing for Bounce and Delay Messages to Yes
4. Click Submit

image
× How can I help you?