40 C
Dubai
Tuesday, April 29, 2025
Home Blog Page 36

Moving Databases and logs in Exchange Server

Moving Mailbox Databases – (Needs DownTime)

Preferred to do only for small databases as if the database is large the down time is huge you may need to move those files manually using adsiedit.msc which are not covered on this post.

Move-DatabasePath Database01 -EdbFilePath "D:\Program Files\Microsoft\Exchange Server\V15\Mailbox\Database01\Database01.edb" -LogFolderPath "D:\Program Files\Microsoft\Exchange Server\V15\Mailbox\Database01"

1.png

Moving Transport Databases – (Needs DownTime – Mailflow)

Lets utilized a inbuilt script .\Move-TransportDatabase.ps1, Move the Exchange management shell to use this location

cd "C:\Program Files\Microsoft\Exchange Server\V15\Scripts"
.\Move-TransportDatabase.ps1 -QueueDatabaseLoggingPath "D:\Program Files\Microsoft\Exchange Server\V15\TransportRoles\data\Queue" -IPFilterDatabasePath "D:\Program Files\Microsoft\Exchange Server\V15\TransportRoles\data\IpFilter" -IPFilterDatabaseLoggingPath "D:\Program Files\Microsoft\Exchange Server\V15\TransportRoles\data\IpFilter" -TemporaryStoragePath "D:\Program Files\Microsoft\Exchange Server\V15\TransportRoles\data\Temp"

2.png

3.png

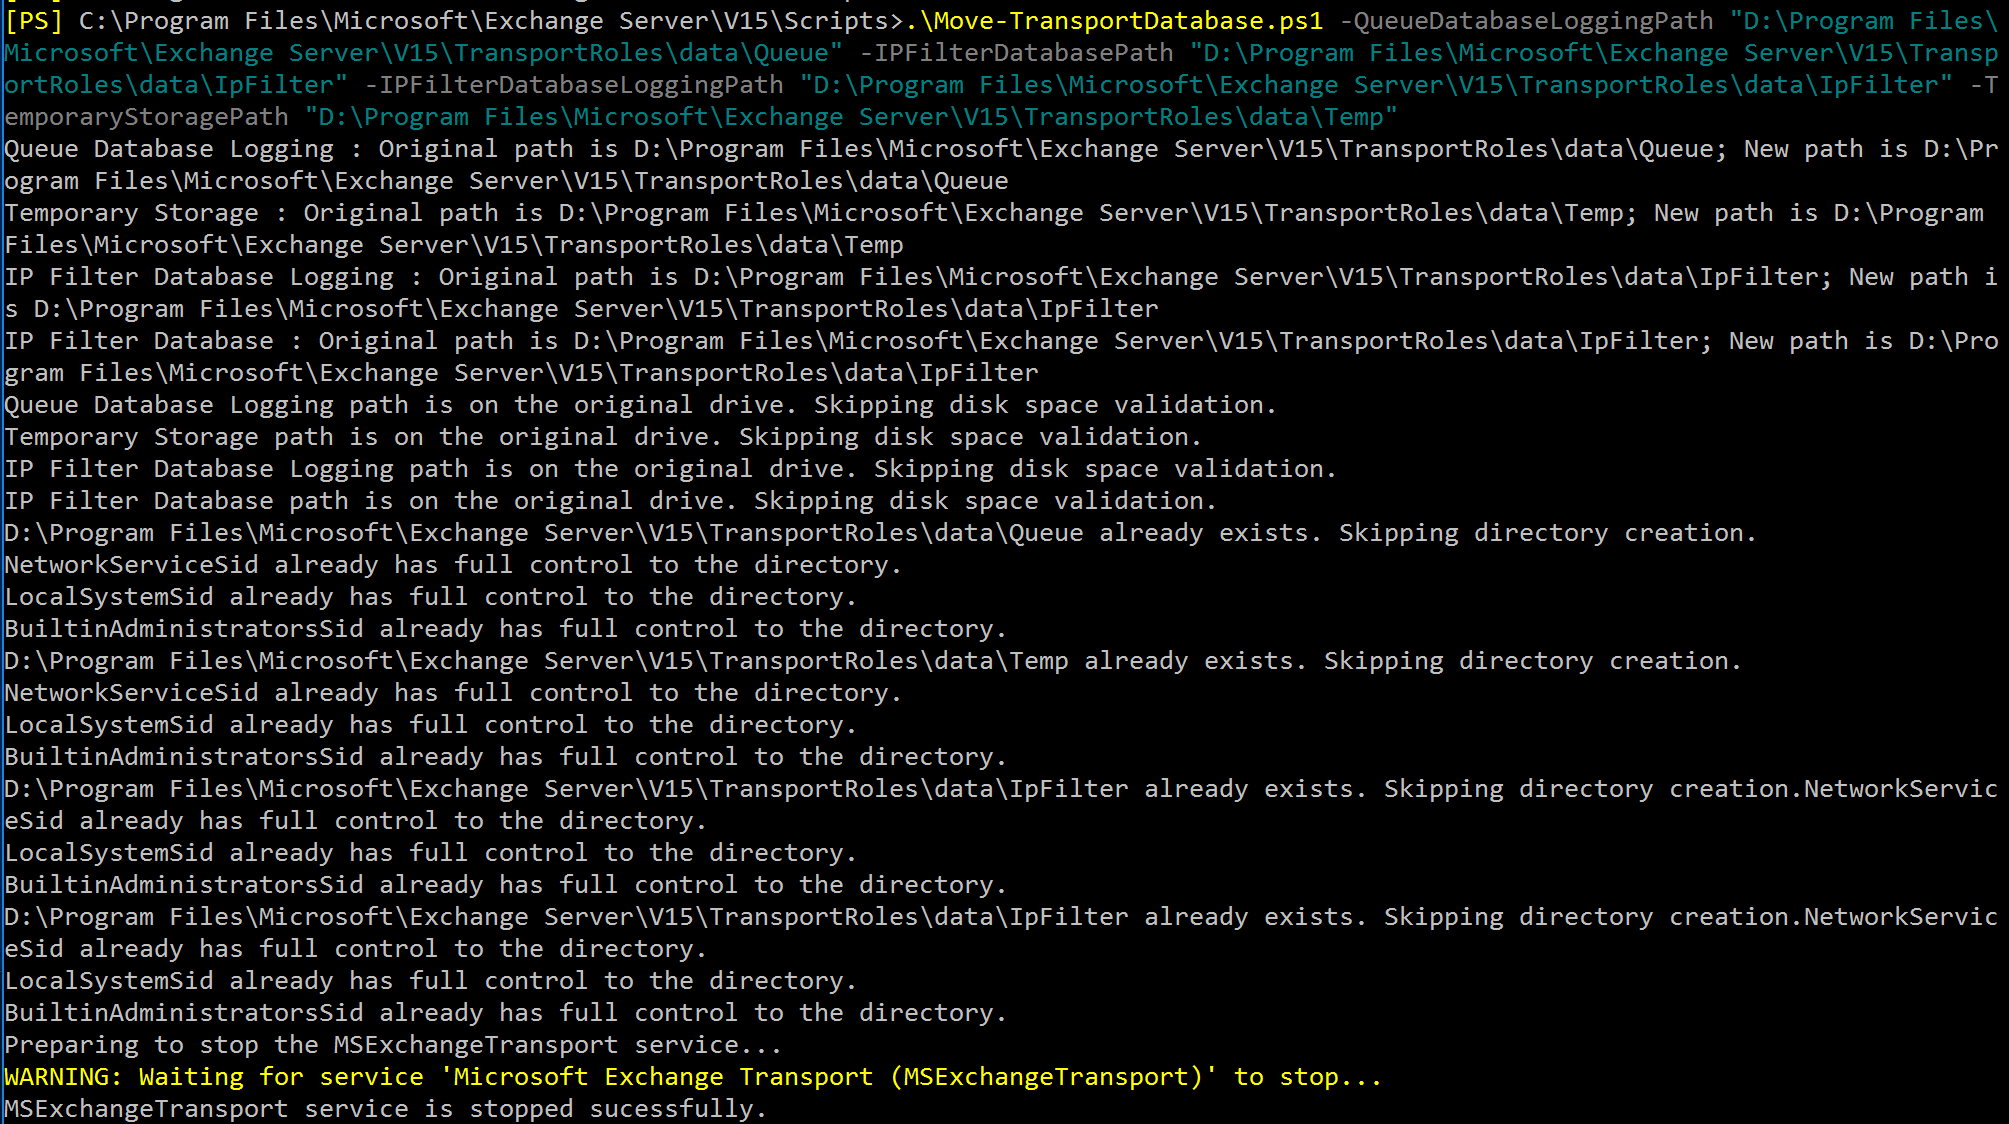
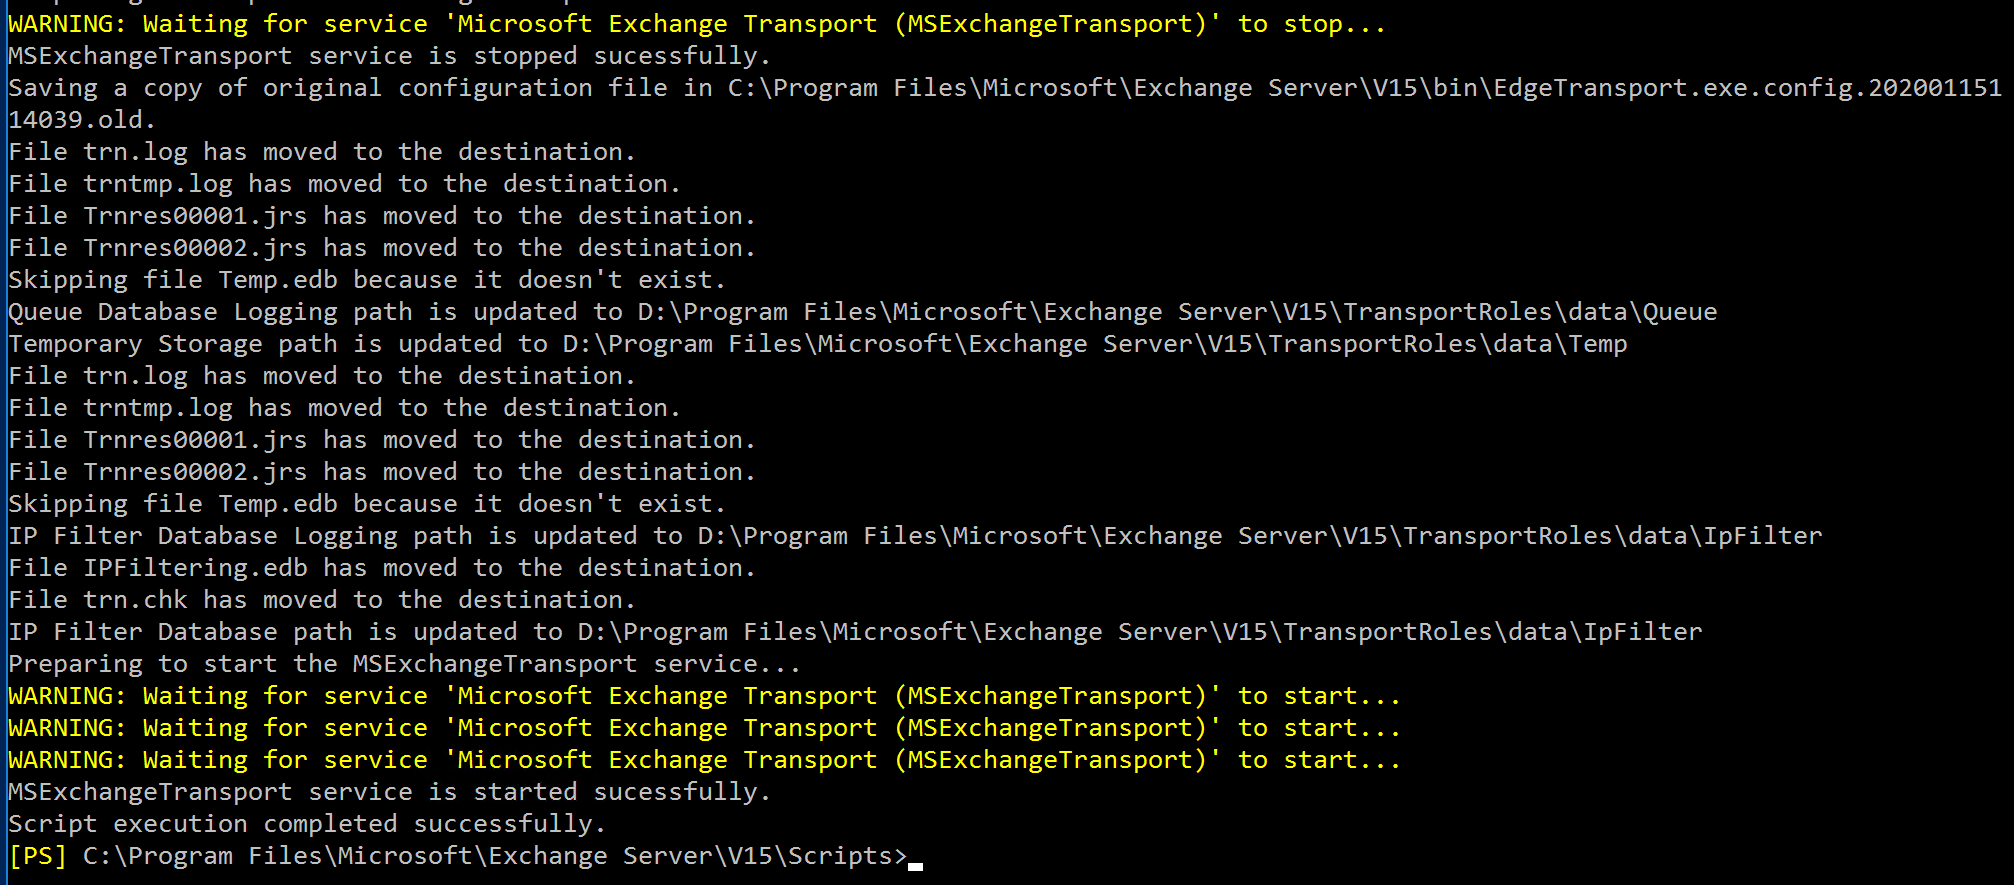
Now you can see its moved successfully.

Lets see how to move these logs locations as well.

To Check Existing locations


ReceiveProtocolLogPath : C:\Program Files\Microsoft\Exchange Server\V15\TransportRoles\Logs\Hub\ProtocolLog\SmtpReceive
SendProtocolLogPath : C:\Program Files\Microsoft\Exchange Server\V15\TransportRoles\Logs\Hub\ProtocolLog\SmtpSend
MessageTrackingLogPath : C:\Program Files\Microsoft\Exchange Server\V15\TransportRoles\Logs\MessageTracking
RoutingTableLogPath : C:\Program Files\Microsoft\Exchange Server\V15\TransportRoles\Logs\Hub\Routing
PipelineTracingPath : C:\Program Files\Microsoft\Exchange Server\V15\TransportRoles\Logs\Hub\PipelineTracing
ConnectivityLogPath : C:\Program Files\Microsoft\Exchange Server\V15\TransportRoles\Logs\Hub\Connectivity

5.png

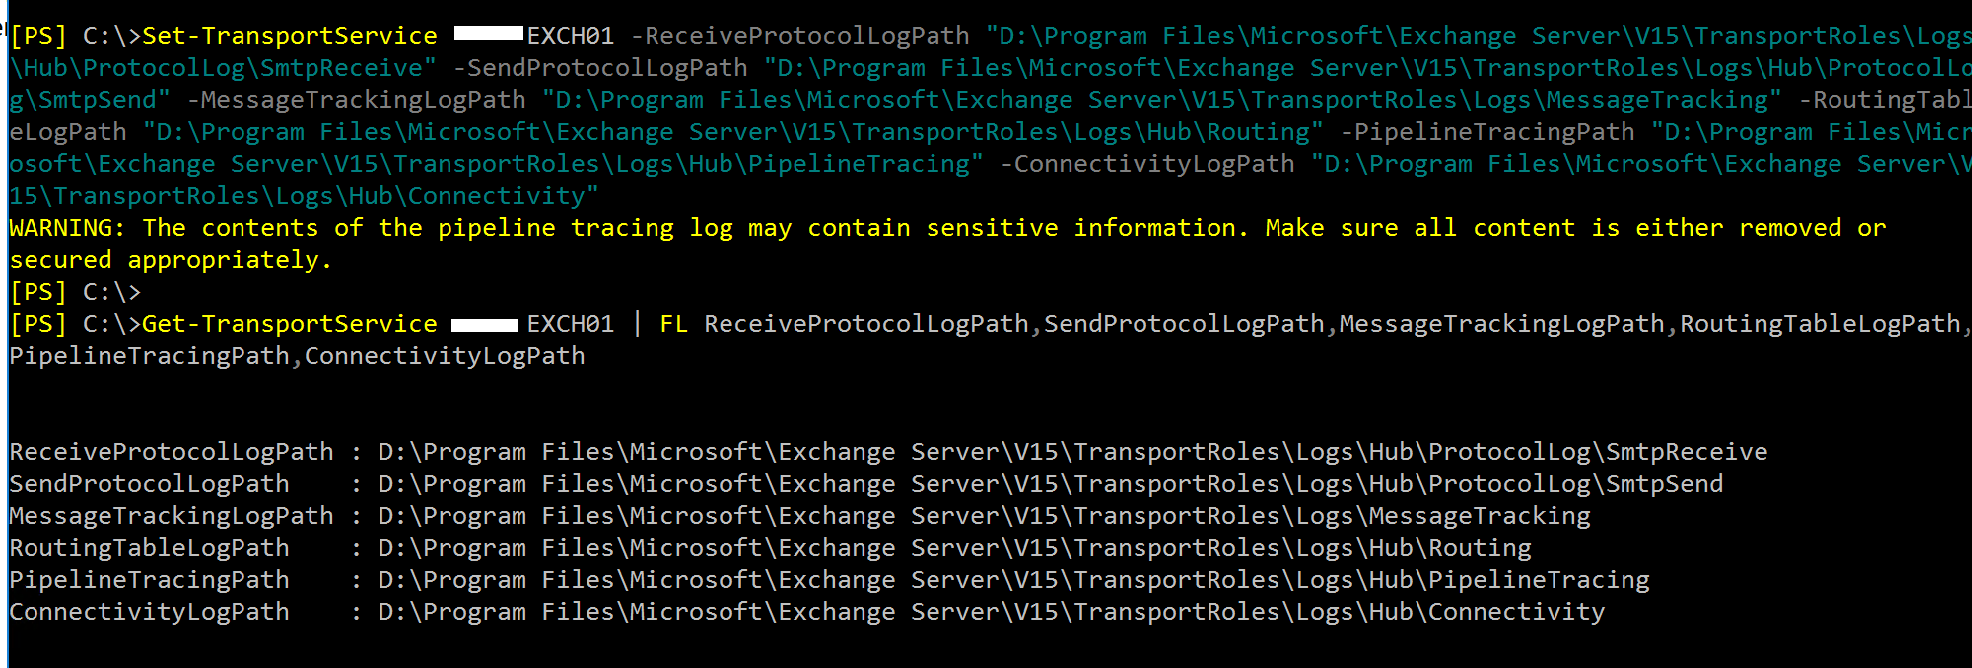
Now lets set them to new location

Set-TransportService DUCV-EXCH01 -ReceiveProtocolLogPath "D:\Program Files\Microsoft\Exchange Server\V15\TransportRoles\Logs\Hub\ProtocolLog\SmtpReceive" -SendProtocolLogPath "D:\Program Files\Microsoft\Exchange Server\V15\TransportRoles\Logs\Hub\ProtocolLog\SmtpSend" -MessageTrackingLogPath "D:\Program Files\Microsoft\Exchange Server\V15\TransportRoles\Logs\MessageTracking" -RoutingTableLogPath "D:\Program Files\Microsoft\Exchange Server\V15\TransportRoles\Logs\Hub\Routing" -PipelineTracingPath "D:\Program Files\Microsoft\Exchange Server\V15\TransportRoles\Logs\Hub\PipelineTracing" -ConnectivityLogPath "D:\Program Files\Microsoft\Exchange Server\V15\TransportRoles\Logs\Hub\Connectivity"

7.png

Good to know –

Quick C drive cleanup of exchange servers log location


\\EXCH1.azure365pro.com\c$\Program Files\Microsoft\Exchange Server\V15\Logging\HttpProxy\Mapi
\\EXCH1.azure365pro.com\c$\inetpub\logs\LogFiles\W3SVC1
\\EXCH1.azure365pro.com\c$\inetpub\logs\LogFiles\W3SVC2
\\EXCH1.azure365pro.com\c$\Program Files\Microsoft\Exchange Server\V15\Logging\NotificationBroker\Client
\\EXCH1.azure365pro.com\c$\Program Files\Microsoft\Exchange Server\V15\Logging\MapiHttp\Mailbox
\\EXCH1.azure365pro.com\c$\Program Files\Microsoft\Exchange Server\V15\Logging\HttpProxy\Eas


Migrating Physical to Virtual IronPort Appliances

Login to Putty _ Run Version

Get the serial numbers and Add Licenses if its not added in the manage licenes console.

image

Choose the Appliance which you want to migrate and click on licenses _ move licenses _ Share Licenses _ Get activation Code

image

Choose Product _ Iron Port Product – SW Bundles

Enter the last part of the serial number and choose destination appliance type Virtual

Leave the target appliance number empty and enter the email address and Click on request code.

image

Choose  licenses _ move licenses _ Share Licenses _ Use activation Code _ Enter the received activation code.

image

Click on Get License _

image

Once you receive the license . Download the same version of the virtual appliance and deploy the OVF Template with Thin Provision in my case.

there are different variety of appliances based on sizes . you can choose the appliance based on the user base. it should not affect your license .as your license is on user and feature based and not on the appliance sizing.

I had to download 11.0.3 as it was C170 Appliance.

Default

username admin

password  ironport

run interfaceconfig to get the ips configured

image

Configure IPs

image

image

Once interface is configured you putty to it using default cred and run loadlicense copy the license from the xml file you received.

image

Remove the appliance from the cluster using clusterconfig _ removemachine

and then take the copy of config file

image

Login to the existing hardware appliance _ system configuration _ Download the configuration in plain text

image

Take a copy of Hardware Config File  – 2 Network

Take a copy of Virtual Config File – 3 Network

Copy pasted this part and replaced from hardware configure file and imported to the virtual appliance.

image

Trying to upgrade and make it to the same version of the cluster.

image

Error:  Failure downloading upgrade list: received invalid update manifest response
Check where the server is pointing to for pulling the list of updates:

Run the following commands via the CLI:
updateconfig
dynamichost
update-manifests.sco.cisco.com:443
commit

While joining back to cluster

image

logconfig _ hostkeyconfig _ delete the keys Try again.

Do the same or the all the physical Iron port appliances

Do the same for Centralized management appliance if your using the same IP and Name and click on submit to verify and add the appliances again. if you wish to upgrade the virtual appliances you need to remove the hardware appliances from the cluster as the virtual appliances can update to the latest version but not the old hardware (All versions need to be same in ironport cluster)

Auto Assign Office 365 Licenses based on Department

Create a new Security group in Azure Active Directory

image

Required _ Azure AD Premium P1 if you don’t have one Membership Type will be greyed like below.

image

Choose Dynamic User

Click on Add Dynamic Query

image

department Equals Information Technology

image

Choose Groups _ Click on the group _ Choose Licenses

image

For Example _ disabling yammer and Skype for business online

image

Now Auto provisioning of License is Active

image

Office 365 Hybrid Configuration Wizard Step by Step

Lets see how to do Office 365 Hybrid Configuration Wizard Step by Step with Test Data Migration and see how to Manage Endpoints. Quick Office 365 Hybrid Migration guide step by step.

Making sure Exchange Server Running Latest CUs in my Case they are running Exchange Servers running latest Cumulative Updates to have stable hybrid.

image

Make sure MRS Proxy Endpoint is Enabled on Internet Facing Client Access Server. If its load balanced. you need to enabled it on all CAS servers

Use IE – Internet Explorer

Login to Exchange Control Panel – On Premises

Hybrid –  Enable

image

412 Cookies are Disabled

Make sure ECP , Office 365 Urls are added to Trusted Sites.

image

Download And Run the Hybrid Setup

image

Choose Next

clip_image001

Choose the Optimal Exchange Server

image

Or Specify the Exchange Client Access Server Manually. (Internet Facing Client Access Server)

image

uncheck – Use windows Credentials and enter it manually.

Enter On-Premises Credentials

Enter Office365 admin Creds.

image

image

Checks Local and Remote Connectivity.

image

Choose Full Hybrid Configuration.

image

Choose Configure my Client Access and mailbox servers for Secure Mail Transport (Typical)

Securing Email flow Using TLS transport layer certificates with On-Prem And Office 365 Servers.

image

Choose Servers to coexist mail between Office 365 and On-premises.

in my case . Both

image

Certificate Used are not there in all servers.

In my case . Both sites are in different countries. using different SSL Certs.

Exchange the certs between them by exporting as .pfx and import them(you can use Exchange Control Panel to export/import certs). Clicked Search Again. Chosen the certificate

image

Choose the Certificate for TLS (Transport Layer Security).

image

Enter the FQDN which has port 25 opened.

image

Its done.

Make sure 443 is opened and its the internet facing Client Access server.

image

Error :

2016.11.16 08:59:47.842 WARNING [Functionality=RunWorkflow]

HCW8078 Migration Endpoint could not be created.

Microsoft.Exchange.Migration.MigrationServerConnectionFailedException

The connection to the server ‘outlook.careexchange.in could not be completed.

Microsoft.Exchange.MailboxReplicationService.RemoteTransientException

The call to ‘https://outlook.careexchange.in/EWS/mrsproxy.svc’ failed. Error details: Access is denied..

Microsoft.Exchange.MailboxReplicationService.RemotePermanentException

Access is denied.

Solution – Once MRS Proxy is accessible

  • Firewall Ports 443
  • MRS proxy not enabled in Web services Virtual Directory.

Endpoints can be created manually using the office 365 console.

Now lets see how to Create a Endpoint and do a test migration

Office 365 Admin Console – Data Migration – Exchange

image

Choose Settings to Get your First Migration Endpoint Created.

Once Migration end point is Created

Choose Mailboxes – Assign License to mailbox and Start Migration

image

Once test mailbox is created.

Sample End Point Default Settings

image

Choose Migration to see status.

Choose Migration Endpoints to Manage Endpoints

image

Manage Migration Endpoints –

image

Co-existence Connectors can be Customized here below .

image

See also –

Office 365 Hybrid Duplicate Mailboxes

Adding Domain in Existing Hybrid Configuration

Hardening Azure AD Connect Service Account

There are some scenarios where user used “Use Existing AD Account” and used a domain admin or Enterprise admin account where this account doesn’t require high privilege permissions.Lets see how to harden them by removing the enterprise admin or domain admin permission and provided only limited permissions only.

image

Once you remove Domain Admin Account or Enterprise Admin of this Service account. you can see AD Sync will fail because of permission issues.

image

Now lets see how to Add Required AD Sync permissions only for the service account.

Import the required Module  _ ADSyncConfig.psm1

Import-Module "C:\Program Files\Microsoft Azure Active Directory Connect\AdSyncConfig\AdSyncConfig.psm1"

Verify the module is properly loaded or not.

 Get-Command -Module AdSyncConfig 
image

Now Add the ADSyncPasswordHashSyncPermissions for the service account. You can always use –ADConnectorAccountDomain if you have multiple Azure AD Account Domains.

 Set-ADSyncPasswordHashSyncPermissions -ADConnectorAccountDN  'ADAccountDN'
image

You can see its skipping AdminSDFolder by Default. So leave as it is.

image

Now Add the Exchange Hybrid Permissions if you are planning to have Exchange Hybrid.

 Set-ADSyncExchangeHybridPermissions -ADConnectorAccountDN  'ADAccountDN'
image

Provide ADSyncMsDsConsistencyGuidPermissions for the service account.

 Set-ADSyncMsDsConsistencyGuidPermissions -ADConnectorAccountDN  'ADAccountDN'
image

This is a ideal scenario. which proper permission inheritance without password write back.

Refer below Microsoft Article if you wish to tighten the permissions even more further like disabling inheritance on the object and add required permissions only or add password write back permissions for the object like

 Set-ADSyncPasswordWritebackPermissions –ADConnectorAccountDN  'ADAccountDN'

https://docs.microsoft.com/en-us/azure/active-directory/hybrid/how-to-connect-configure-ad-ds-connector-account


Uninstalling Exchange Server 2010

Uninstalling Legacy Exchange 2010 Servers

Post migration to Exchange 2013 or later. Lets see how to remove exchange 2010 Server.

1.Verify No Mailboxes Exist on Exchange 2010 Server

2.Check for Arbitration mailboxes on Exchange 2010 Server and move them to Exchange 2013

3. Make sure all the databases are removed.

4. Remove the Exchange 2010 Offline address book .

5.Verify any applications are used for Email relaying with Exchange 2010 Server in Receive Connectors

6.You need to remove the servers from the send connectors (Source Transport Servers).

7.Removing Public Folder Databases using ADSIEDIT.msc.

8.Disabling Third Party Services

9.Make Sure DAG membership is removed

1.Verify No Mailboxes Exist on Exchange 2010 Server

Get-Mailbox -Server "ServerName"

It should return Empty.

image

You should move the discovery search mailbox as well

Sample Commands –

Moving all the mailboxes from Exchange server 2010 to Exchange Server 2013

Get-Mailbox -Server "Exch2010" | New-MoveRequest -TargetDatabase "Mailboxdatabase2013"

Moving Mailboxes from a specific database from Exchange server 2010 to Exchange Server 2013

Get-Mailbox -Database "Mailboxdatabase2010" | New-MoveRequest -TargetDatabase "Mailboxdatabase2013"

2.Check for Arbitration mailboxes on Exchange 2010 Server and move them

Get-Mailbox -Arbitration -Server "Exch2010"

.

image

.

Get-Mailbox -Arbitration -Server "Exch2010" | New-MoveRequest -TargetDatabase "mailboxdatabase2013"

.

image

3. Make sure all the databases are removed.

image

4. Remove the Exchange 2010 Offline address book .

image

6.You need to remove the servers from the send connectors (Source Transport Servers).

Make sure we don’t have any legacy Exchange servers on the source transport servers of all send connectors.


image

7.Removing Public Folder Databases using ADSIEDIT.msc (Manual Removal may have adverse impacts).

As you may already know . Public Folder Database is no more.
If you are using public folders in your Exchange organization and decided to get rid of it.

Make sure

Removing all Public folder Data
Ensure OAB distribution is set to web and not using any public folders.
Ensure all clients are Outlook 2007 or later
When I attempt to remove the public folder database I receive this error.

The public folder database cannot be deleted
The public folder database ‘PFDB’ cannot be deleted.

image

Failed Error:Public folder database “PFDB” is the default public folder database for the following mailbox database(s):

Before deleting the public folder database, assign a new default public folder database to the mailbox database(s).

Connect to the Configuration naming context with ADSIEdit

Navigate to the container that holds the Exchange databases.

For Exchange 2010

CN=Services -> CN=Microsoft Exchange -> CN=organization name -> CN=Administrative Groups -> CN=Exchange Administrative Group (FYDIBOHF23SPDLT) -> CN=Databases.

image

Right-click the mailbox database you want to remove the default public folder database from and choose Properties.

Scroll down until you find the msExchHomePublicMDB attribute. Highlight it and then click Edit.

image

Click the Clear button so that the value changes to “not set”.

Click OK

You need to wait for active directory replication.  When you try to remove the public folder database again you should find that it now removes without error.

Public folder database successfully removed

If you still end up with PF replica error . you can remove the Public Folder Database Object from ADSIEDIT.MSC

CN=Services -> CN=Microsoft Exchange -> CN=organization name -> CN=Administrative Groups -> CN=Exchange Administrative Group (FYDIBOHF23SPDLT) -> CN=Databases.

Right-click the Public Folder mailbox database

Delete (Manual Removal may have adverse impacts at your risk)

8.Disabling Third Party Services

Like Scan mail and Backupexec it may interrupt the uninstallation process . Start run services.msc stop the services and set to disabled.

  • bemote (Backup Exec Service)
  • SMEX_Master SMEX_CmAgentHost.exe (Scan mail for Exchange )

9.Make Sure DAG membership is removed

Database Availability Groups _ Manage Database Availability Group membership

Summary: 1 item(s). 0 succeeded, 1 failed.
Elapsed time: 00:00:00

MBX01
Failed

Error:
Database availability group server MBX01 cannot be removed from database availability group HQDAG since it is currently set for datacenter activation mode and it requires at least two mailbox servers.
Click here for help… http://technet.microsoft.com/en-US/library/ms.exch.err.default(EXCHG.141).aspx?v=14.3.399.0&t=exchgf1&e=ms.exch.err.Ex76DE64

Warning:
The operation wasn’t successful because an error was encountered. You may find more details in log file “C:\ExchangeSetupLogs\DagTasks\dagtask_2019-12-05_03-51-59.162_remove-databaseavailabiltygroupserver.log”.

Exchange Management Shell command attempted:
Remove-DatabaseAvailabilityGroupServer -MailboxServer ‘MBX01’ -Identity ‘HQDAG’

Elapsed Time: 00:00:00

Turning Off DatacenterActivationMode –

Set-DatabaseAvailabilityGroup HQDAG -DatacenterActivationMode off

Error – Winrm service is not running.
Ran powershell as administrator

winrm quickconfig

Remove Exchange Server 2010

Start – Run – appwiz.cpl

(Add or Remove Programs) Choose Exchange Server 2010 ,

Clear all the Check boxes

Click on uninstall

image

image

× How can I help you?