33 C
Dubai
Tuesday, April 29, 2025
Home Blog Page 5

Access Specific Office 365 Mailbox using Microsoft Graph

We are already on the verge of throwing away basic auth and EWS (Exchange Web Services). There are tons of applications that retrieve attachments and messages using basic auth or Exchange Web Services. So they need to start using Oauth with Microsoft Graph to retrieve messages and attachments so that legacy dependencies can be safely removed to secure the environment further. In this article, I have explained how an application can access a specific service account only to retrieve its attachments and messages and not the whole environment.  if the application needs to read mailboxes across the environment then you need to use New-ApplicationAccessPolicy to scope the permission to a particular set of users which I covered in the end. What we are looking for here is a basic application that needs to retrieve its attachments from its mailbox only and not from the whole environment.

Service Account to retrieve messages and attachments from a specific Microsoft 365 mailbox using an API (Microsoft Graph) would be a safe way to say.

  • Creating an Azure AD application
  • Create a test account with a mailbox and add some attachments
  • Use PostMan to retrieve the same using Microsoft Graph

let’s see how to do it. Login to https://aad.portal.azure.com/

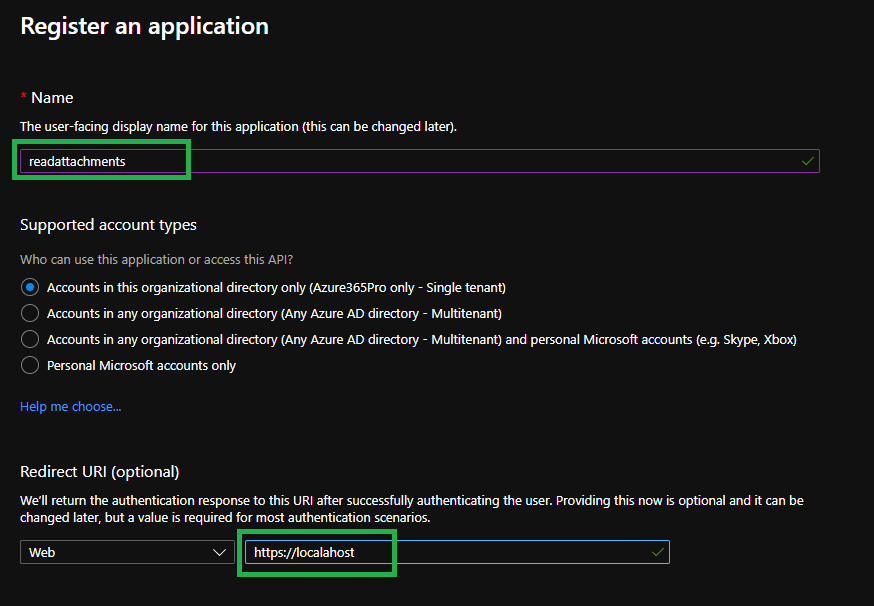
Azure Active Directory – App Registrations – New Registration

readattachments app – register the application
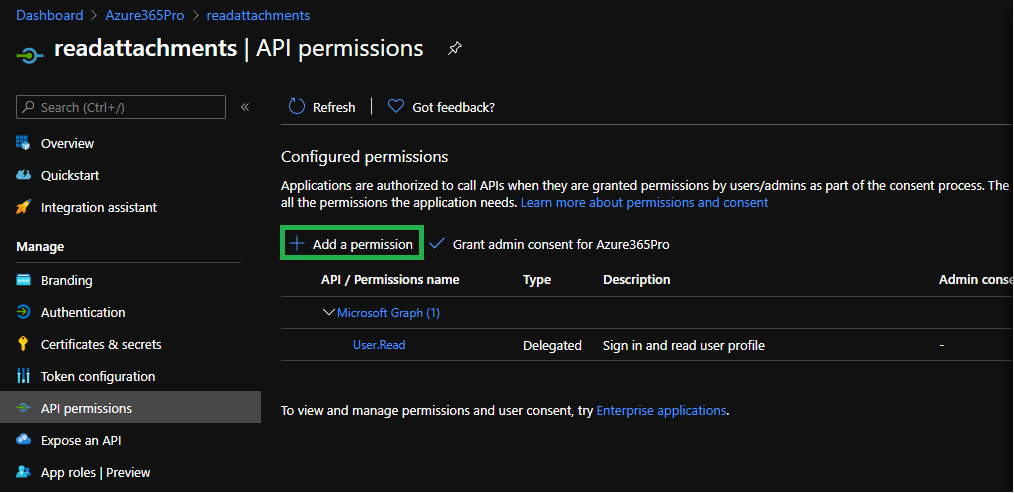
Click on API permissions – Add a Permission
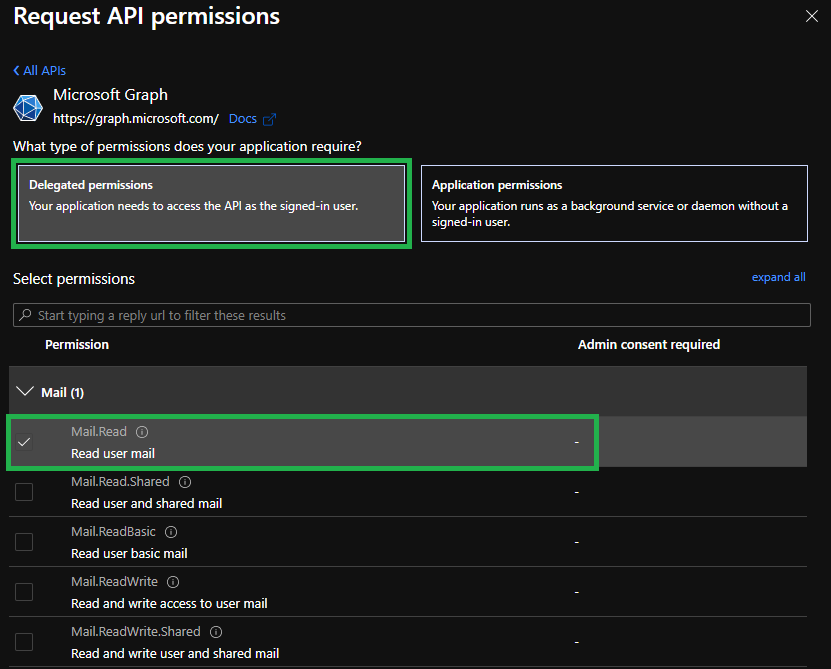
Choose Microsoft Graph

Choose Delegated Permissions – Mail.Read (Allows the app to read the signed-in user’s mailbox.)

Note :
Delegated Permission Used for – Sign-in Users
Application Permission Used for – Applications
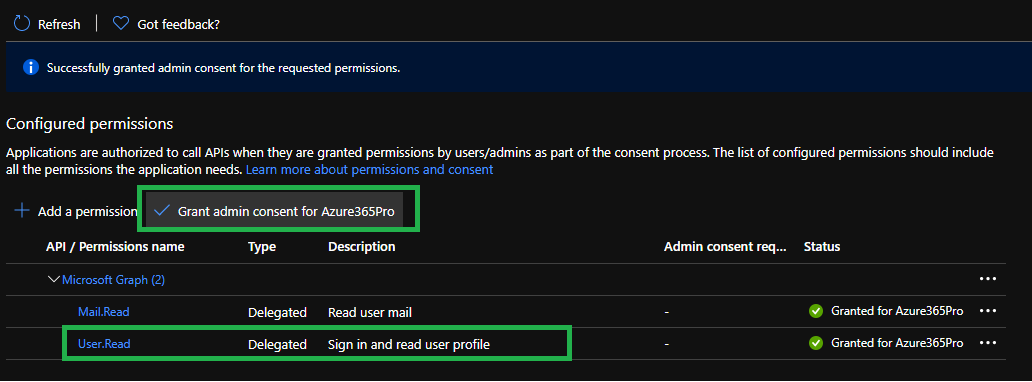
Grant Admin Consent – You can see the green mark “Granted for Azure365pro”
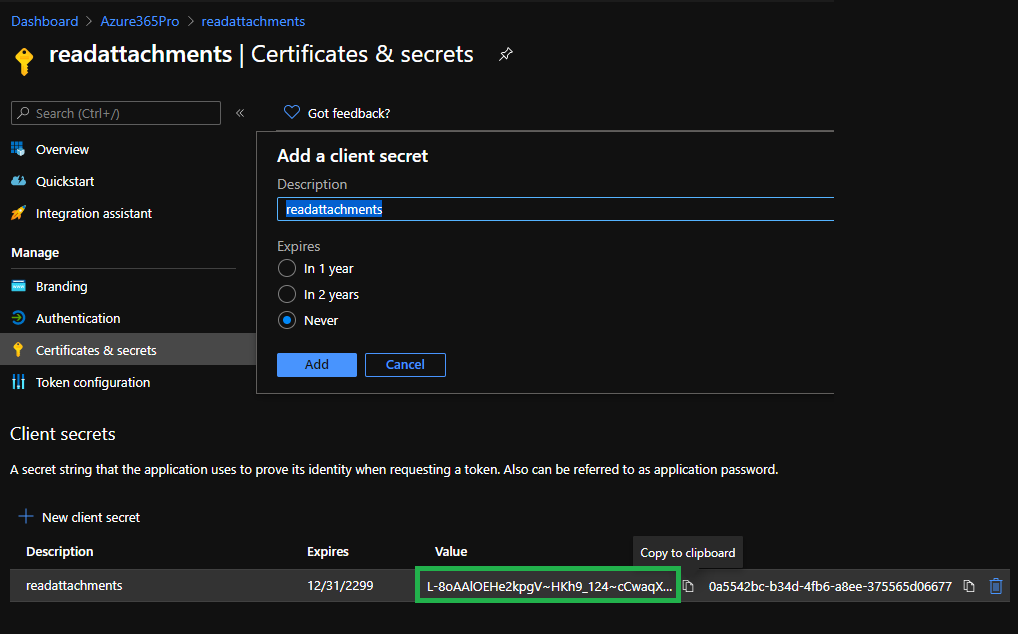
Certificates & Secrets – Client Secrets – New Client Secret

Copy your own Secret L-8oAAlOEHe2kpgV~HKh9_124~cCwaqX7u
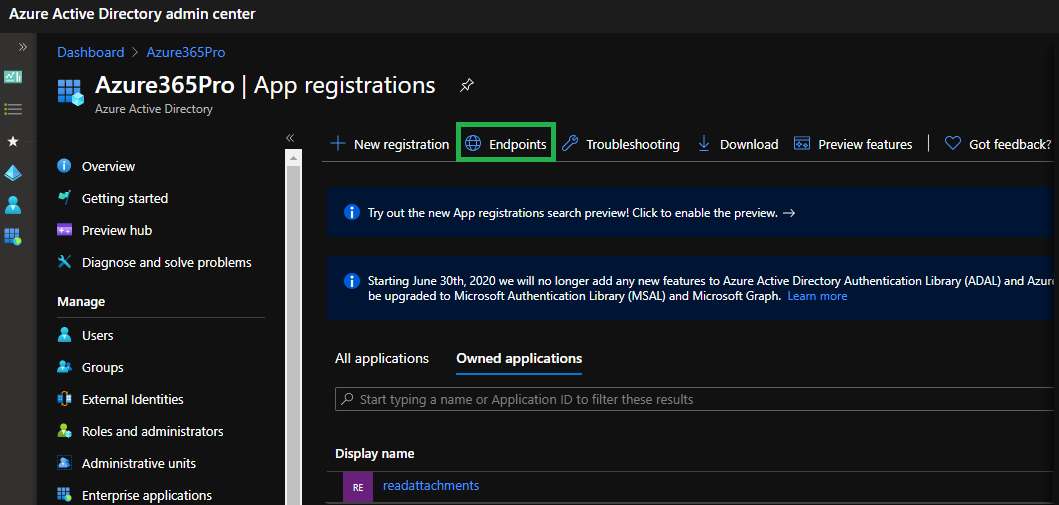
Click on endpoints
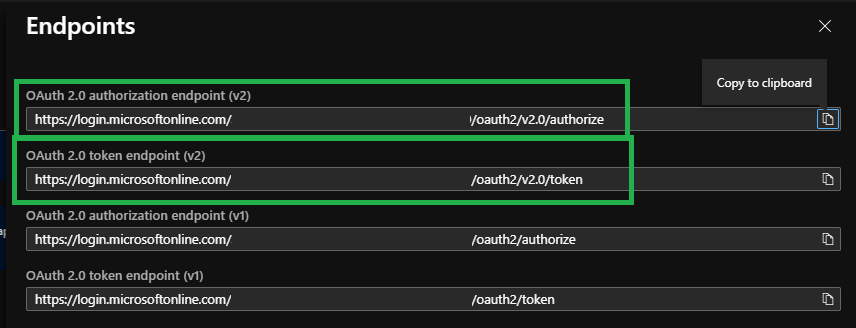
Auth URL = OAuth 2.0 authorization endpoint (v2) = https://login.microsoftonline.com/2549c50e-e478-0000-82cf-fa4efb5d000/oauth2/v2.0/authorize
Access Token URL = OAuth 2.0 token endpoint (v2) = https://login.microsoftonline.com/2549c50e-e478-0000-82cf-fa4efb5d0000/oauth2/v2.0/token

Copy Both URLs
Application (Client) ID

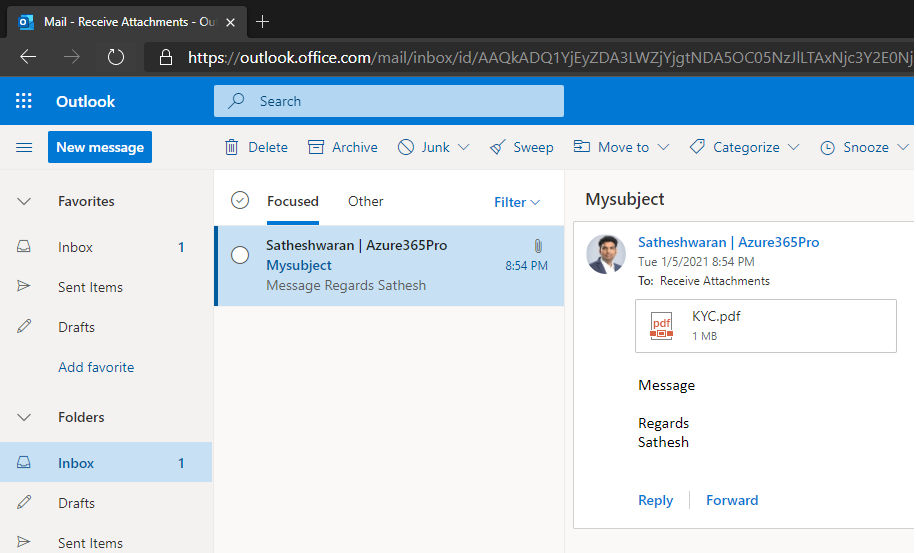
Created a Service mailbox that will receive the attachments
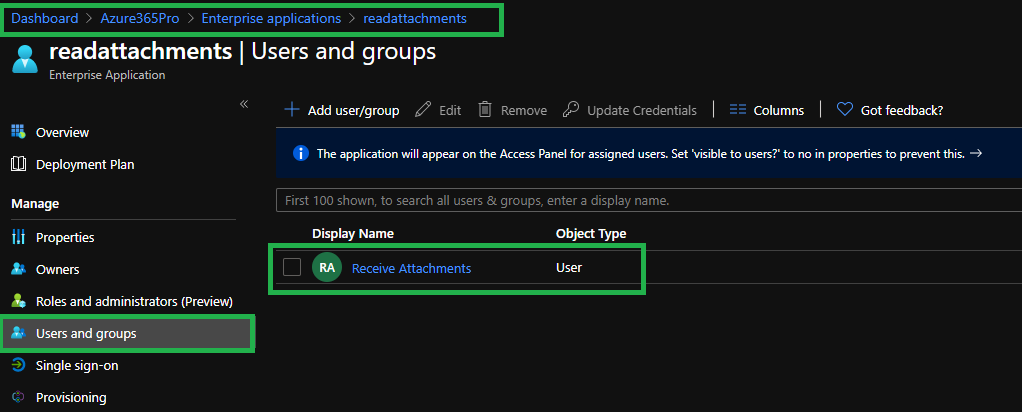
Assign the service account to access the application
Postman is your best friend when it comes to testing Oauth

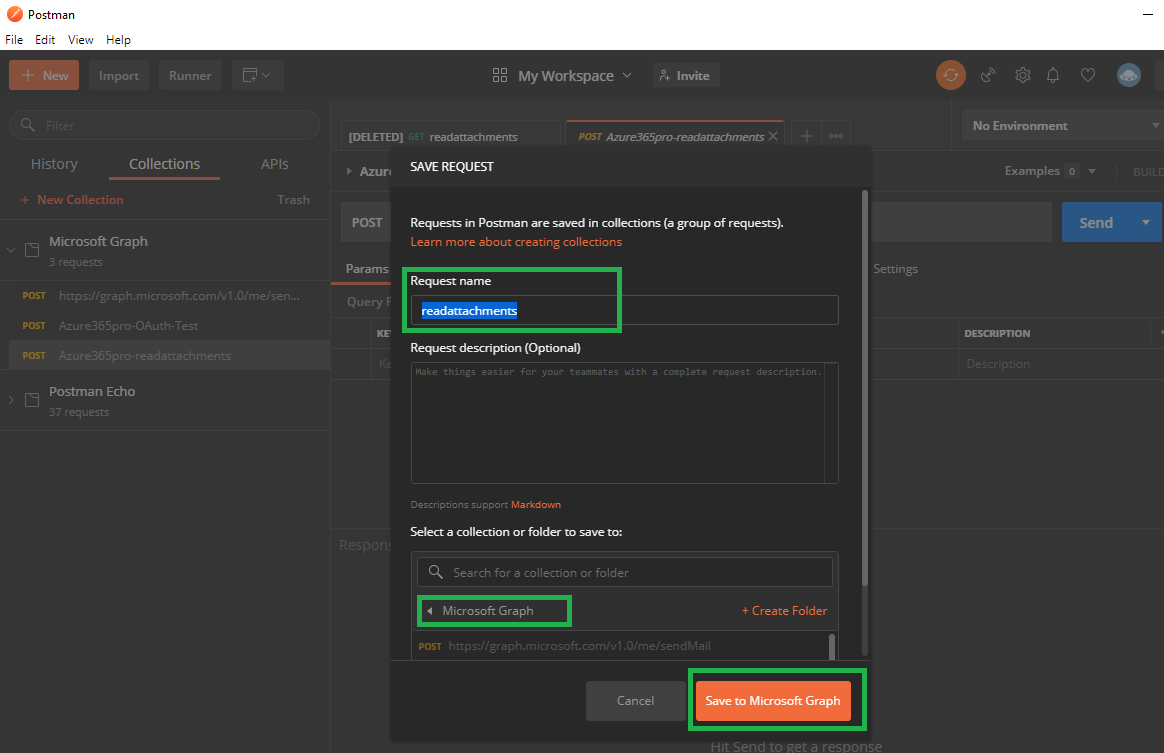
New – Request

create a request name read the attachments

\

Request Token – Once you filled all the below information


Now you have your
Token Name = Friendly Name
Grant Type = Authorization Code
Callback URL = https://localhost
Auth URL = OAuth 2.0 authorization endpoint (v2) - Use it from your tenant - https://login.microsoftonline.com/2549c50e-e478-0000-82cf-fa4efb5d1426/oauth2/v2.0/authorize
Access Token URL = OAuth 2.0 token endpoint (v2) - Use it from your tenant - https://login.microsoftonline.com/2549c50e-e478-0000-82cf-fa4efb5d1426/oauth2/v2.0/token
Client ID = (Get it from the Overview Tab like below) - Use it from your tenant - 61745b89-1b77-481d-a8d3-f0b6dc09de68
Client Secret = (Get it from Certificates and Secrets Tab like above) - Use it from your tenant - L-8oAAlOEHe2kpgV~HKh9_124~cCwaqX7u
Scope = https://graph.microsoft.com/.default
State = State
Client Authentication = Send Client Credentials in body
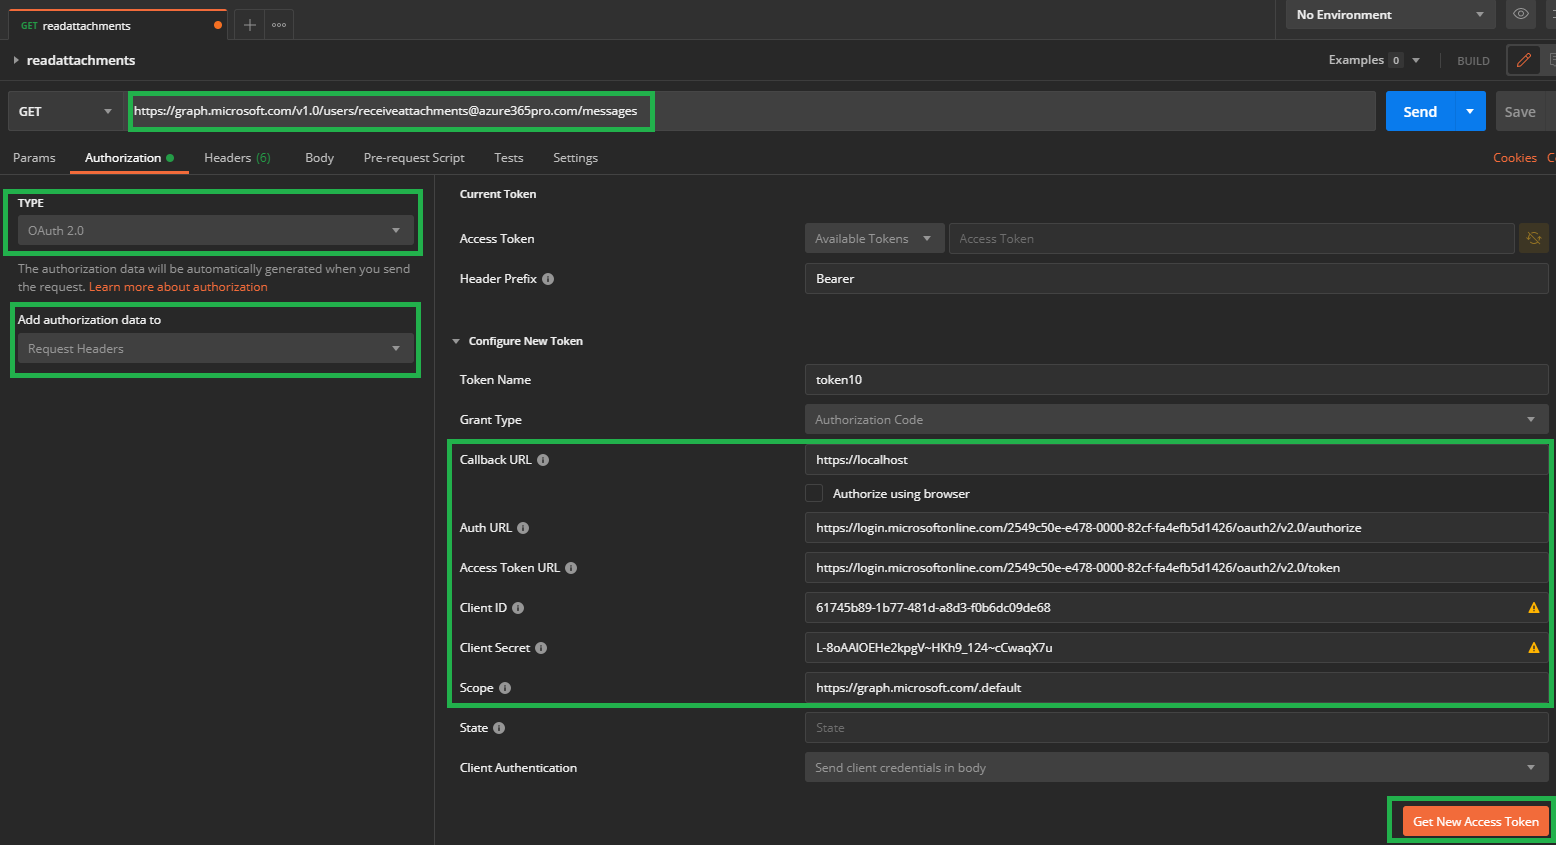
Get new access token – used my service account credential to enter – received the token

Choose use token
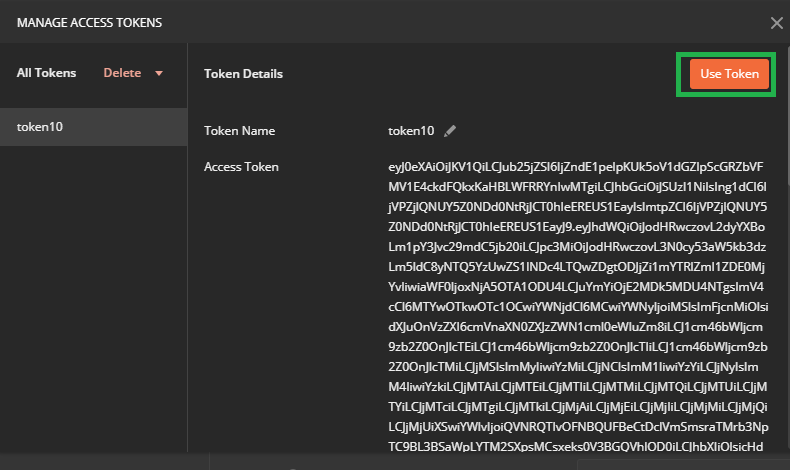
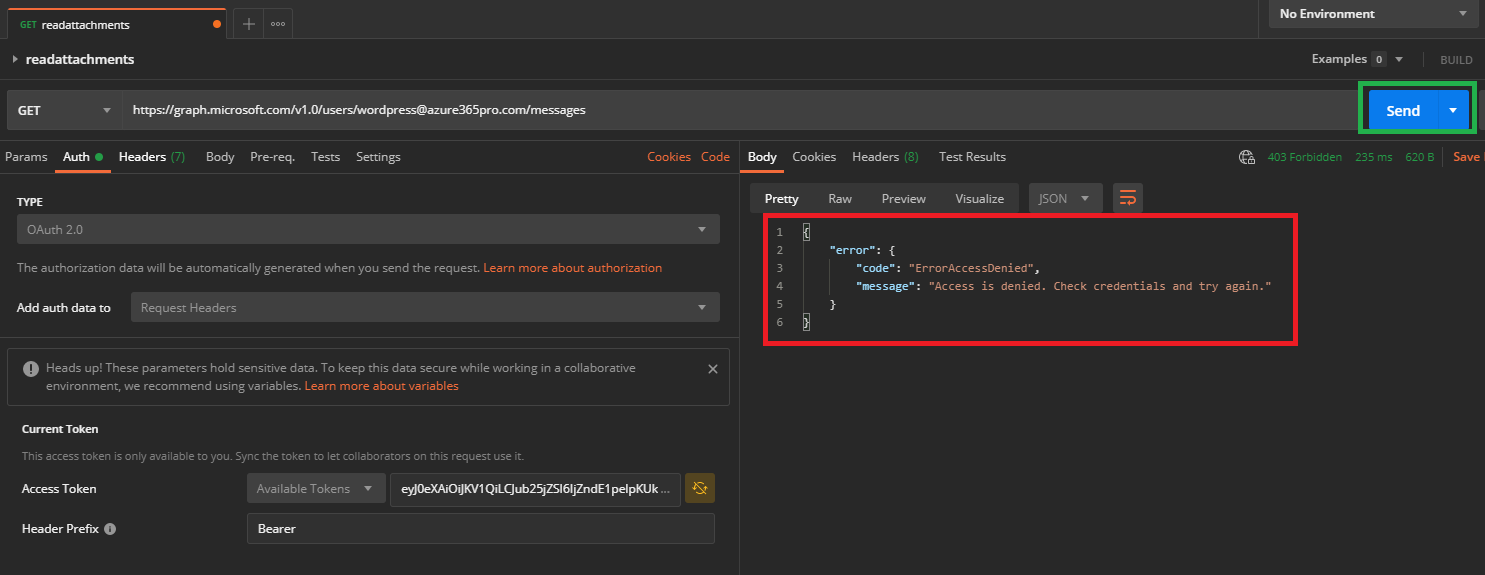
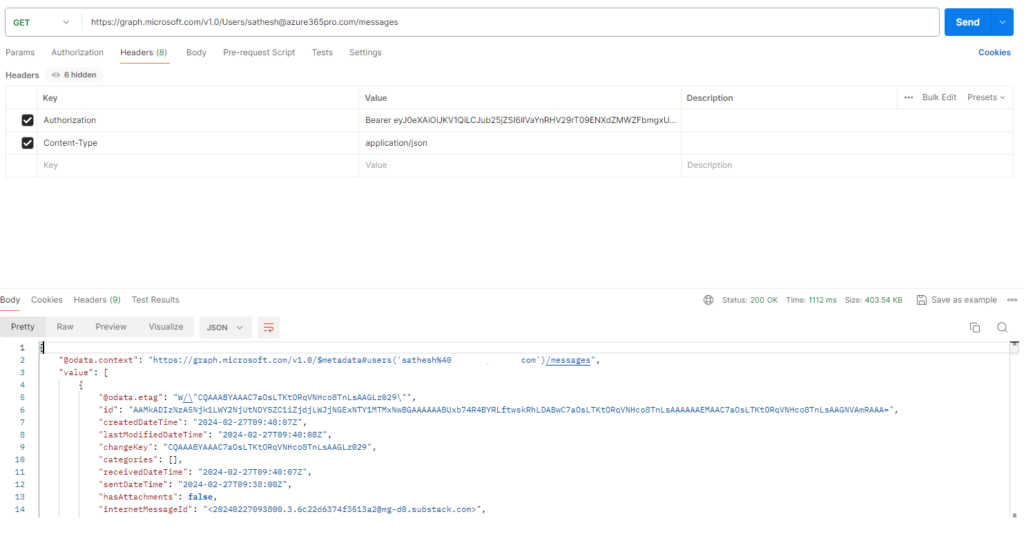
Trying to retrieve messages using the received token

https://graph.microsoft.com/v1.0/users/receiveattachments@localhost/messages
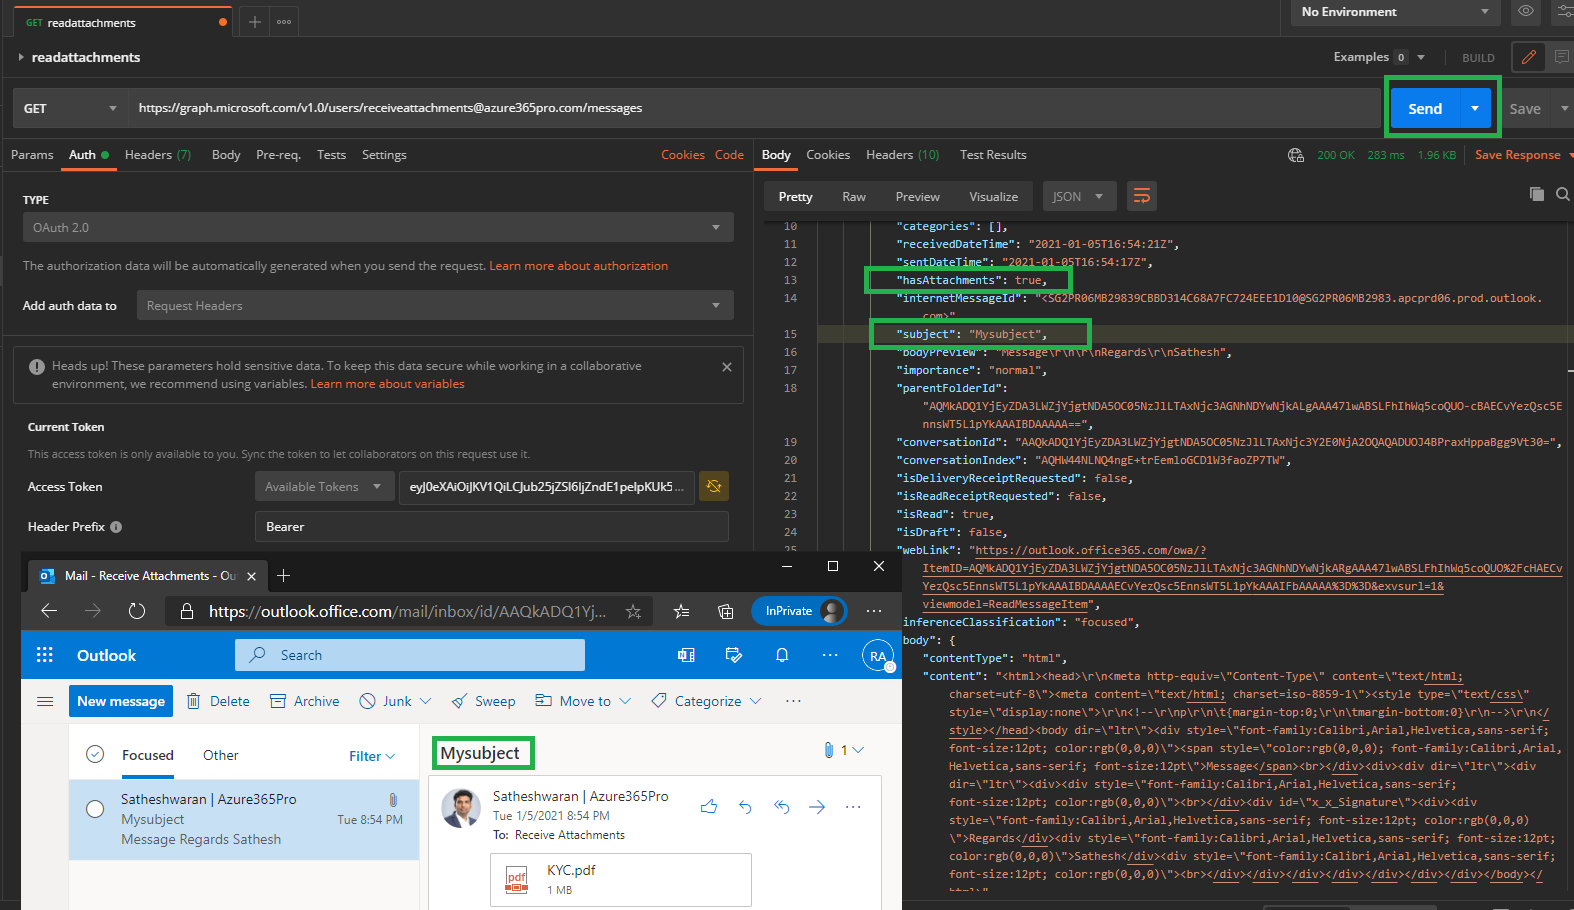
Trying to access the account that is not assigned to my enterprise application. where I can access messages from my service account only. Even after assigning the other account, I get the same error as expected. as the graph permission says to allow read-only for signed-in accounts only. As whichever account is used to receive the token it can retrieve messages from that account only.
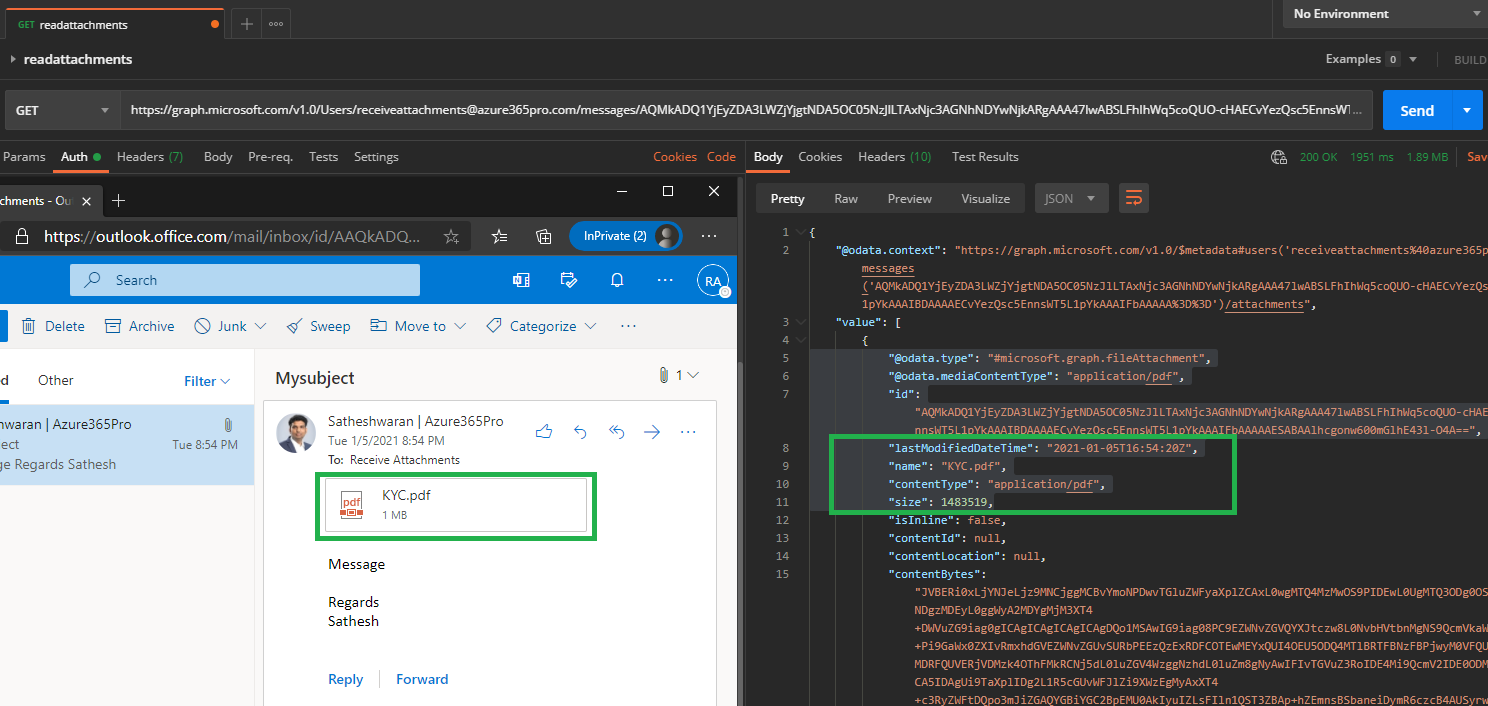
Let’s see how to retrieve the attachment using Microsoft Graph

Get the ID of the message to retrieve the attachment


https://graph.microsoft.com/v1.0/Users/receiveattachments@localhost/messages/AQMkADQ1YjEyZDA3LWZjYjgtNDA5OC05NzJlLTAxNjc3AGNhNDYwNjkARgAAA47lwABSLFhIhWq5coQUO-cHAECvYezQsc5EnnsWT5L1pYkAAAIBDAAAAECvYezQsc5EnnsWT5L1pYkAAAIFbAAAAA==/attachments

Now you can see the attachment is retrieved using Microsoft Graph.
Let’s consider you are developing a .NET console application and you want the application to retrieve the data without a signed-in user.

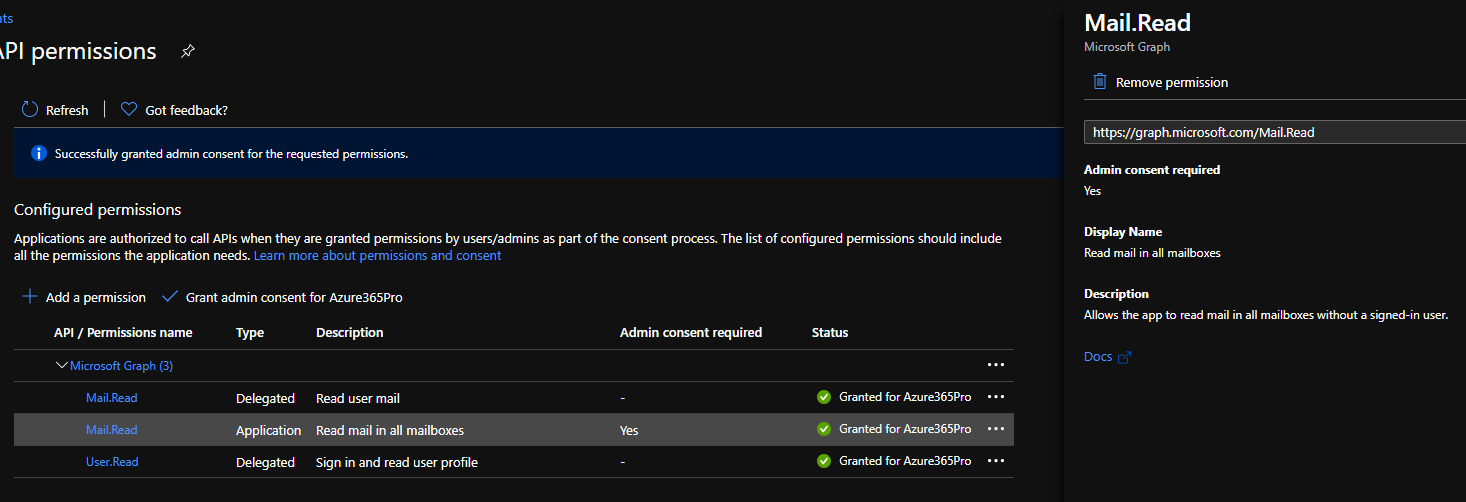
Then you need to Add Application permission for the application. So that they can retrieve without a sign-in prompt from the application. Now this application can read all the user mail from the environment.  let’s see how to restrict them
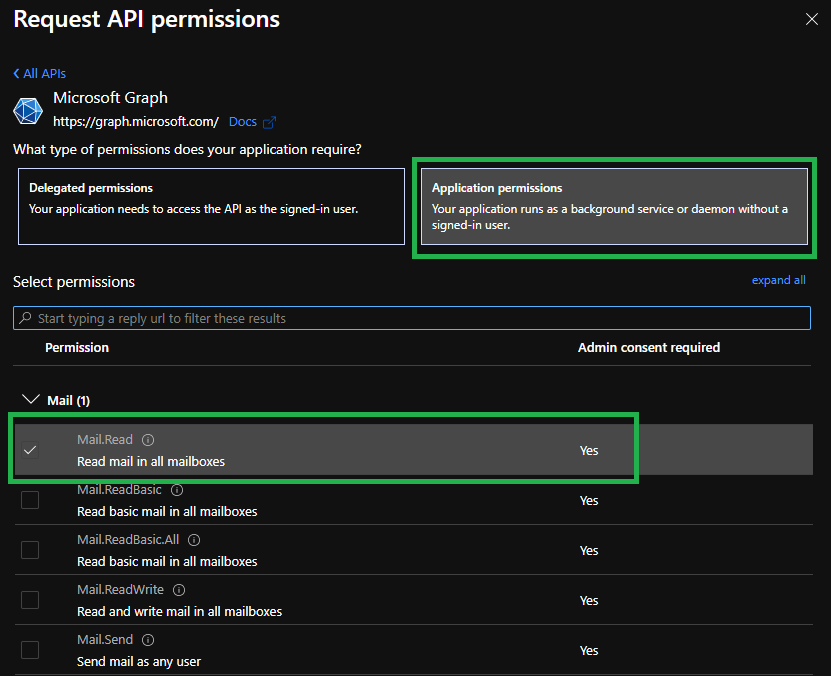
Mail.Read – Read mail in all mailboxes
Create a Mail-Enabled Security group so that you can provide access only to the members of this group
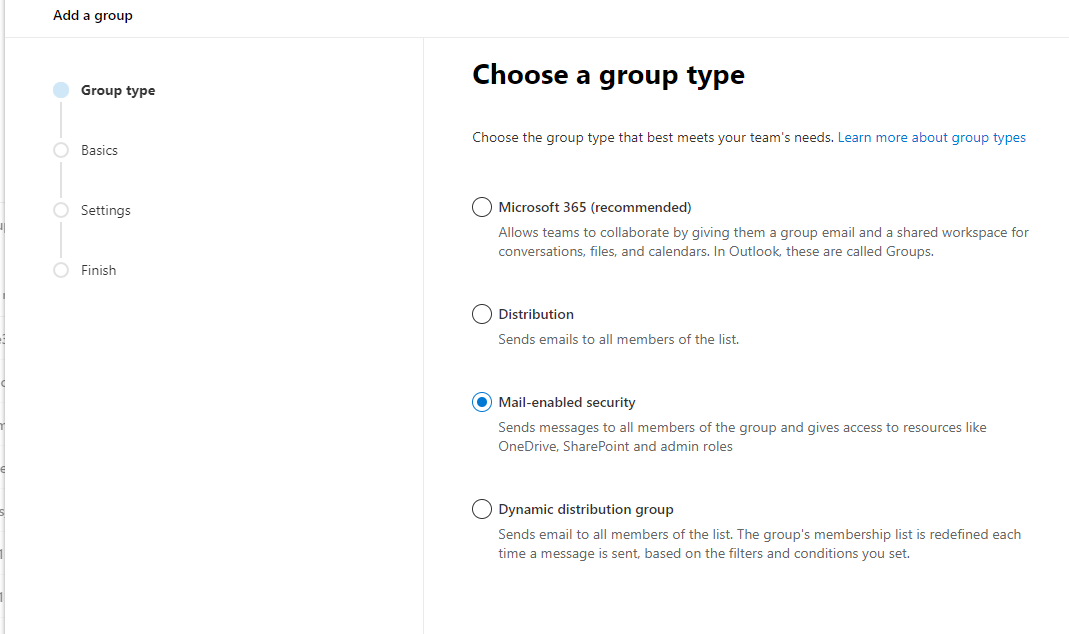
New-ApplicationAccessPolicy -AppId 50f4b7ac-a83a-4f18-8b5a-81273f55a40d -PolicyScopeGroupId read.mail@localhost -AccessRight RestrictAccess -Description "Restrict this app to members of distribution group EvenUsers."

Client Credentials work if a user is a member of the mail security group we created. if a user is not a member we can Access denied.
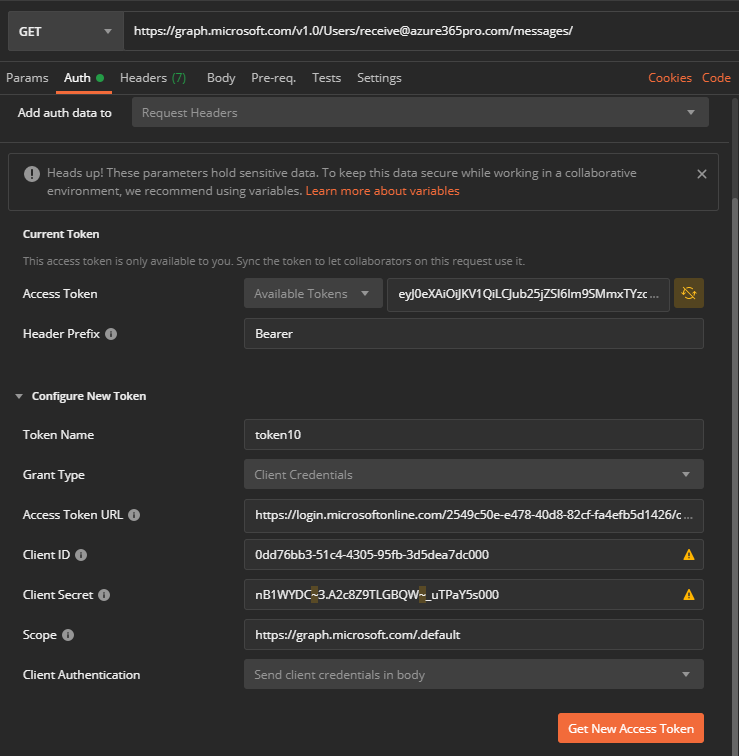
Error Access Denied “Access to OData is disabled” if the user is not a member of the mail security group
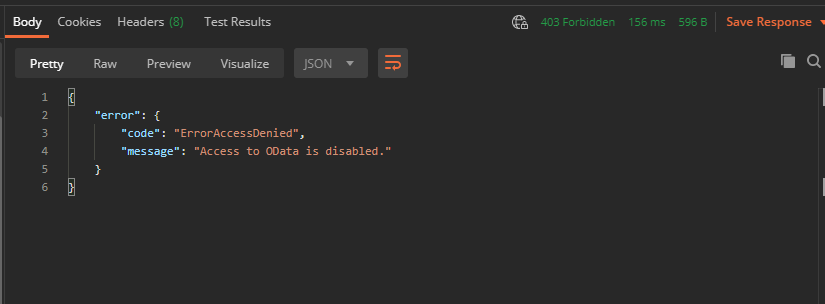
For Access Token and Retrieving Messages using Implicit Flow – Without Credentials
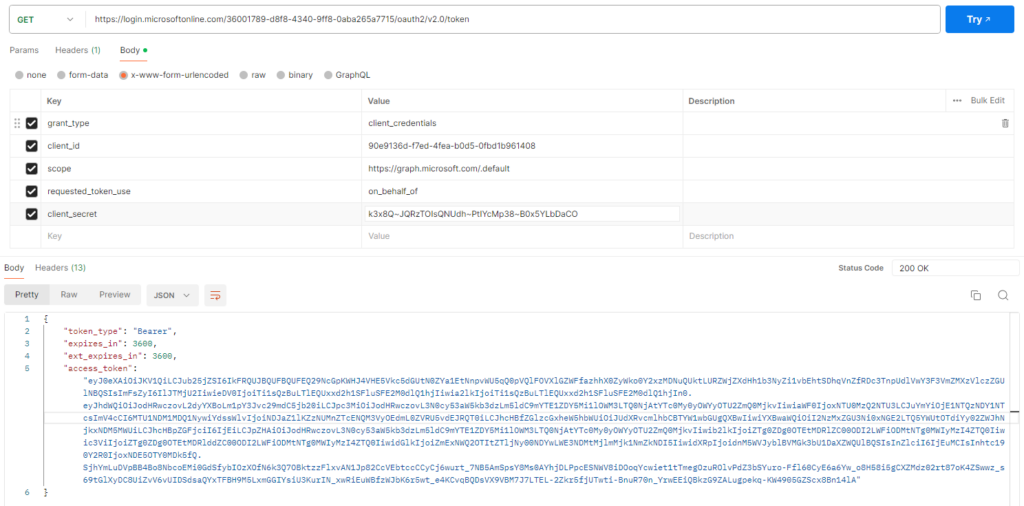
Now copy the access token without Quotes – Use it like

Authorization Bearer <AccessToken>

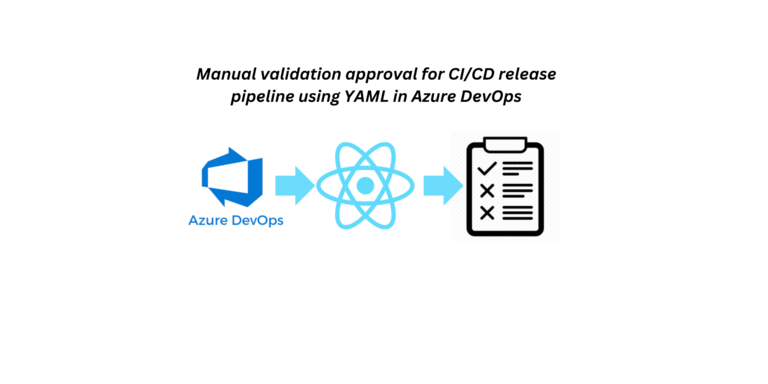
Manual Validation Approval for CI/CD Release Pipeline using YAML in Azure DevOps

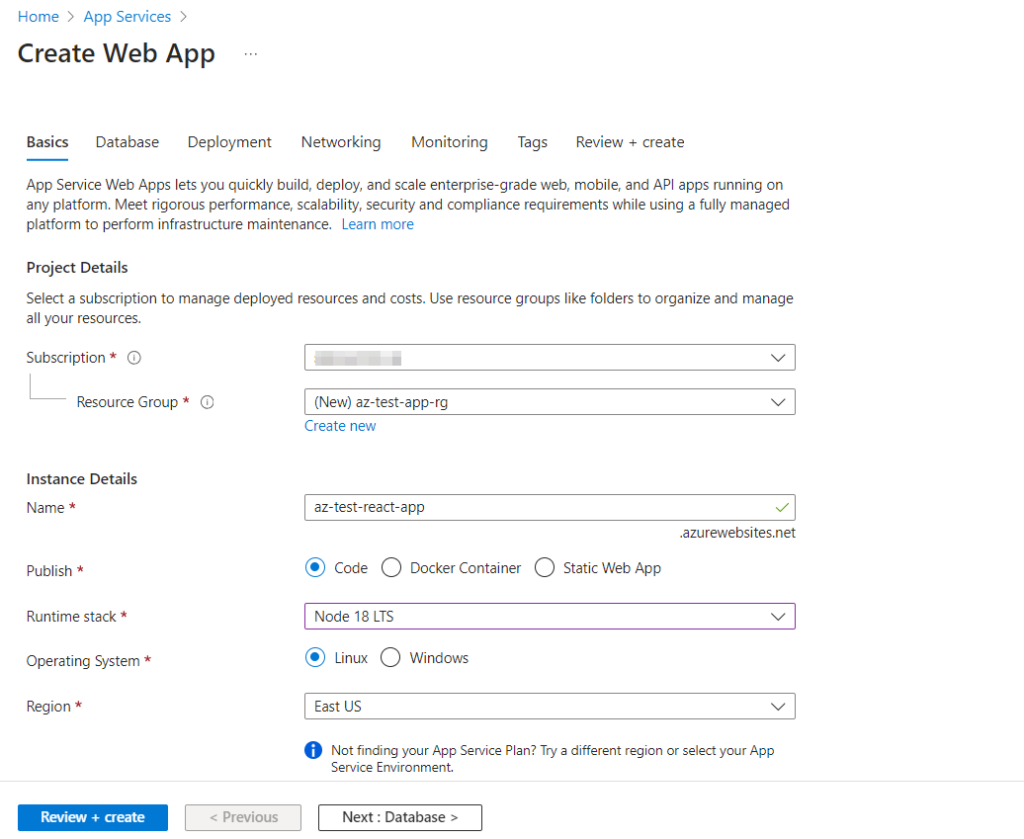
Step 1: Create an Azure App Service and select Node.js 18 as the runtime stack to host your React application. This provides the necessary infrastructure for deploying and running your app on Azure’s platform.

.

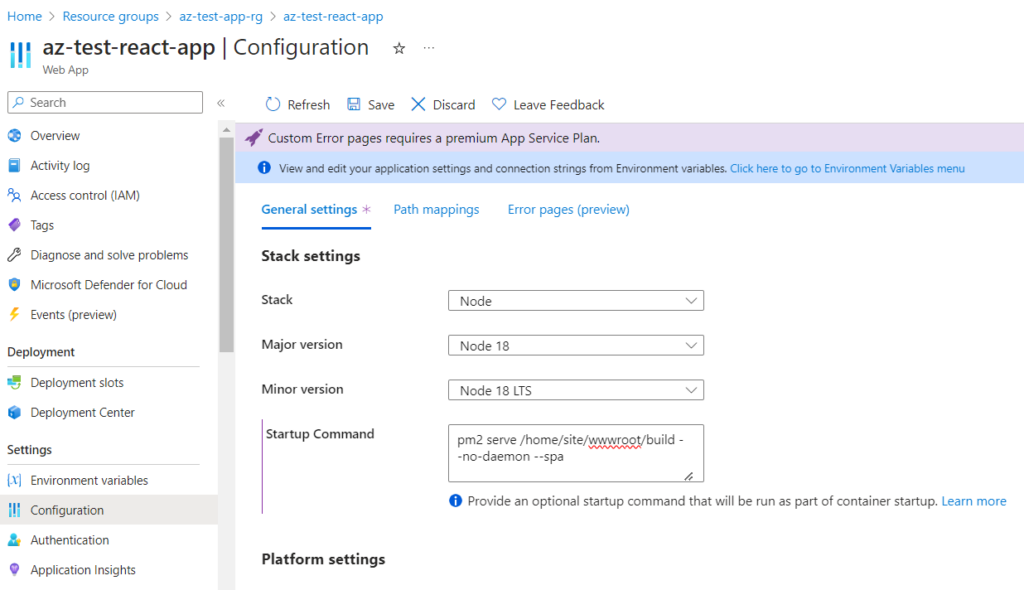
Step 2: Once your web app is deployed, go to configurations and add the startup command “pm2 serve /home/site/wwwroot/build –no-daemon –spa“. This command ensures proper serving of your React app using PM2, making it suitable for single page applications (SPAs) on Azure Web App.

pm2 serve /home/site/wwwroot/build –no-daemon –spa

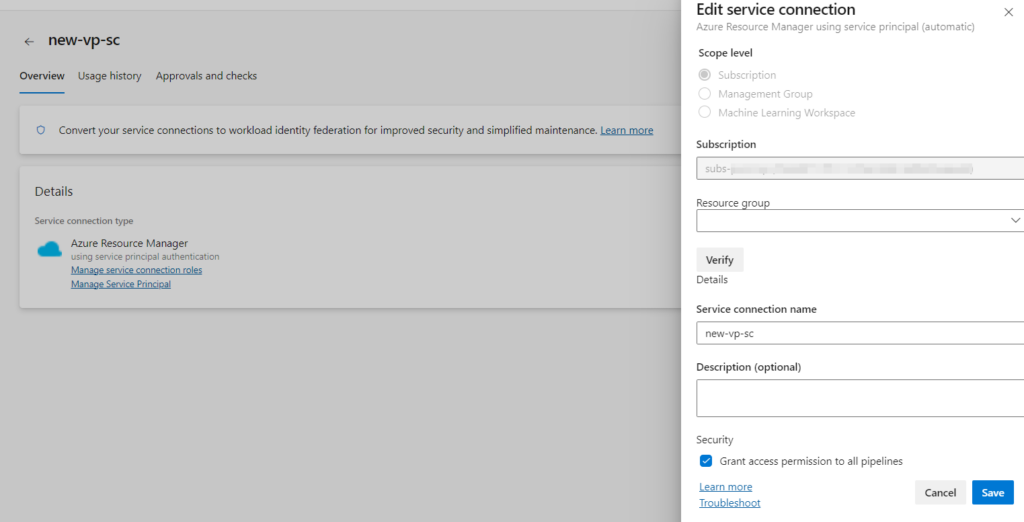
Step 3: Establish a service connection in Azure DevOps. This connection allows your Azure DevOps pipeline to interact securely with your Azure resources, enabling seamless deployment of your React app to Azure Web App.

.

Step 4: Begin creating your Azure DevOps pipeline. This involves defining the stages, tasks, and configurations necessary to automate the deployment process of your React app from source control to Azure Web App.

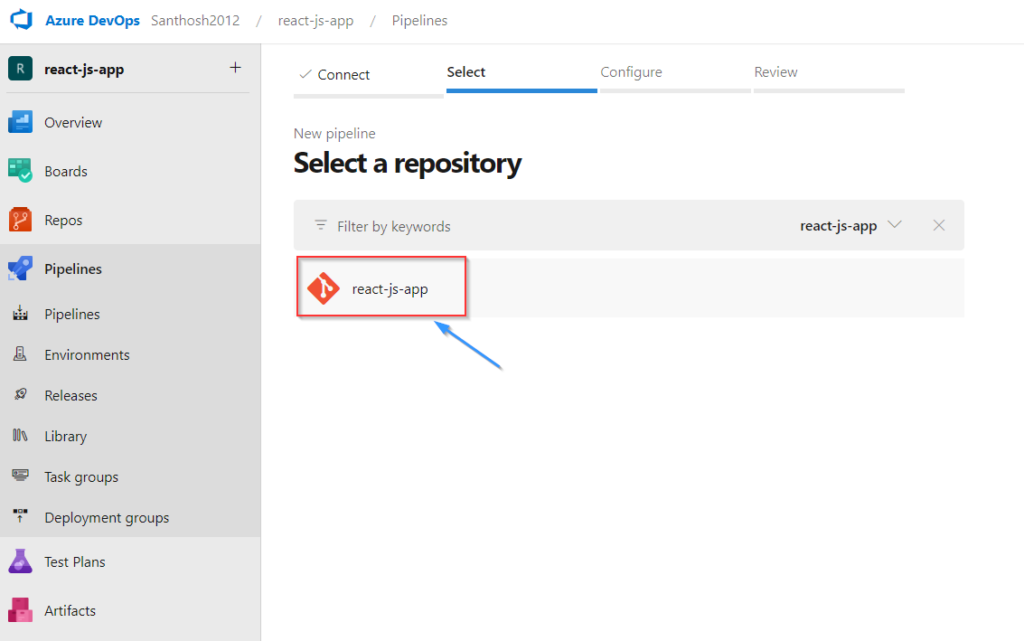
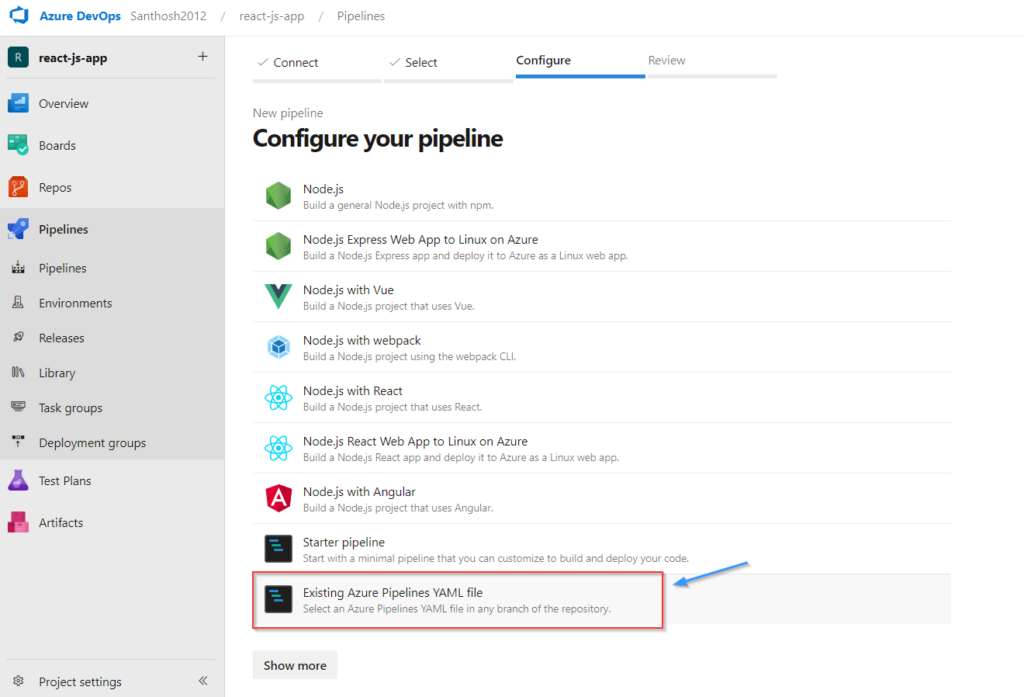
Step 5: Access the pipelines section in Azure DevOps, then initiate the creation of a new pipeline. Choose the repository where your React application resides, setting the foundation for automating deployment workflows directly from your source control.

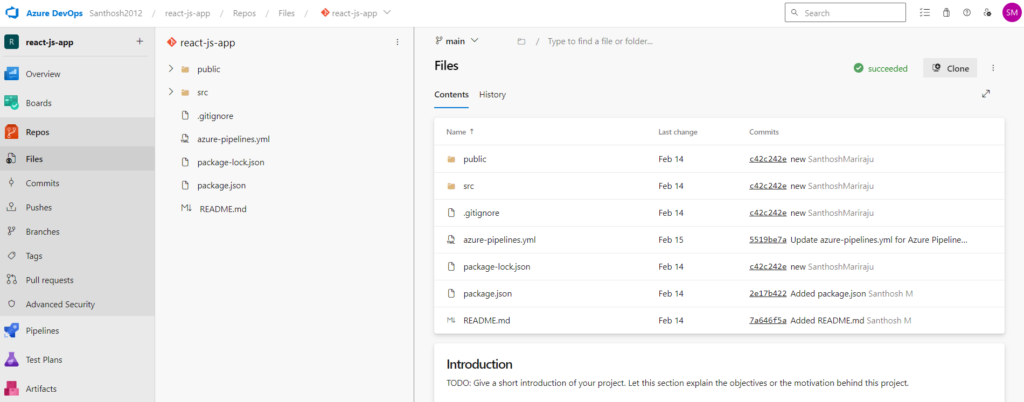
Select Existing YAML file.

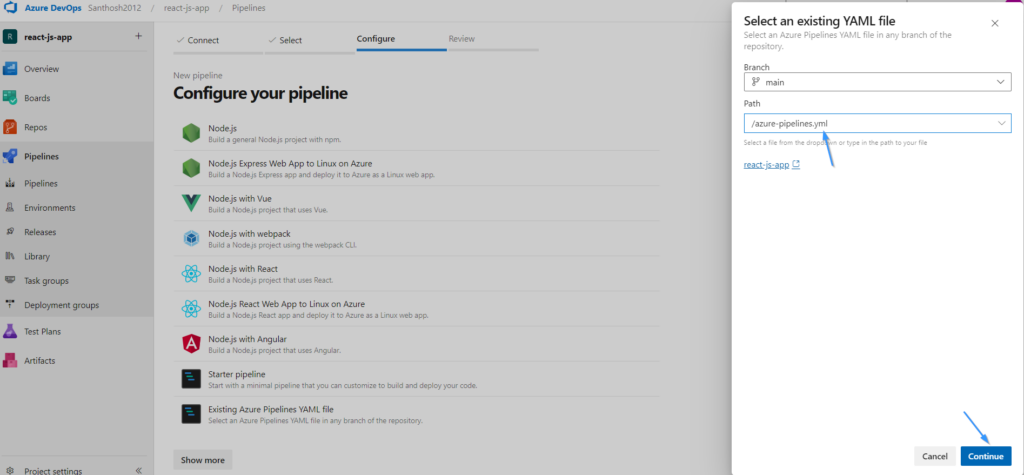
Select the YAML file in the Repository.

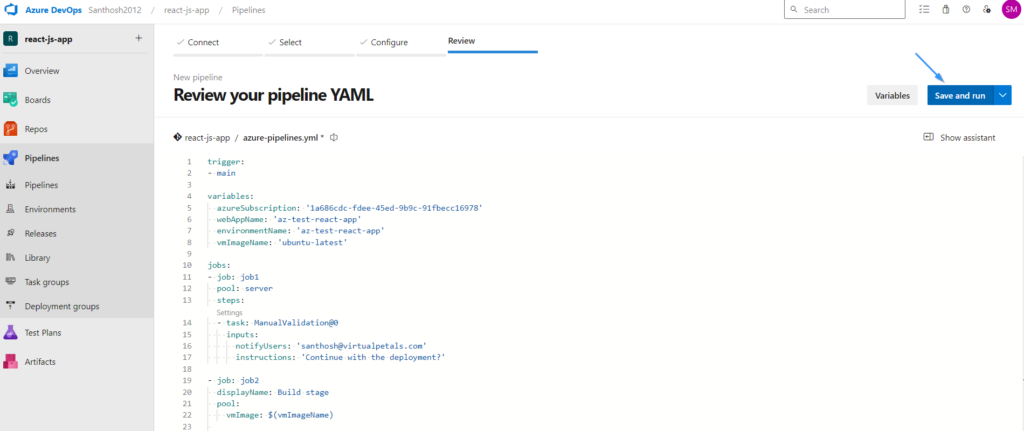
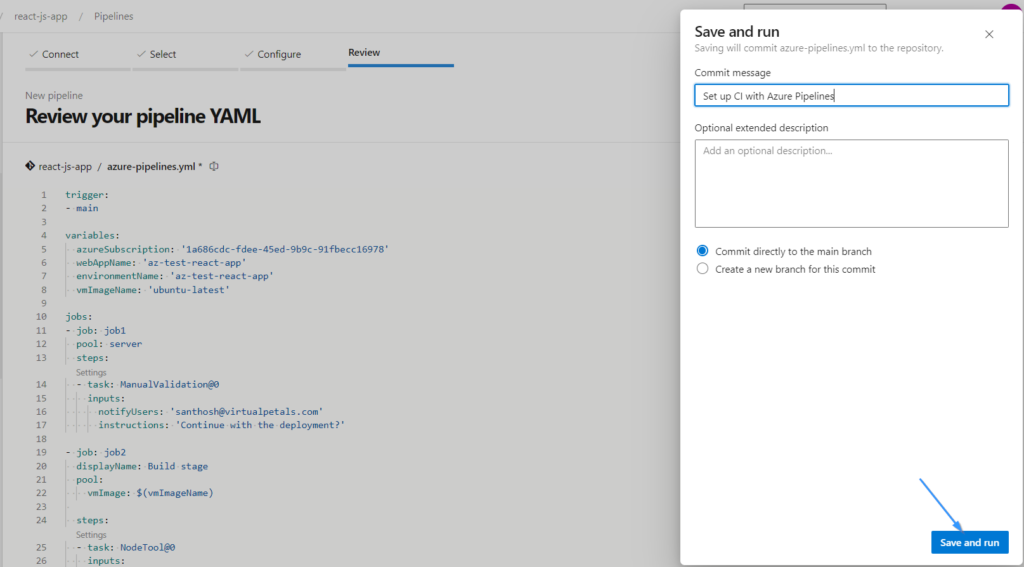
Once the YAML file is setup click on save and run the Pipeline.

.

Step 6: Below is the YAML configuration for implementing validation approval within the Release Pipeline:

trigger:
- main

variables:
  azureSubscription: '1a686cdc-fdee-45ed-9b9c-91fbecc16978'
  webAppName: 'az-test-react-app'
  environmentName: 'az-test-react-app'
  vmImageName: 'ubuntu-latest'

jobs:
- job: job1
  pool: server
  steps:
  - task: ManualValidation@0
    inputs:
      notifyUsers: 'santhosh@abcd.com'
      instructions: 'Continue with the deployment?'

- job: job2
  displayName: Build stage
  pool:
    vmImage: $(vmImageName)
 
  steps:
  - task: NodeTool@0
    inputs:
      versionSpec: '18.x'
    displayName: 'Install Node.js'

  - script: |
      npm install
      npm run build --if-present
    displayName: 'npm install, build'

  - task: ArchiveFiles@2
    displayName: 'Archive files'
    inputs:
      rootFolderOrFile: '$(System.DefaultWorkingDirectory)'
      includeRootFolder: false
      archiveType: zip
      archiveFile: $(Build.ArtifactStagingDirectory)/$(Build.BuildId).zip
      replaceExistingArchive: true

  - publish: $(Build.ArtifactStagingDirectory)/$(Build.BuildId).zip
    artifact: drop

- job: job3
  displayName: Deploy stage
  dependsOn: job1
  condition: succeeded()
  pool:
    vmImage: $(vmImageName)
  steps:
  - download: current
    artifact: drop

  - task: AzureWebApp@1
    displayName: 'Azure Web App Deploy: xxxxx'
    inputs:
      azureSubscription: 'new-vp-sc'
      appType: 'webAppLinux'
      appName: 'az-test-react-app'
      package: '$(Pipeline.Workspace)/drop/$(Build.BuildId).zip'
      runtimeStack: 'NODE|18-lts'

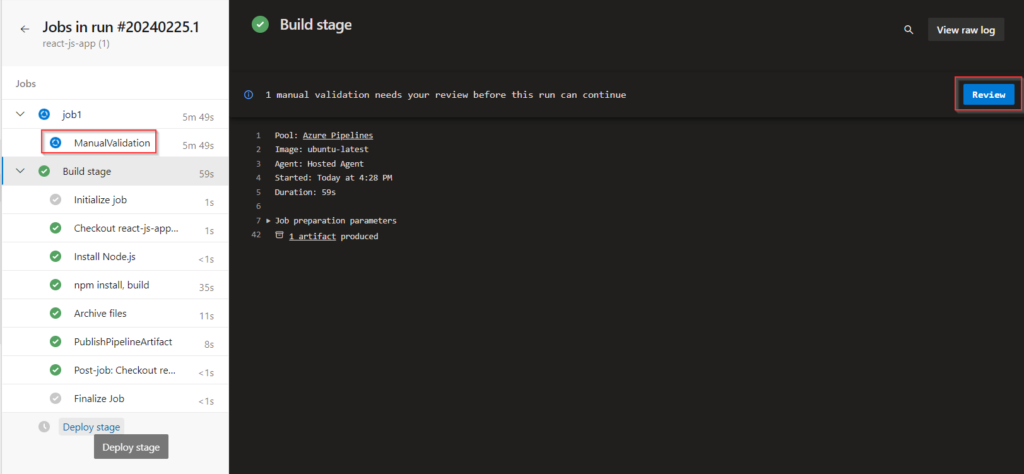
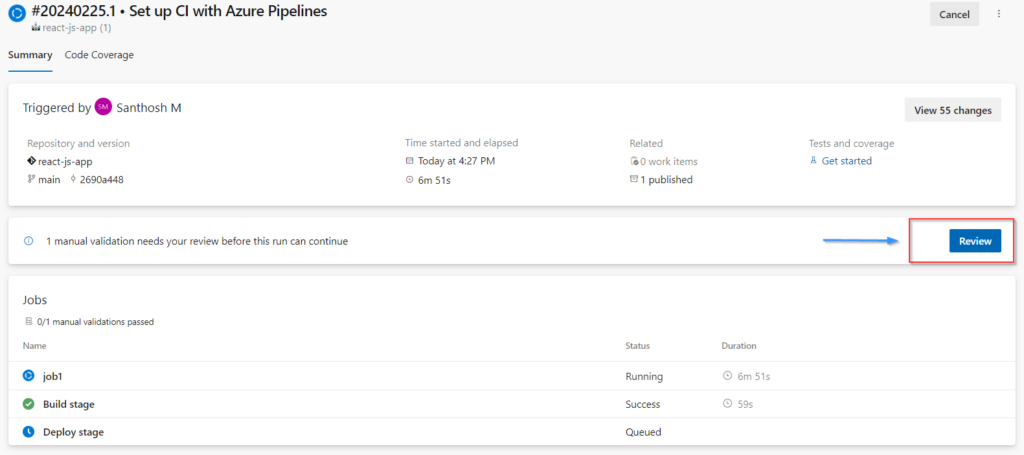
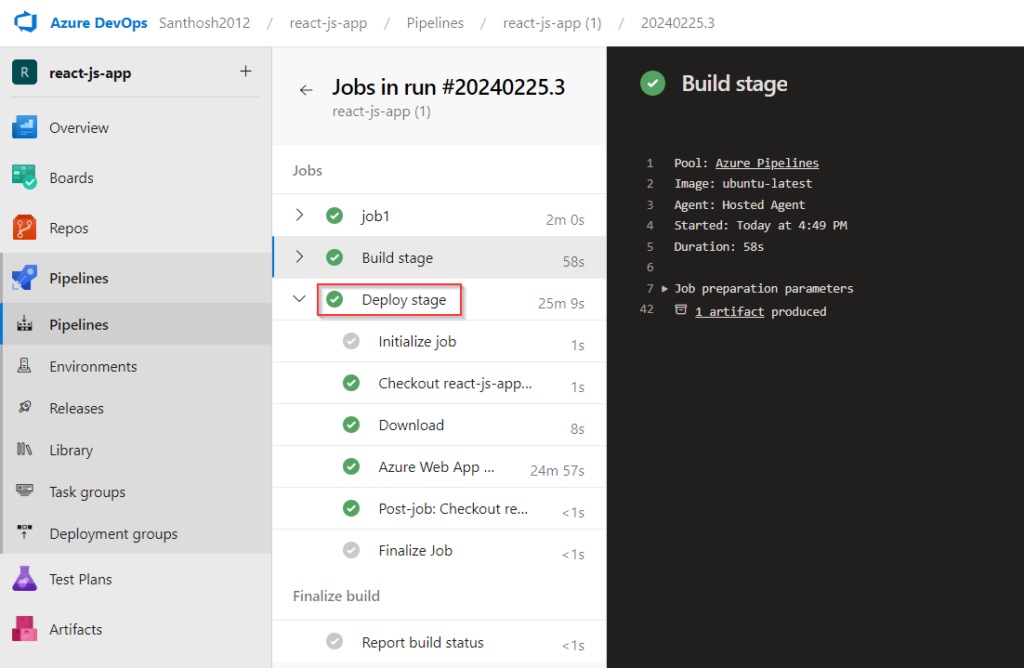
Now we could see the only the Build Stage is successful and the Deploy Stage is waiting for the ManualValidation Approval form the Mail ID that we have provided in the YAML file.

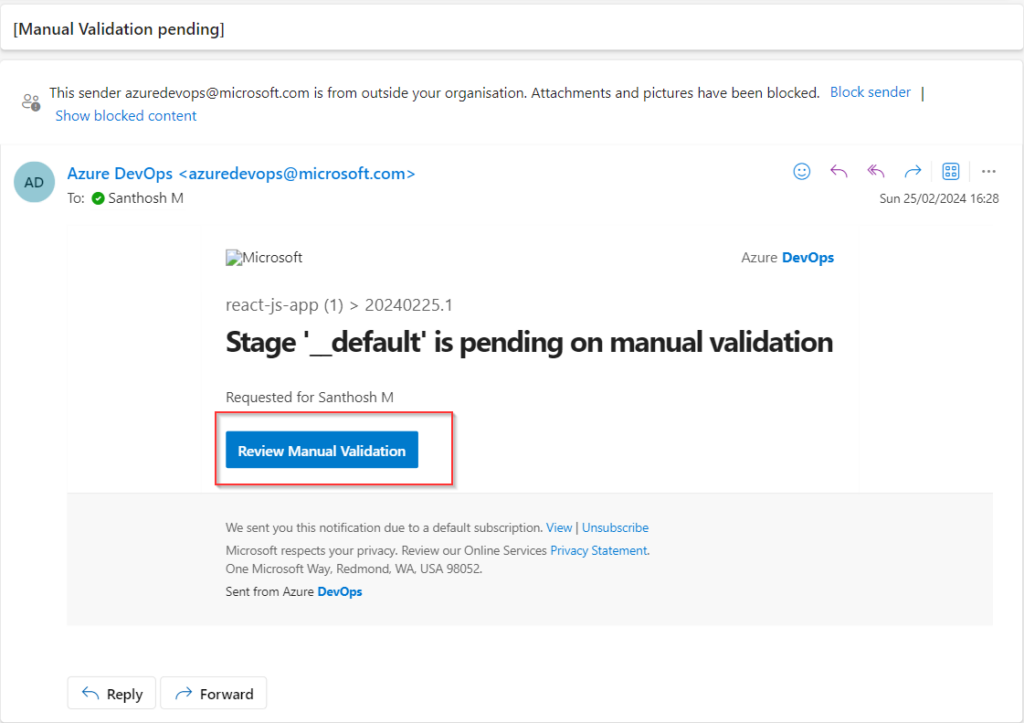
Step 7: Once the Validator receives the email and approves the deployment, the Release Pipeline automatically initiates the deployment process. This triggers the deployment tasks defined in the pipeline, enabling the seamless transition of your React application from staging to production environment on Azure Web App.

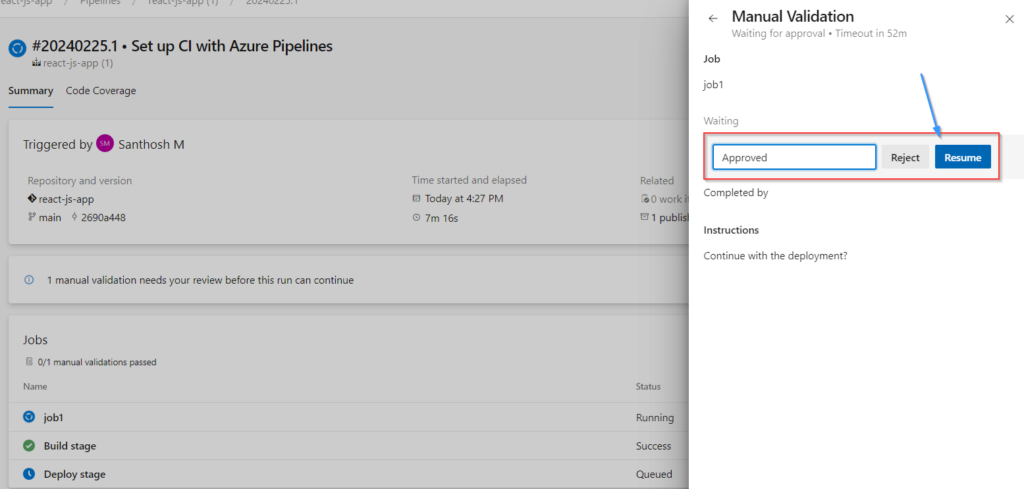
Step 8: Navigate to the Release Pipeline, then click on “Review” and select “Resume” to proceed with starting the deployment process.

.

Now both the Build and Deploy Stage is successfully completed.

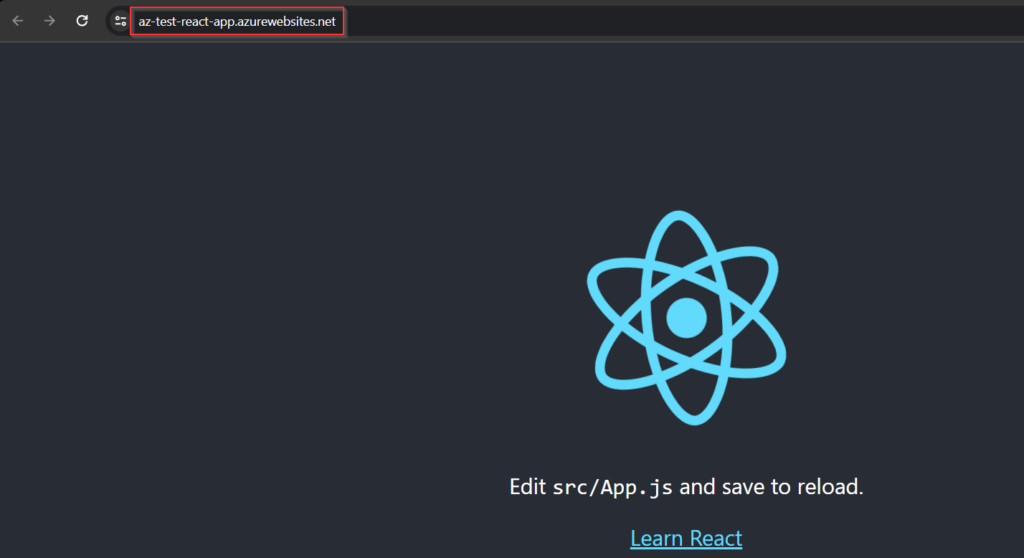
Step 9: Verify the success of the deployment by opening a new tab and accessing the Azure Web App service URL. If the React application loads without errors, it indicates a successful deployment. This confirms that your React app is now live and accessible through the provided URL.

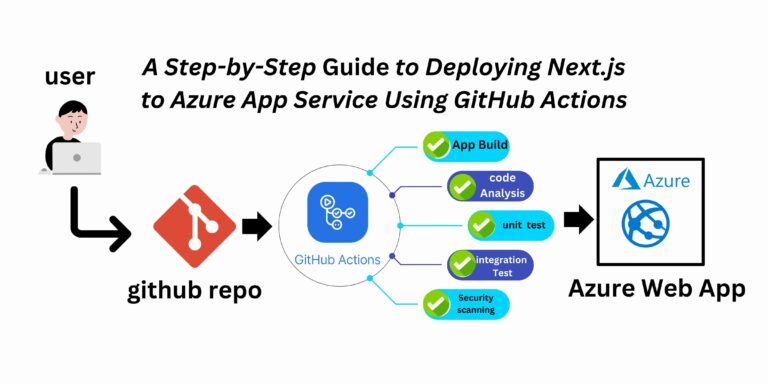
A Step-by-Step Guide to Deploying Next.js to Azure App Service Using GitHub Action

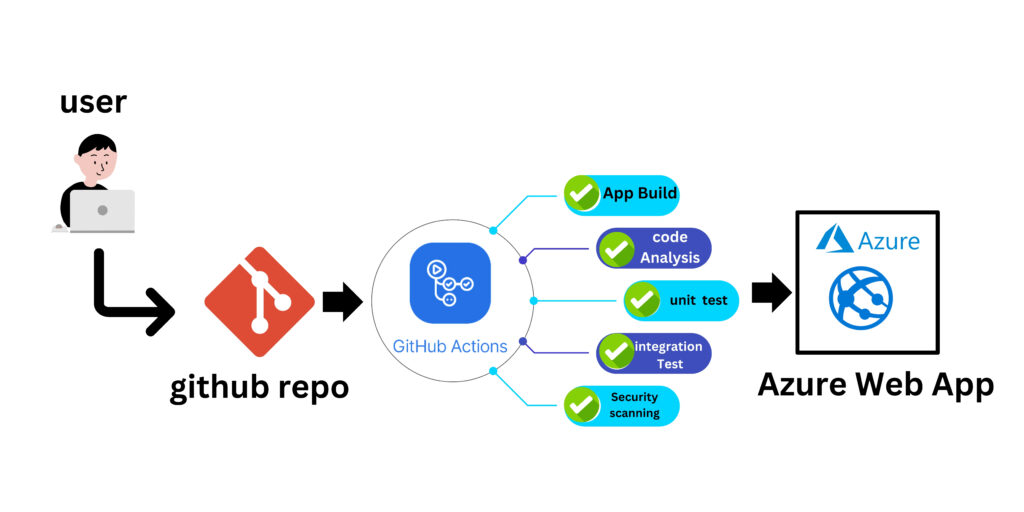
workflow Diagram

Step 1: Local Development

Create a Next app.

  1. Setup a local environment starting with NPX:
 npx create-next-app@latest  
  • This will prompt you for an application name – which will create a new directory for the application with the name you choose:

? What is your project named? … local

After this it will install all needed dependencies into said folder.

  • Once the installation is done, cd into the new folder and then start the server using:

Browse the site with http://localhost:3000 to get the default page

 Npm run dev  

Step 2:

Create GitHub repository.

In your local terminal run the following commands in order to Push to Github  

 git add .  
   git commit -m "Initial Commit"  
 git remote add  
  git push  

Step 4:

Create an App Service

Let’s choose Public with Code, Node 18 LTS as runtime, Linux as Operating System,

Let’s click the “+ Create” button and choose “+ Web App”.

Step 5:

You can quickly get started with GitHub Actions by using the App Service Deployment Center. This will automatically generate a workflow file based on your application stack and commit it to your GitHub repository in the root directory in the folder. github. You can deploy a workflow manually using deployment credentials.

                How to call GitHub action with azure app service

Step 1:

Download the (Download publish profile save local disk.)

After downloading and copy.

Step 2:

Right side core clicks settings

Step 3:

Under security click secrets and variable

Choose actions and click.

Step 4:

Crete new repository secrete.

GitHub

Step 5

Go to the workflow file, we should modify the workflow to make the GitHub.

Modify Workflow

We will modify the .github/workflows

Use this yml file.

  name: Deploy to Azure App Service

on:
  push: 
    branches: 
      - master

jobs: 
  build-and-deploy:
    runs-on: ubuntu-latest
    steps:
      - name: Checkout Source
        uses: actions/checkout@v3
      - name: Setup Node.js version
        uses: actions/setup-node@v4
        with: 
          node-version: '18.x'
      - name: Install Dependencies
        run: npm install
      - name: Deploy to Azure App Service
        uses: azure/webapps-deploy@v2
        with:
          app-name: nextjsgit
          publish-profile: ${{ secrets.AZURE_WEBAPP_PUBLISH_PROFILE }}
          package: .   

Step 7

Try Deploy.

Now we can try to deploy by manually triggering or pushing the code to the selected branch.

When successful, it will mention the domain that you can use.

After the deployment, the application should now be available to browse.

NOTE: To use yarn, simply switch out npm for it in the workflow file

Creating Azure DevOps CI/CD Pipeline for .Net application.

Step 1: Create a API App in Azure through which the application will be Hosted.

.

Review the configurations and click on Create.

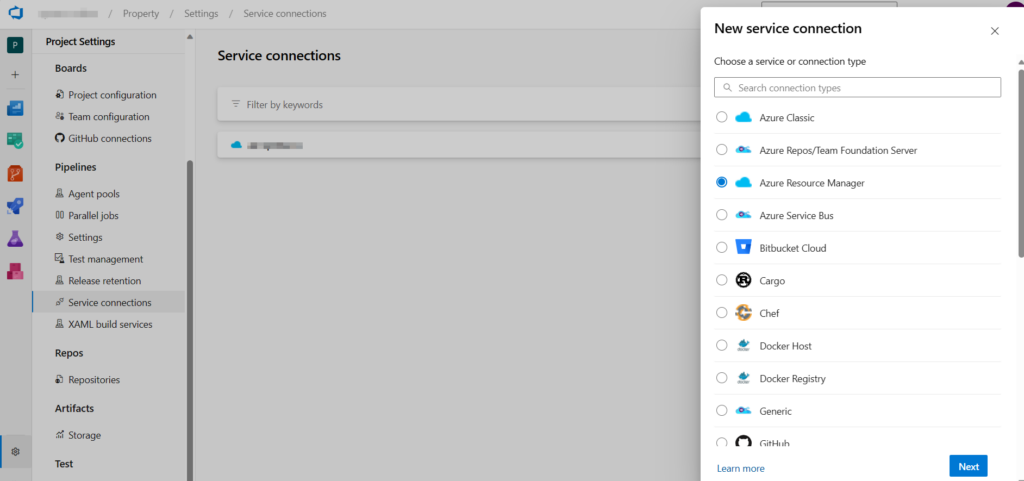
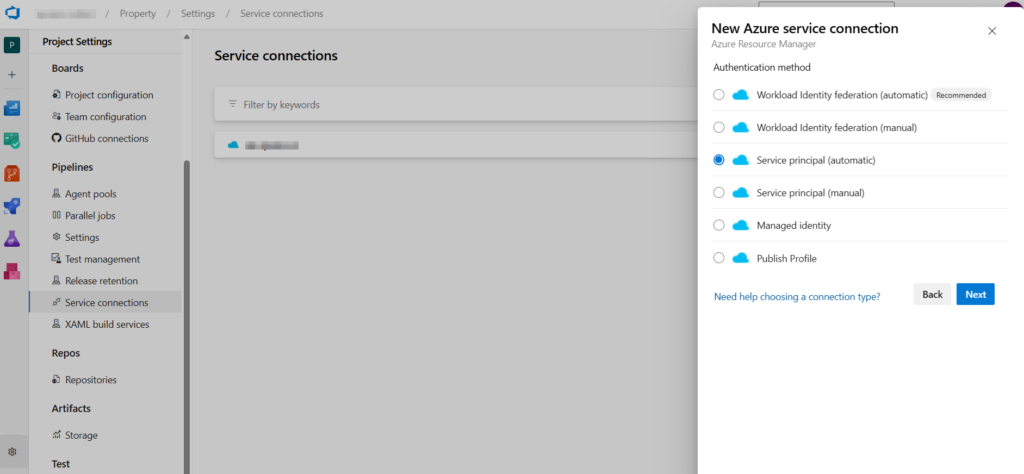
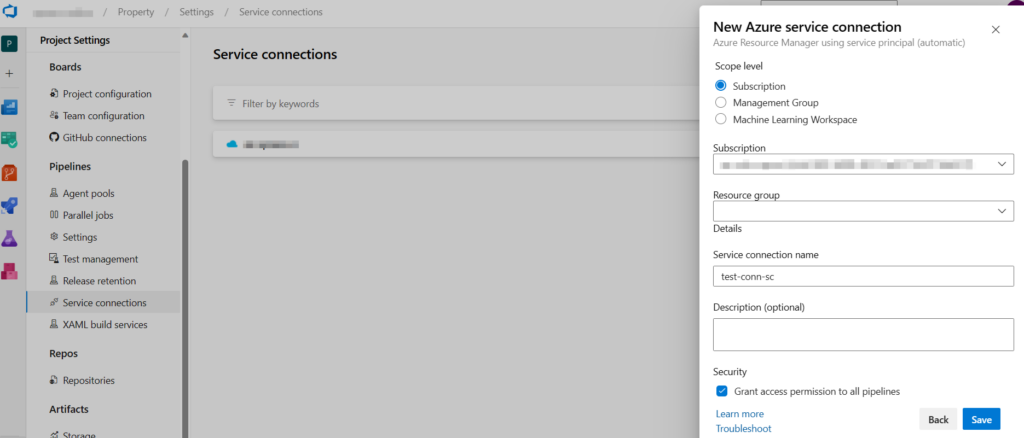
Step 2 : Creating a Service Connection for the pipelines to push the code to the API App

.

Select the Subscription and Click on Save.

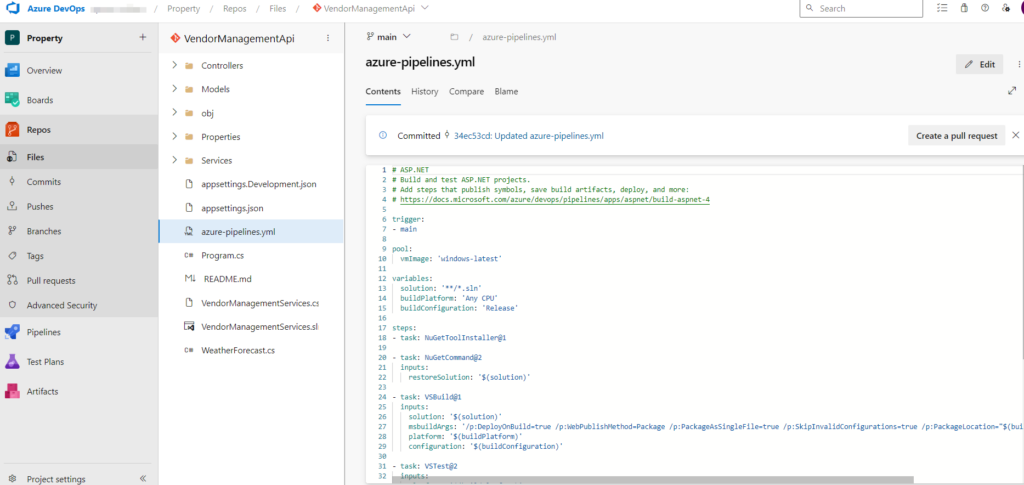
Step 3 : In the Source folder of the Application add a yml file and configure the deployment for the application.

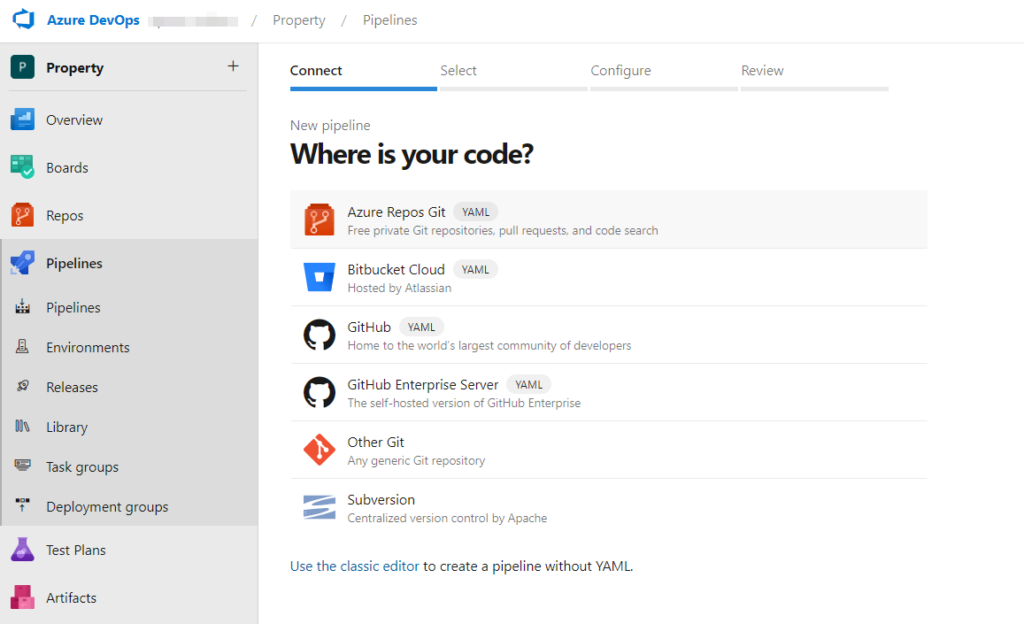
Step 4 : Now lets start creating a Pipeline. Click on Pipelines and select the type which stores the application. Here I am using Azure Repos Git, which has my application.

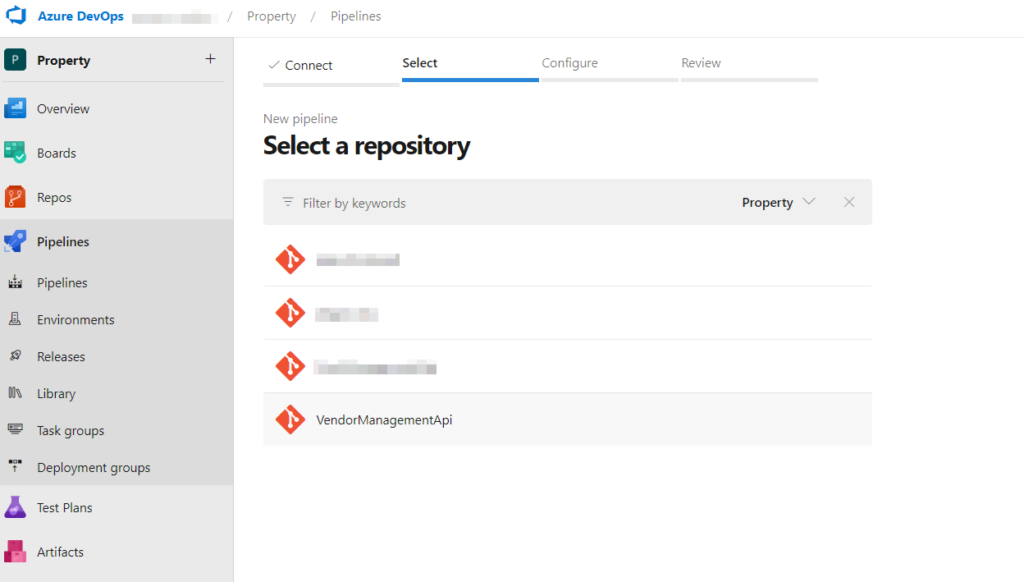
Select the Repository in which the Application is Stored.

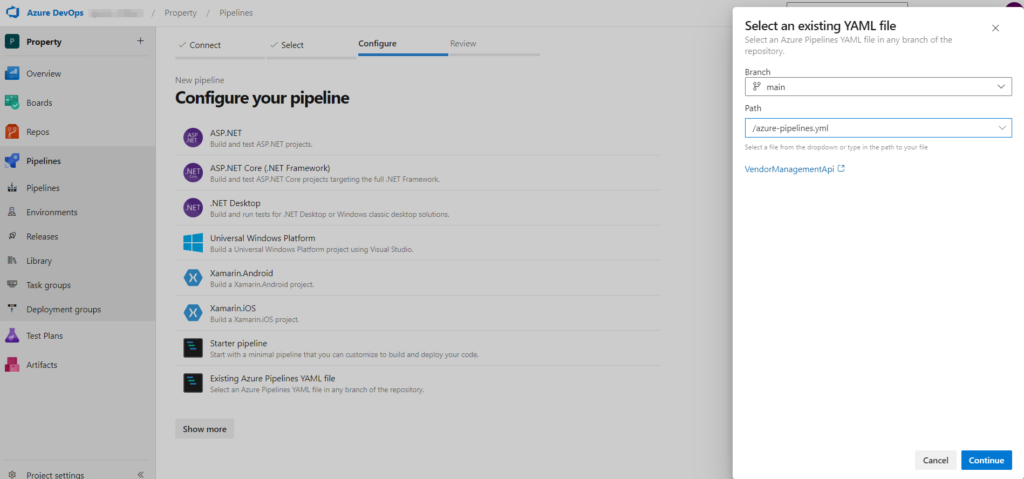
Select the YAML file that we have added previously to the source code.

.

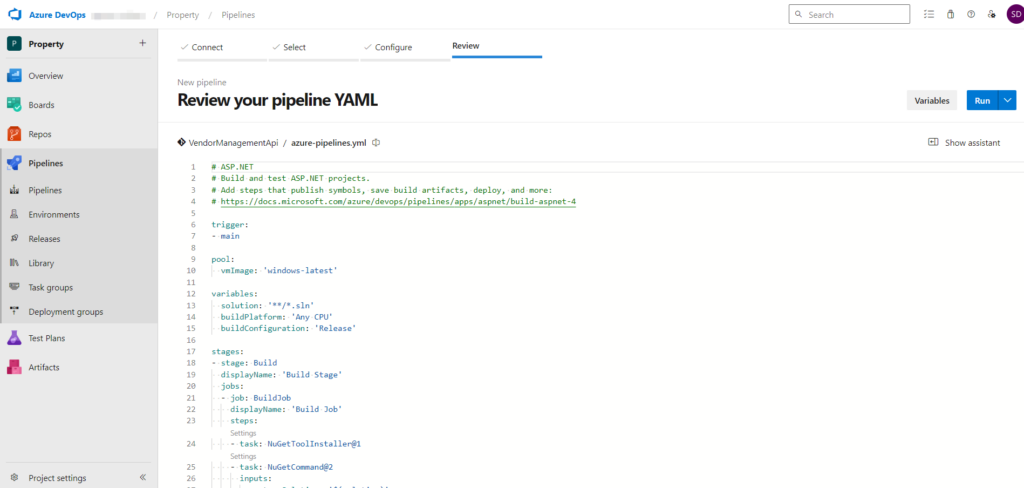
Use the below code that I used during this deployment. Change the API App name and Service Connection name according to the one that you create.

trigger:
- main

pool:
  vmImage: 'windows-latest'

variables:
  solution: '**/*.sln'
  buildPlatform: 'Any CPU'
  buildConfiguration: 'Release'

stages:
- stage: Build
  displayName: 'Build Stage'
  jobs:
  - job: BuildJob
    displayName: 'Build Job'
    steps:
    - task: NuGetToolInstaller@1
    - task: NuGetCommand@2
      inputs:
        restoreSolution: '$(solution)'
    - task: VSBuild@1
      inputs:
        solution: '$(solution)'
        msbuildArgs: '/p:DeployOnBuild=true /p:WebPublishMethod=Package /p:PackageAsSingleFile=true /p:SkipInvalidConfigurations=true /p:PackageLocation="$(build.artifactStagingDirectory)\WebApp.zip"'
        platform: '$(buildPlatform)'
        configuration: '$(buildConfiguration)'
    - task: VSTest@2
      inputs:
        platform: '$(buildPlatform)'
        configuration: '$(buildConfiguration)'
    - task: DotNetCoreCLI@2
      inputs:
        command: 'build'
        projects: '$(solution)'
        arguments: '--configuration $(buildConfiguration)'
    - task: DotNetCoreCLI@2
      inputs:
        command: 'test'
        projects: '**/*Tests/*.csproj'
        arguments: '--configuration $(buildConfiguration)'
    - task: PublishBuildArtifacts@1
      inputs:
        pathtoPublish: '$(Build.ArtifactStagingDirectory)'
        artifactName: 'drop'
        publishLocation: 'Container'

- stage: Deploy
  displayName: 'Deploy Stage'
  dependsOn: Build
  jobs:
  - deployment: DeployJob
    displayName: 'Deploy Job'
    environment: 'az-test-app-app'
    pool:
      vmImage: 'windows-latest'
    strategy:
      runOnce:
        deploy:
          steps:
          - task: DownloadBuildArtifacts@0
            inputs:
              artifactName: 'drop'
              downloadPath: '$(System.DefaultWorkingDirectory)'
          - task: AzureRmWebAppDeployment@4
            inputs:
              ConnectionType: 'AzureRM'
              azureSubscription: 'az-conn-sc' #Reclace with Service Connection Name
              appType: 'apiApp'
              WebAppName: 'az-test-app-app' # Replace with Api App Service Name.
              packageForLinux: '$(System.DefaultWorkingDirectory)/drop/WebApp.zip'

Step 5 : Run the Pipeline, here Build and Release Pipelines are together configured in a single YAML file.

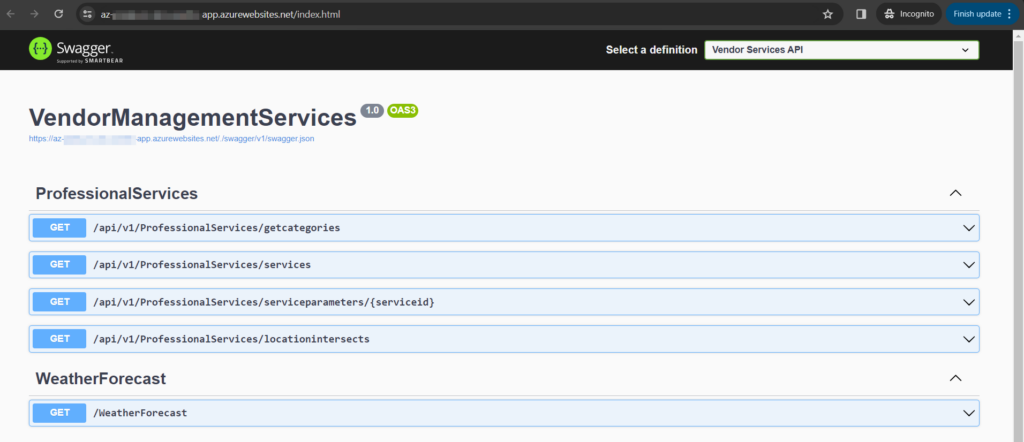
Step 6 : Once the Build and Deploy process is successful, check whether the application is published API App. Use the API apps URL to verify the application deployment.

The application is successfully deployed to API app, via Azure DevOps Pipeline.

Mastering Proper Naming Conventions for Azure DevOps Connections

Resource group

Az– Azure – Company NamePR (production)- UKS (location)- App (application)- RG (Resource group)

  Application Name

Project Administrators:

Should be create itadmin only do not person name on this project administrators

Service Connections:

Az– Azure – Company NamePR (production)- UKS (location)- App (application)- SC (Service Connections)

Repos file Name

Setting Up Strapi on Azure App Service Environment

Step 1:

Log in to the Azure Portal and navigate to the Marketplace

Step 2:

Type ‘Strapi’ in the search box and select ‘Strapi on Azure App Service

Step 3:

The template uses some default settings and configuration as mentioned below, they can be changed by editing the ARM template.

  • Azure App Service – Basic B1
  • Azure Database for MySQL – Basic, 1 vCore(s), 5 GB (Gen5)
  • Storage Account – General Purpose v2 Standard

Click the create button.

Step 4:

Create a Resource Group and Review/Create Resources.

Deployment takes more than 20 minutes

Step 5:

IMPORTANT NOTE: It takes a good 15 minutes or more before the URL starts working.

Once the deployment is finished open your Web App URL. In my case:  strapisqae5web.azurewebsites.net

Add ‘/admin’ to the URL!

strapisqae5web.azurewebsites.net/admin

× How can I help you?