I’ll walk through the process of deploying a React application to a Linux virtual machine using Azure DevOps. At the end of this process, your React application will be automatically deployed to your Linux VM every time you push to the main branch.
Overview:
The purpose of this step-by-step guide is to demonstrate a complete DevOps workflow for deploying a React application on an Azure Linux Virtual Machine using Nginx as a web server and then integrating it with Azure DevOps for continuous integration and deployment (CI/CD).
This workflow teaches:
- Cloud Deployment—How to Host a Web App on Azure.
- DevOps Automation—How to Use Azure DevOps for CI/CD.
- Web Server Configuration—Setting up Nginx for a React app.
- How to change the script and run it locally.
- End-to-End Development—From local development to production deployment.
Step-by-Step Guide:
Step 1: Create an Azure Linux Virtual Machine
What is it?
A virtual machine (VM) is like a computer in the cloud. We’ll use it to host our React app using Nginx, a web server.
How to do it:
- Go to the Azure Portal and sign in.
- In the search bar, type “Virtual machines” and click it.

- Click + Create – Azure Virtual Machine.
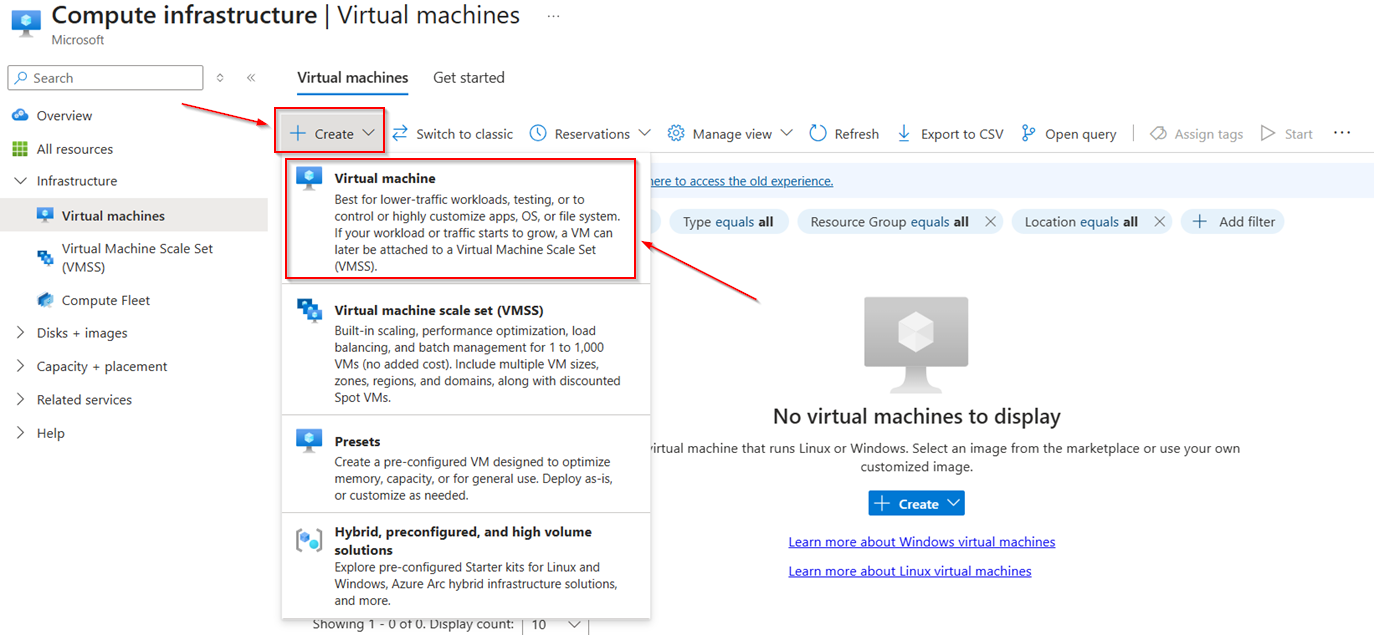
- Fill in the required fields:
- Subscription: Choose your subscription.
- Resource Group: Create a new one (e.g., MyReactAppGroup).
- Virtual Machine Name: e.g., ReactVM.
- Region: Choose a region close to you.
- Image: Select Ubuntu 20.04 LTS.
- Size: Choose something like Standard B1s (good for dev/testing).
- Authentication type: Choose Password or SSH (more secure).
- Username/Password: Set a username and password.
- Leave most other settings as default.
- Click Review + Create > Create.
- Wait for it to deploy (takes 1–2 minutes).
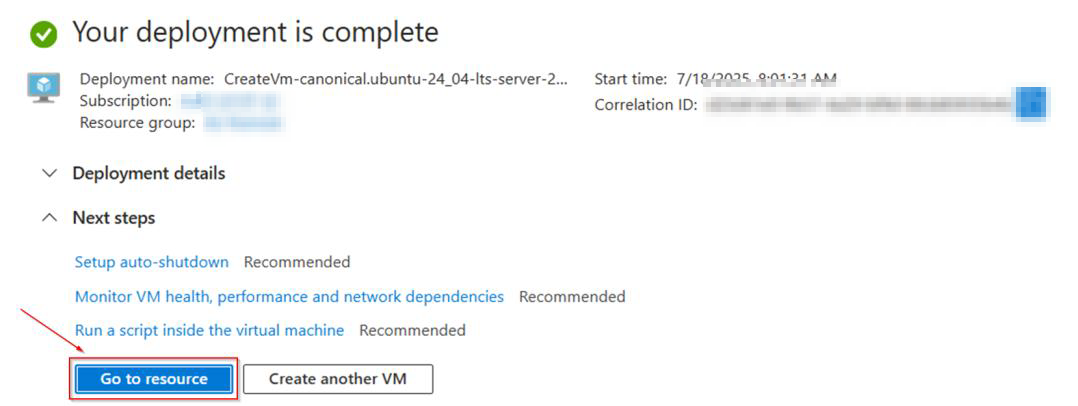
Step 2: Connect to the Virtual Machine
What is it?
You’ll connect to your Azure VM with VS Code. (Visual Studio Code)
What You Need:
| Tool | Description |
| VS Code | Installed on your local machine |
| Remote – SSH Extension | A VS Code extension |
| SSH access to your VM | IP address, username, and password or SSH key |
How to do it:
- Once the VM is running, go to the VM Overview page.
- Copy the public IP address (you’ll need it in the next step).
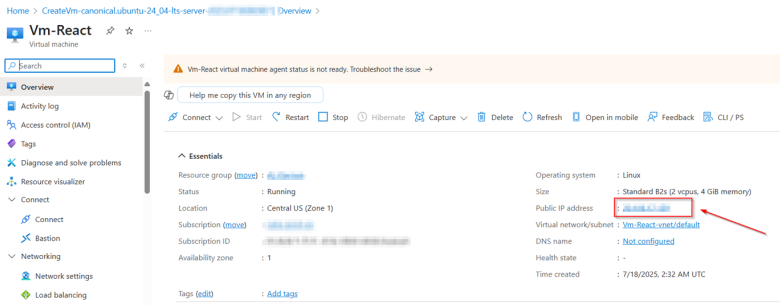
2.1: Install VS Code
If not already installed:
Download from https://code.visualstudio.com/.
2.2: Install Remote – SSH Extension
- Download and install VS Code.
- Open VS Code.
- Click on the Extensions icon. (left sidebar)
- Search for Remote—SSH.
- Click Install.
This lets you connect to remote Linux machines like your Azure VM.
2.3: Set Up the SSH Connection
You need to know:
- Your VM’s public IP.
- Your username. (e.g., azureuser)
- Your authentication method. (password or SSH key)
2.4: Set Up the VM at Vs Code
- Open VS Code.
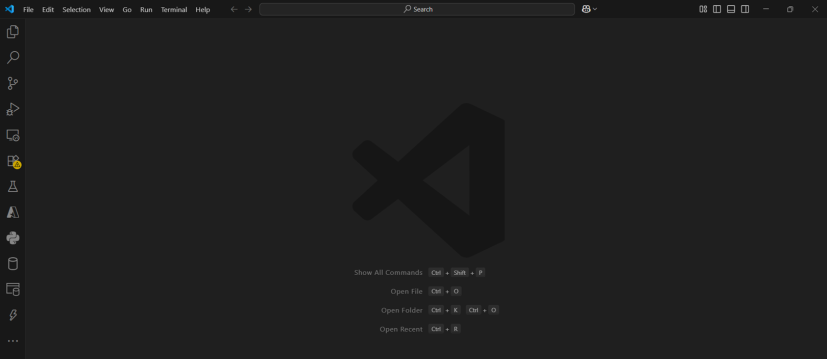
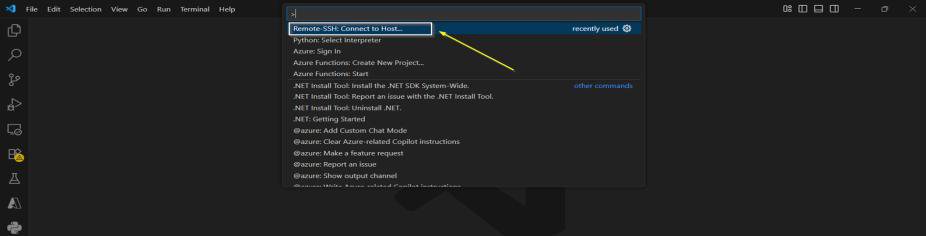
- Press Ctrl+Shift+P in VS Code, type Remote-SSH: Connect to Host…
- Click + Add New SSH Host. (e.g., ssh azureuser@)
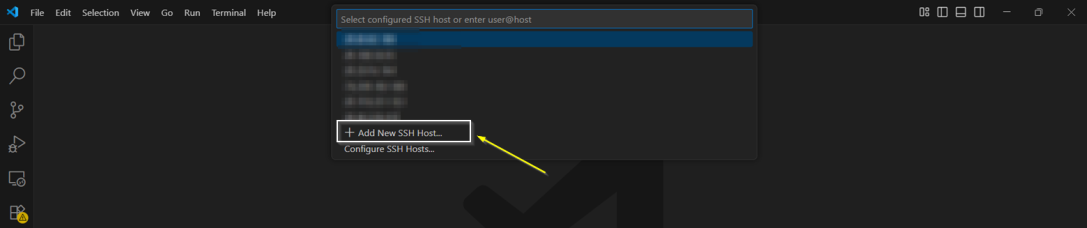

- It will ask where to save the config; choose the default. (usually ~/.ssh/config)

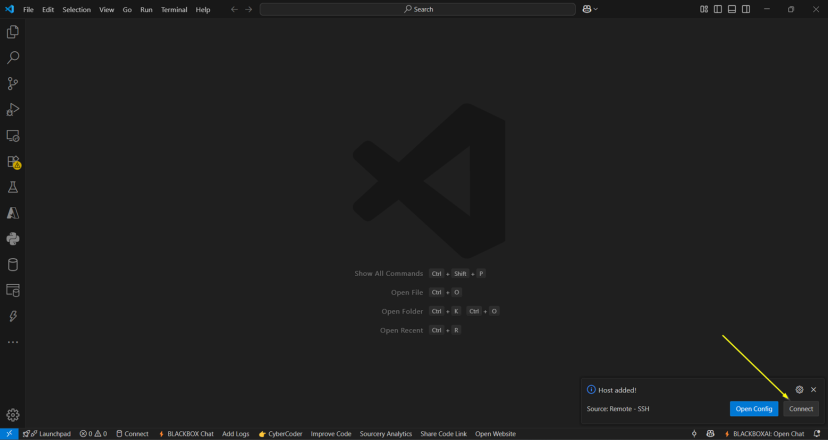
- On the right side, it will open a pop-up box. Click to Connect.
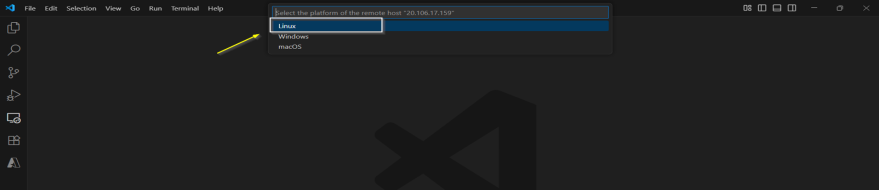
- Ask the platform to choose Linux.
- It will try to connect—VS Code asks for your VM password.

- Now VM is connected successfully at VS Code.
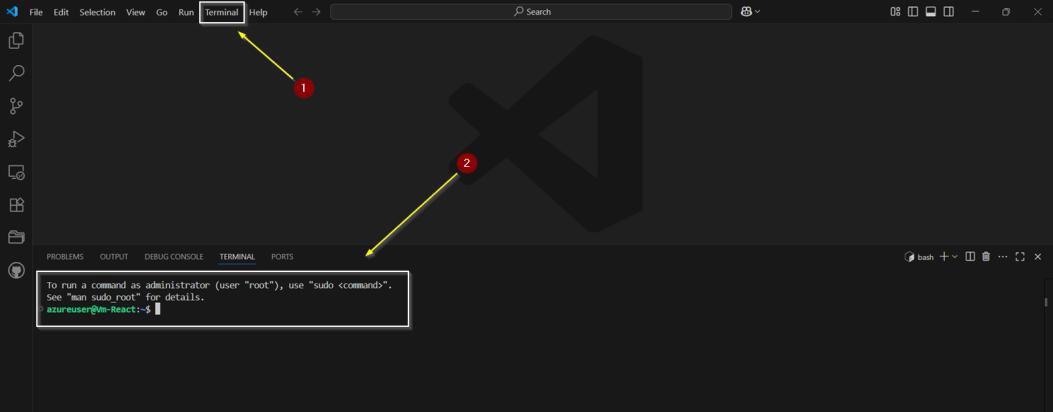
- To check, open your terminal inside VS Code; you will see something like username@VM Name: ~$
Step 3: Install Necessary Software Inside the Vm
- Inside the VM, run this command:
sudo apt update.

sudo apt install nodejs npm nginx -y.
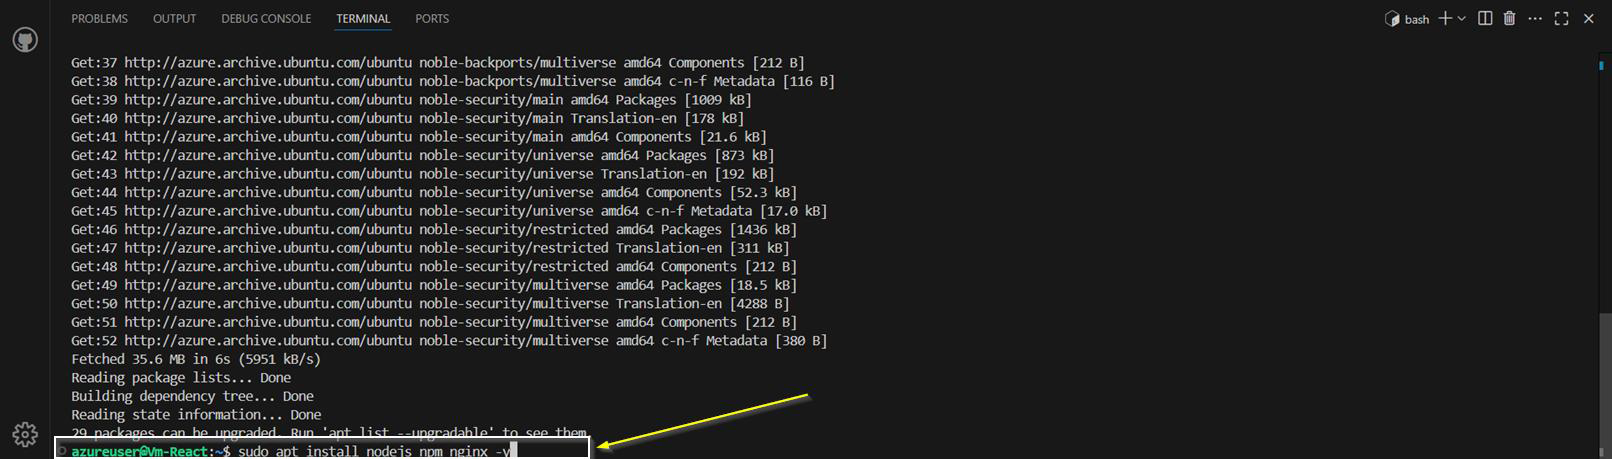
This installs:
- Node.js and npm: To build your React app.
- Nginx: To serve the website.
Step 4: Create a sample React app
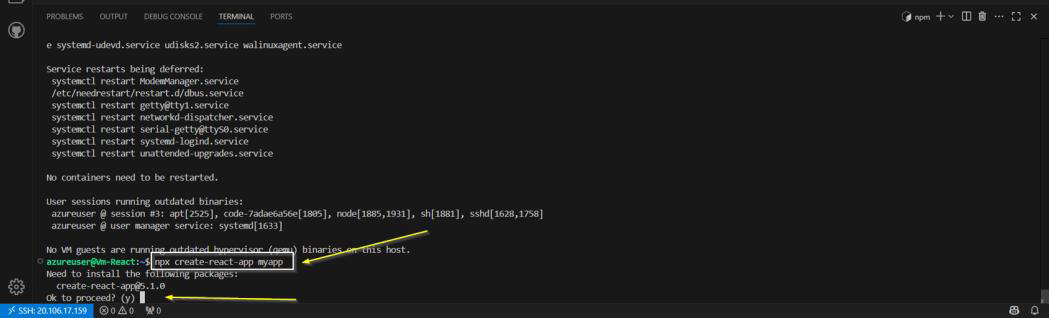
- Still inside your VM, run this command:
npx create-react-app myappOnce run this command, It will ask if it’s ok to proceed; give yes (y) to proceed
Next, run this command:
cd myapp

npm run build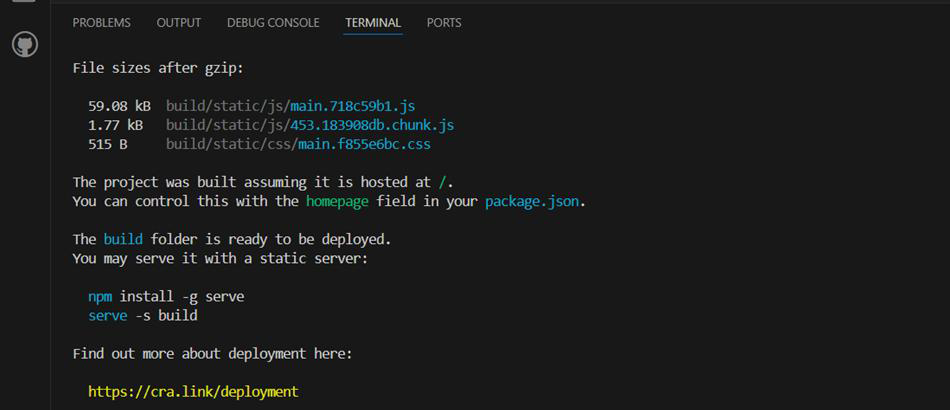
This creates a build folder with the static files for your app.
Step 5: Serve React app using NGINX
- Copy the React build to a public directory:
Run the command:
sudo cp -r build/ /var/www/myapp- Create a new NGINX config file:
Run the command:
sudo nano /etc/nginx/sites-available/myapp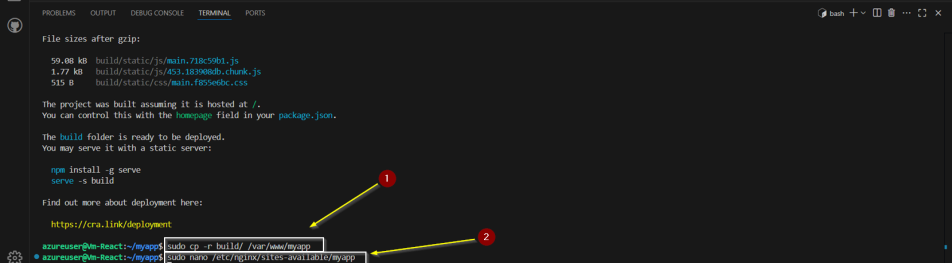
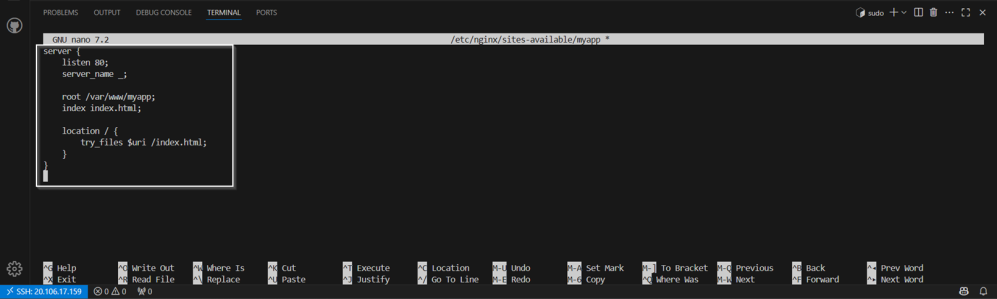
It will open another Linux window; paste this script.
server {
    listen 80;
    server_name _;

    root /var/www/myapp;
    index index.html;

    location / {
        try_files $uri /index.html;
    }
}
To save this script: Ctrl + O > Enter > Ctrl + X
- Enable the config and restart NGINX:
sudo ln -s /etc/nginx/sites-available/myapp /etc/nginx/sites-enabled

sudo nginx -t

sudo systemctl restart nginx
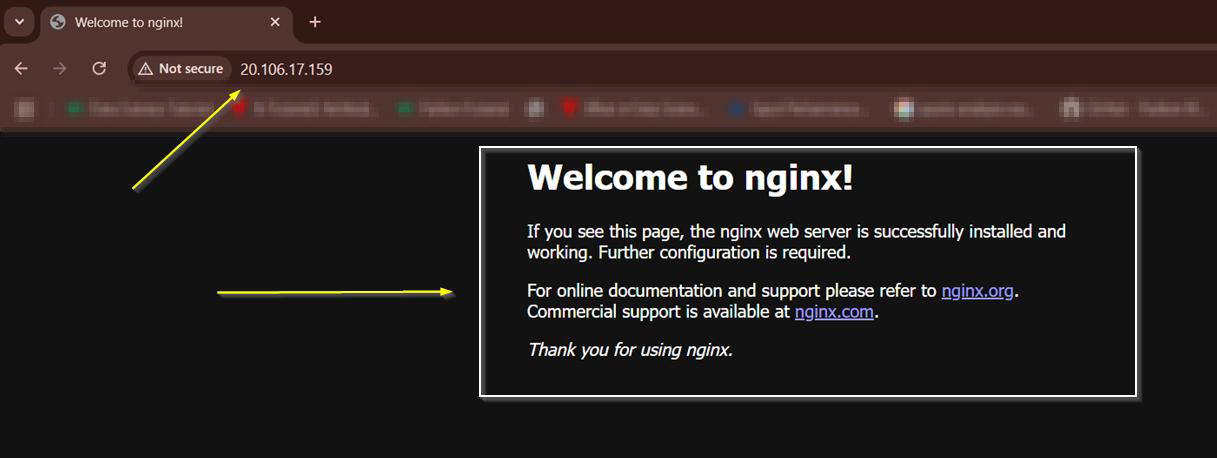
- Now copy your VM IP and paste it in your browser. It will show the Nginx server.
- Replace the default Nginx web page with your React app.
- Copy the React app build to the Nginx web root.
Make sure you’re in your Linux VM, inside your React app folder (usually ~/myapp). Run this command:
cd ~/myapp

npm run build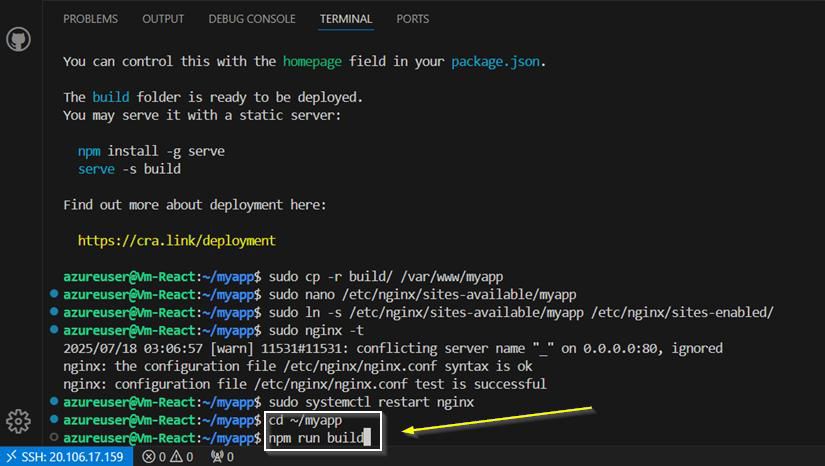
- Copy the build folder contents to Nginx’s web root.
sudo rm -rf /var/www/html/*

sudo cp -r build/* /var/www/html/- Restart the Nginx server.
sudo systemctl restart nginx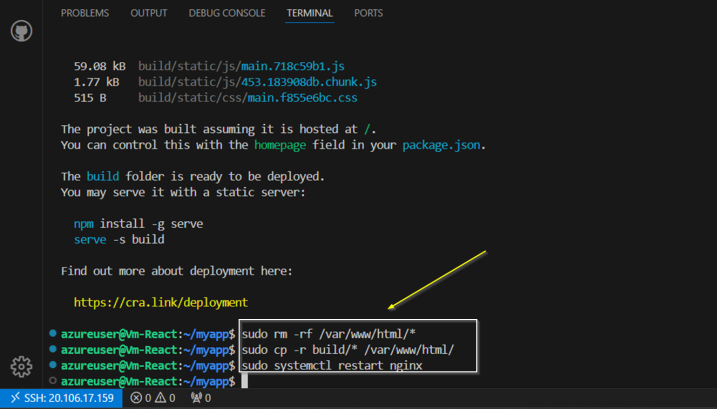
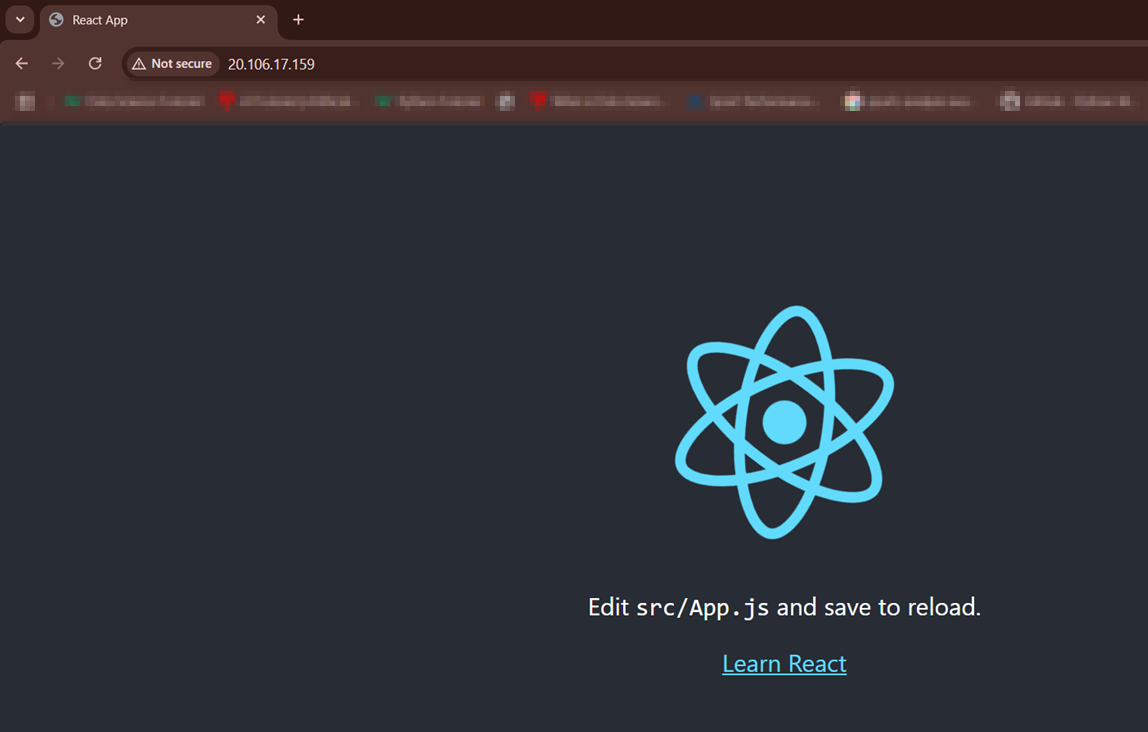
- Refresh the browser, and now you can see the React app.
Step 6: How to change the script inside the VM and test it locally
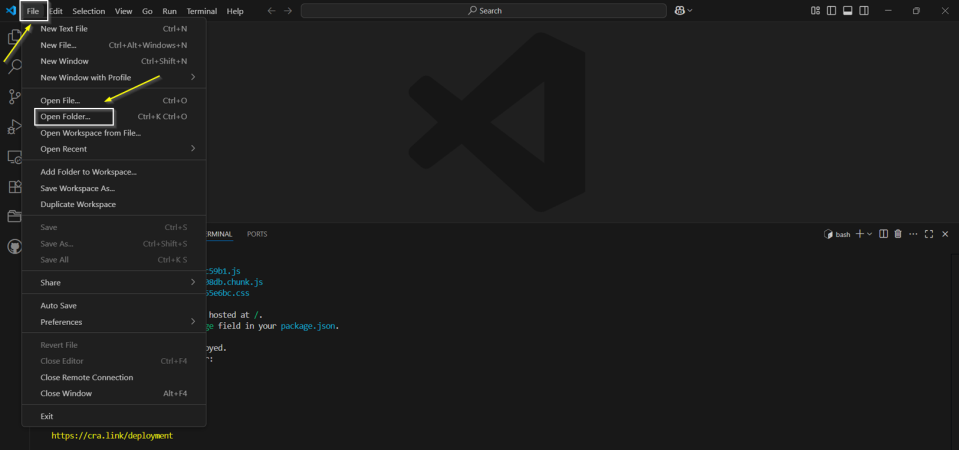
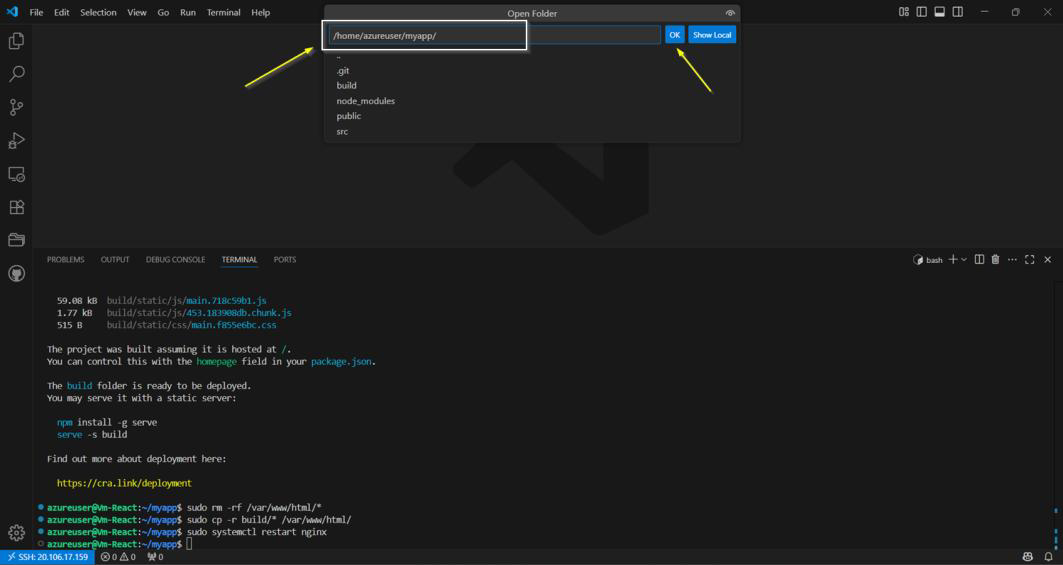
- In VS Code, go to File > Open Folder.
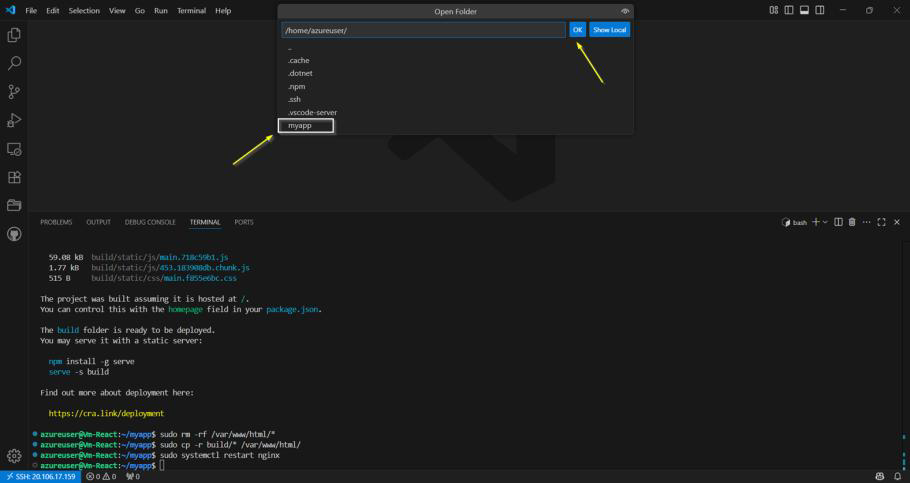
- It will react to the folder path and name. Click it > Click OK.
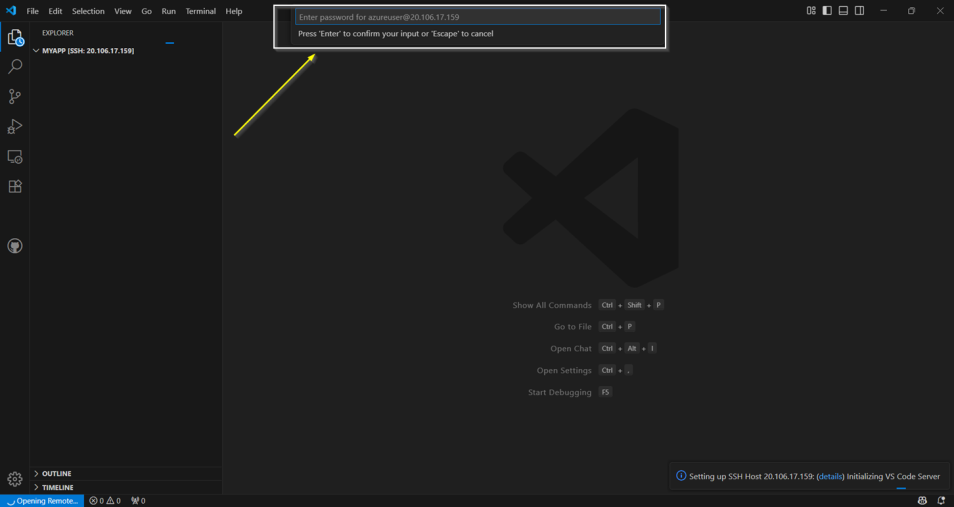
- It will ask for the VM password; put in the password and click Enter.
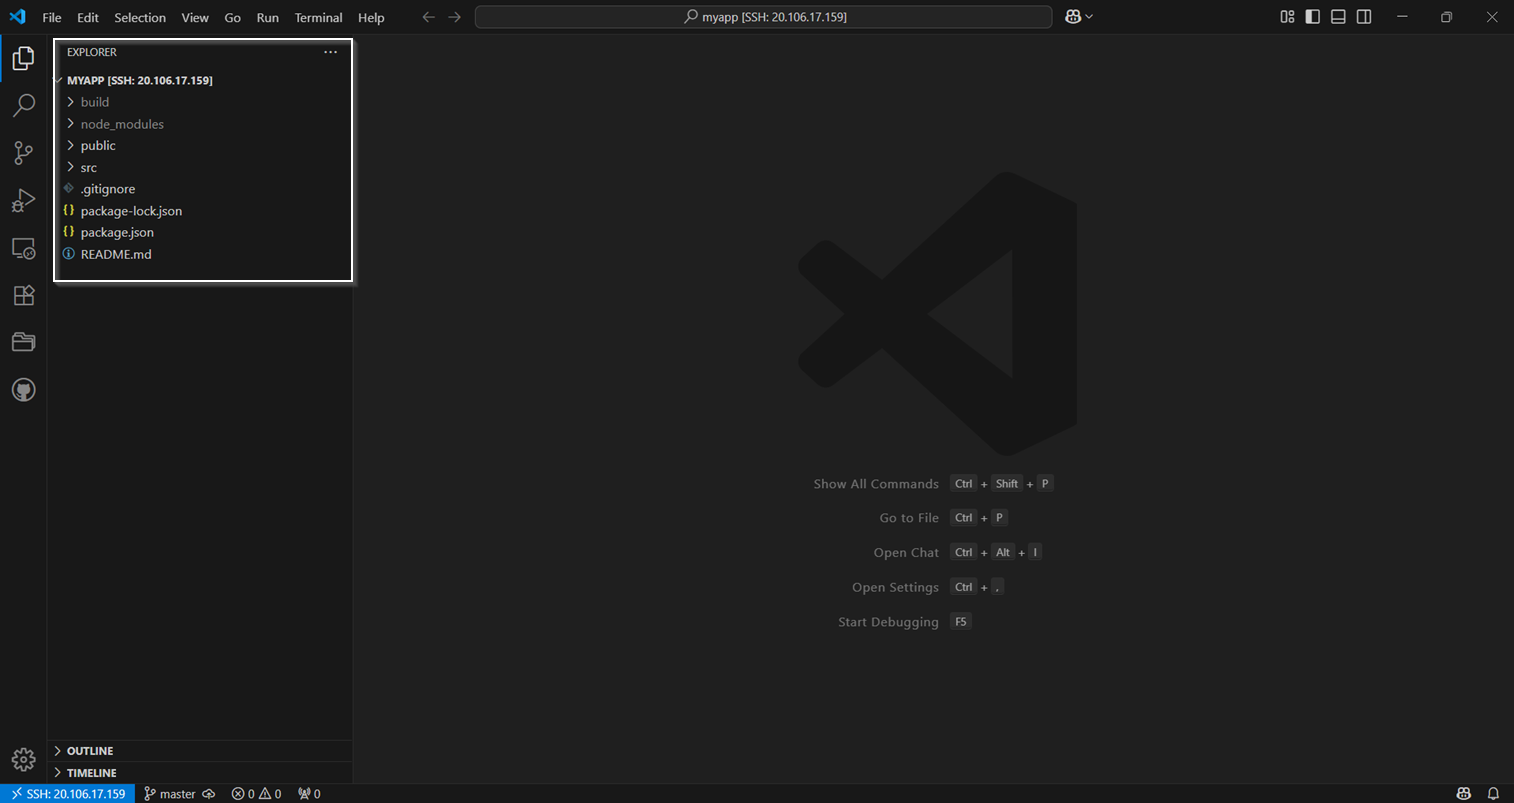
- Now you will see the React application previously created.
- Inside the src file, select the App.js and remove the old script.
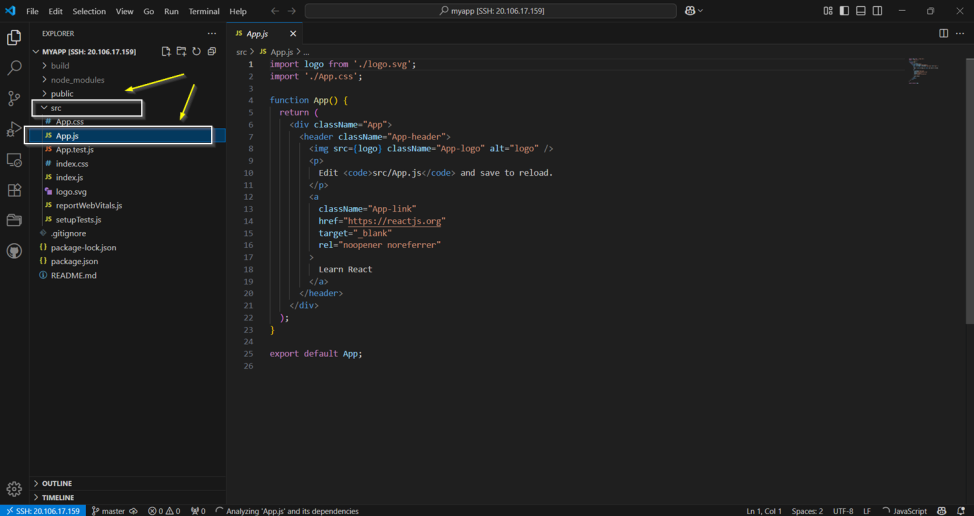
- Paste the script given below:
import React from 'react';

function App() {
  return (
    <div>
      <h1>Hello from React!</h1>
    </div>
  );
}

export default App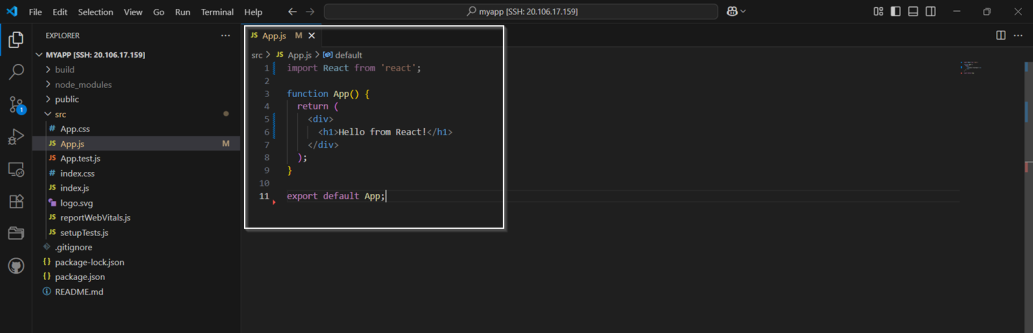
- Once you’ve saved the file, again run this command:
npm run build

sudo cp -r build/ /var/www/myapp

sudo systemctl restart nginx

npm start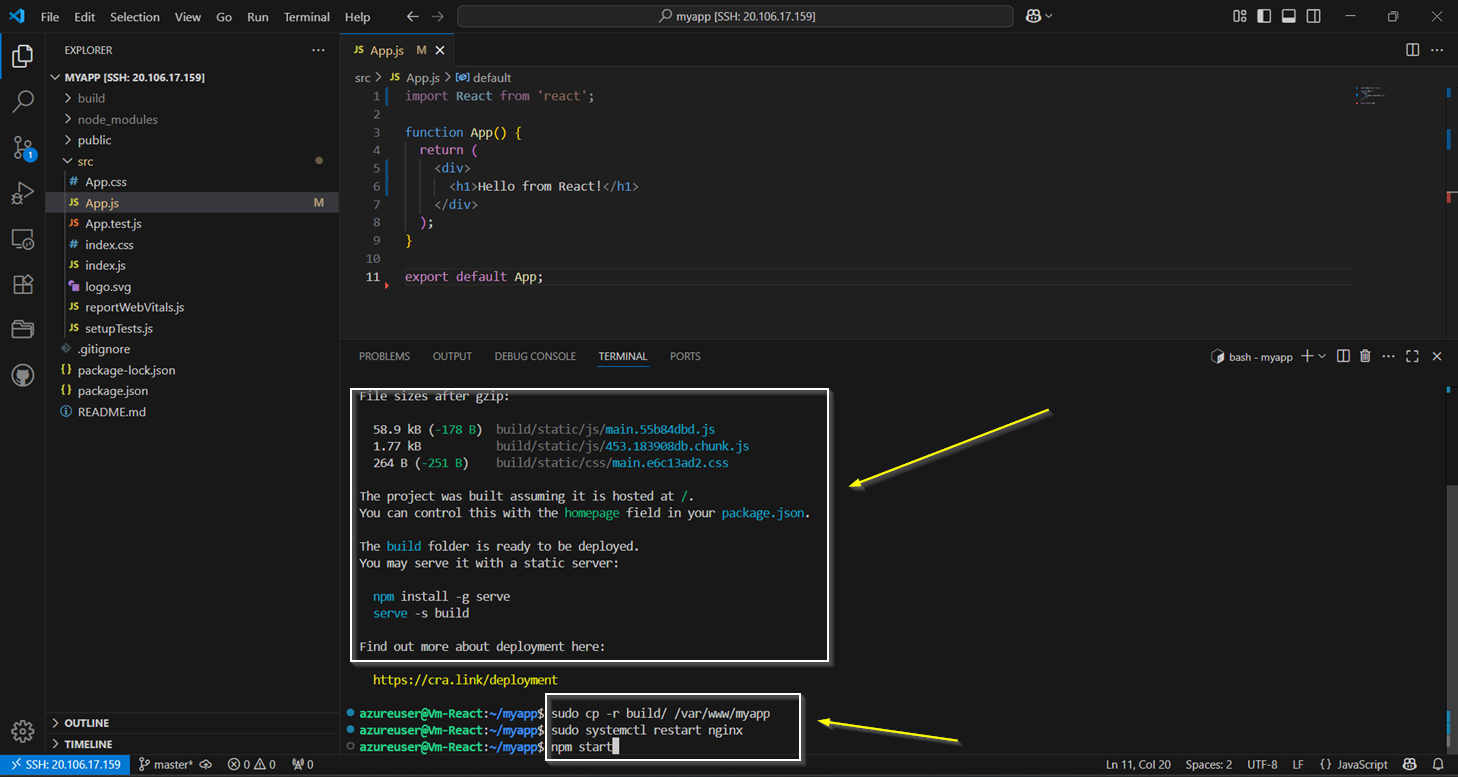
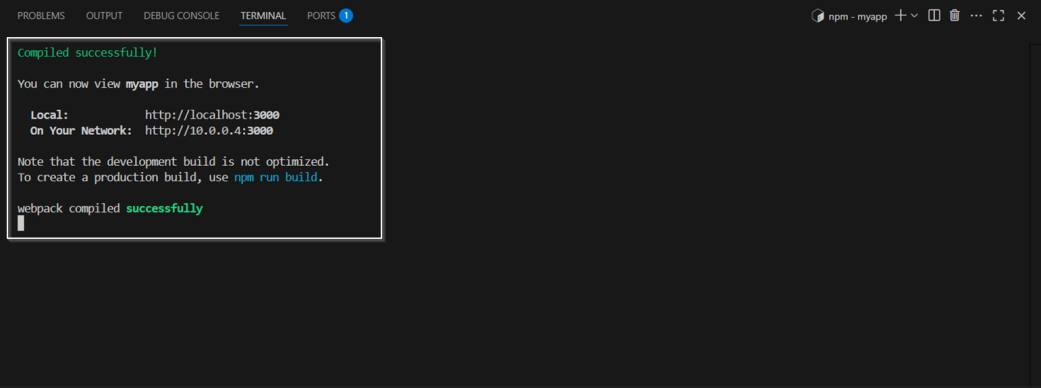
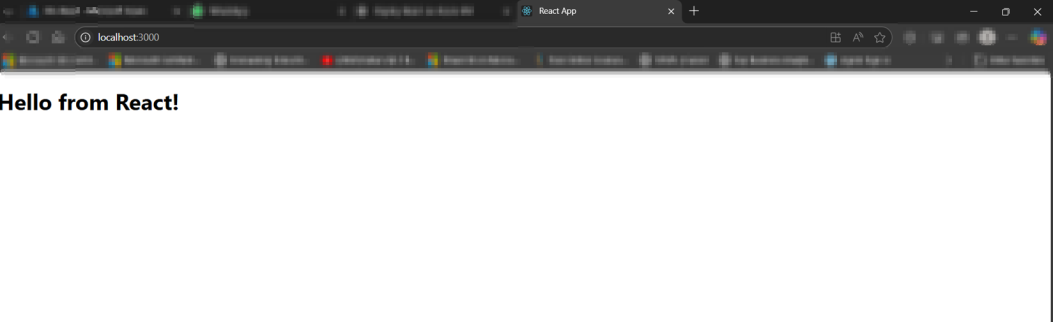
Now run your React app locally in the VM. It will run at localhost:3000 inside the VM.
Step 7: Deploy to Azure DevOps
- Go to https://dev.azure.com.
- Click the organization; if not already, please create it.
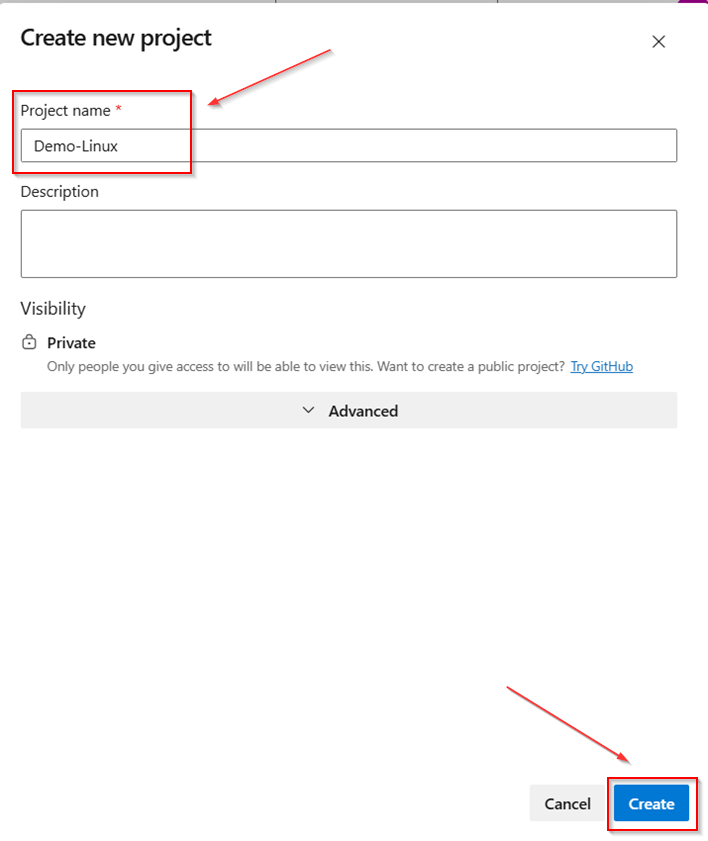
- Create your project (e.g., Demo-Linux) > Click Create.
- Go to your project.
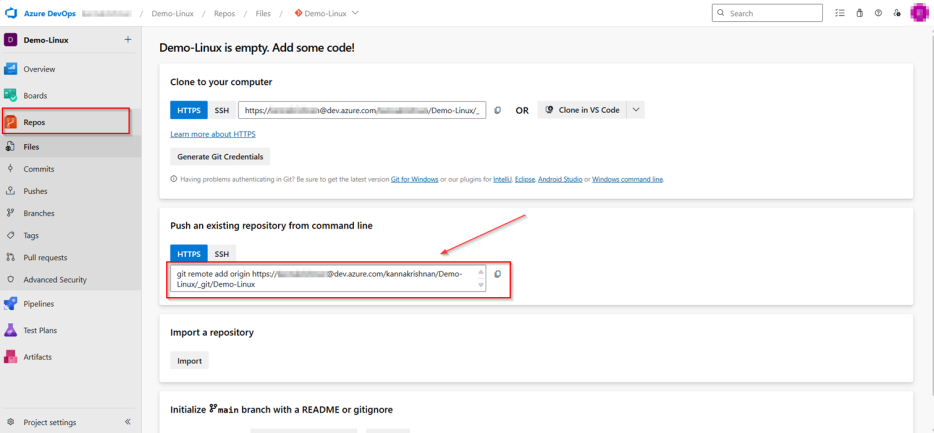
- Click Repos > Files
- Copy the URL; you will need this later.
Step 8: Set up the PAT (Personal Access Token)
What is a Personal Access Token (PAT)?
A Personal Access Token (PAT) in Azure DevOps is a security token that you can use as an alternative to a password when authenticating to Azure DevOps services.
If Azure asks for a username and password, the password is not your login password.
You need to generate a personal access token.
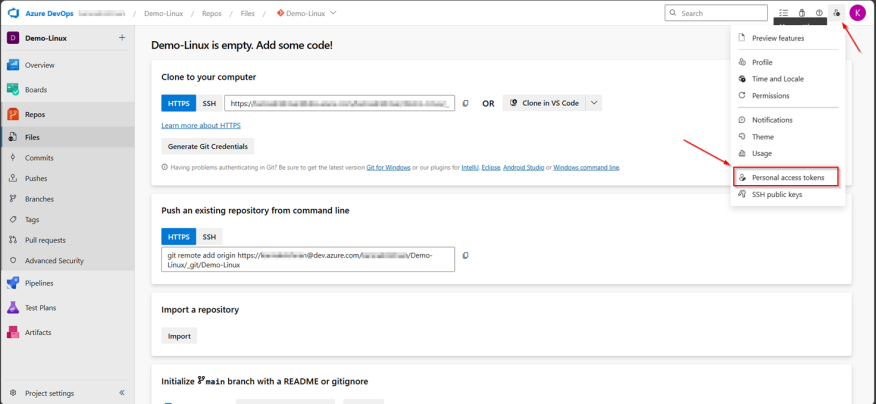
- To create the Personal Access Token (PAT)
- Click your profile (top right corner) ? Security
- Click New Token

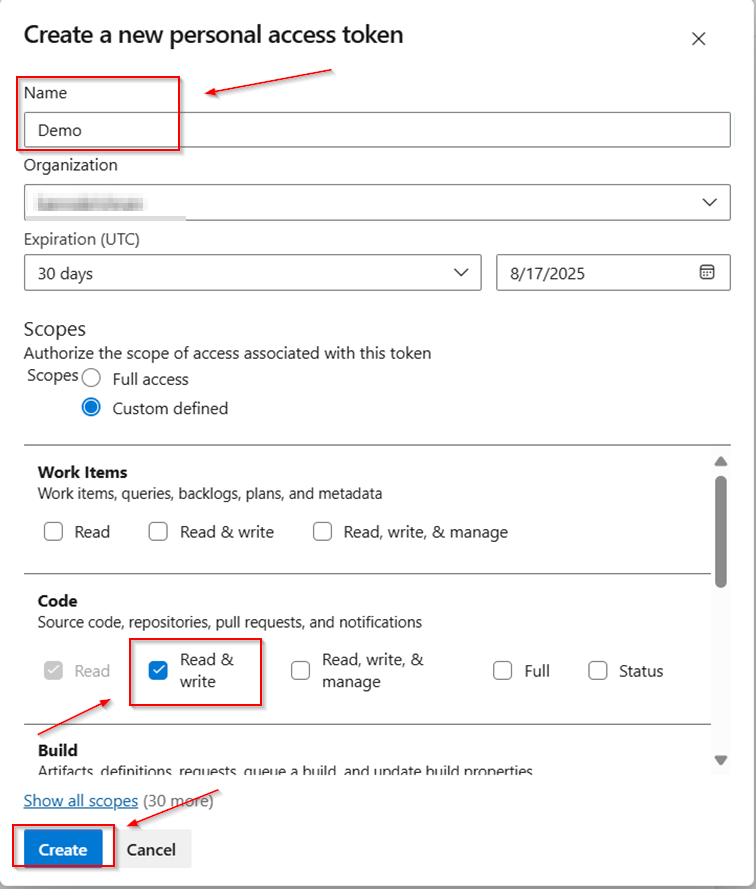
- Set:
Name: (e.g., Demo)
Scope: Code > Read & Write
- Click Create
- Copy the token (you won’t see it again)
- Click the Close
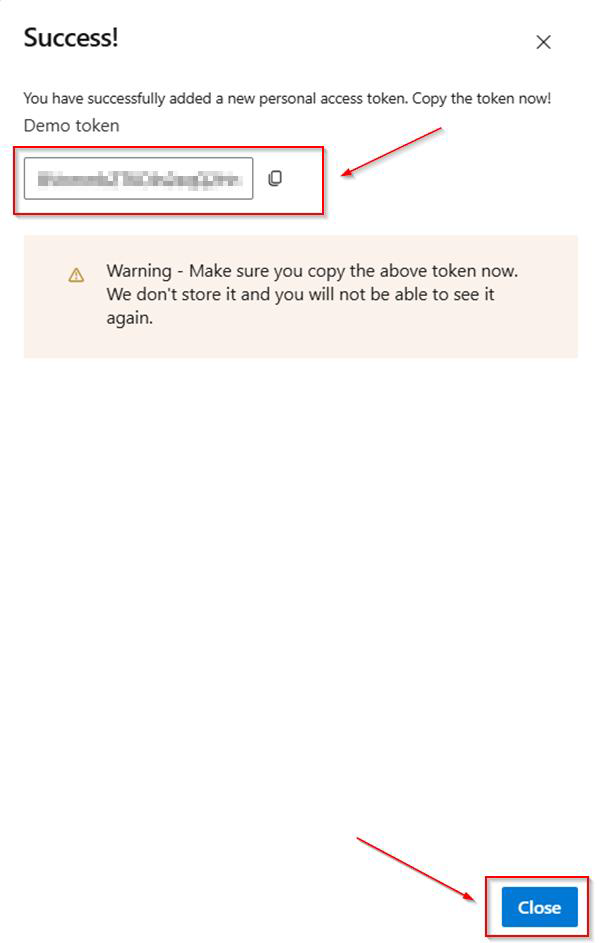
When Git asks for a password, paste the PAT
Step 9: Set up the Git in your VM
- Run these commands one-by-one:
git init

git add .

git remote add origin https://dev.azure.com/your-org/your-project/_git/your-repo

git branch -M main

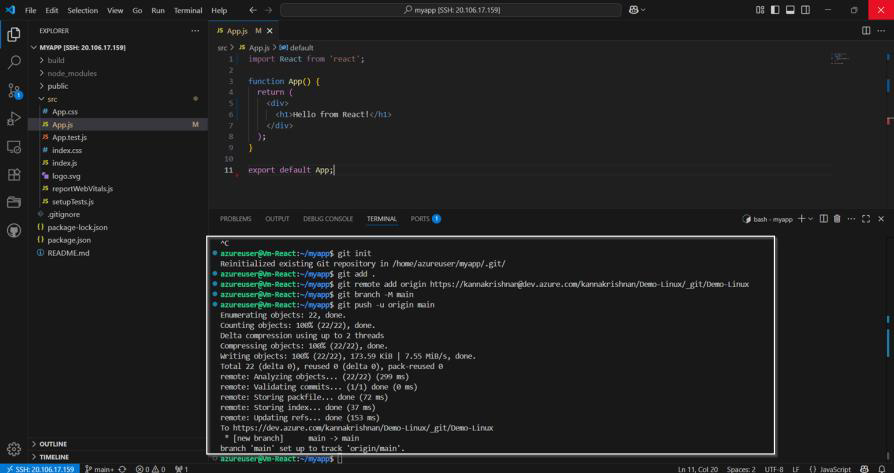
git push -u origin main
Once you run this command, git push -u origin main, it will ask for a password. Don’t paste your Azure login password and VM password. Copy and paste your already created PAT.
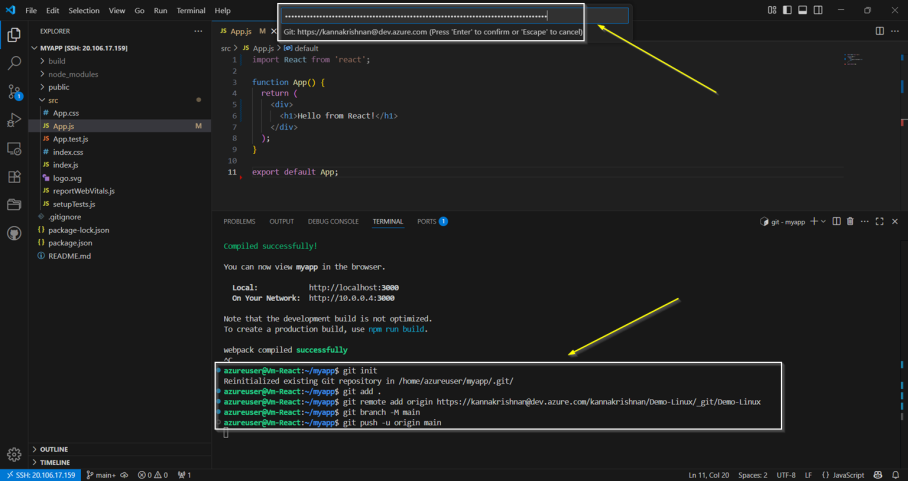
- Now successfully push into the repository.
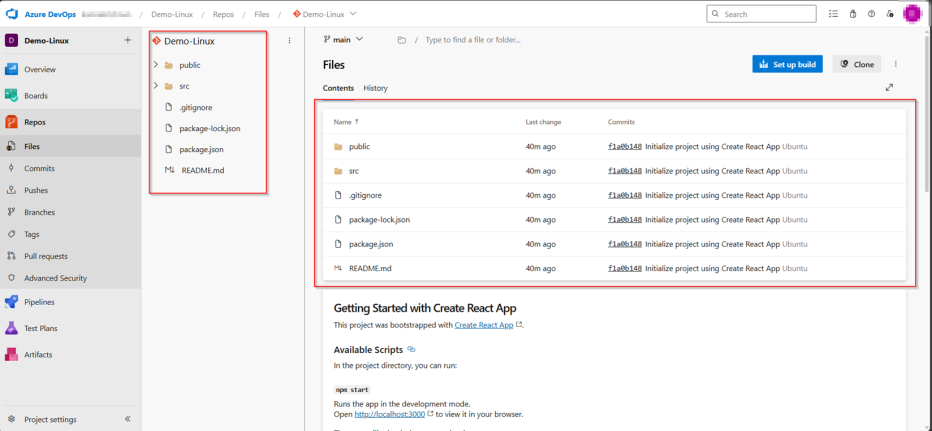
Step 10: Set Up SSH Connection to the VM
Before you can copy files to the VM, you must allow Azure DevOps to connect via SSH.
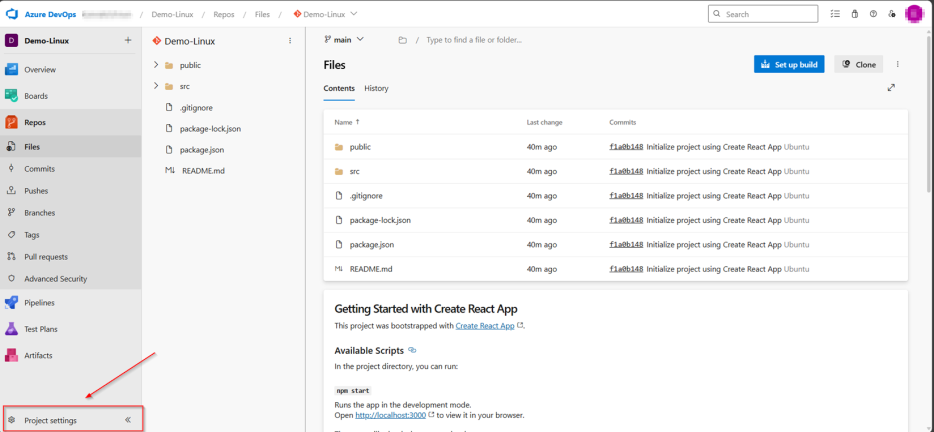
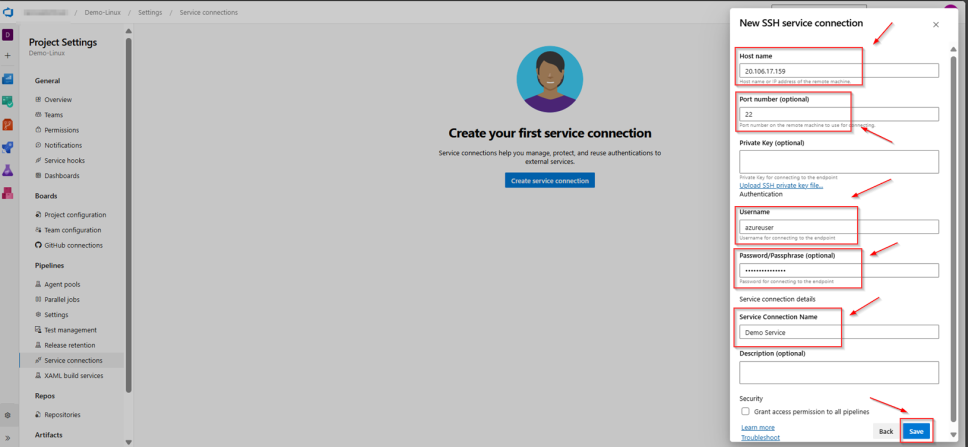
- In Azure DevOps, go to Project Settings (bottom left corner)
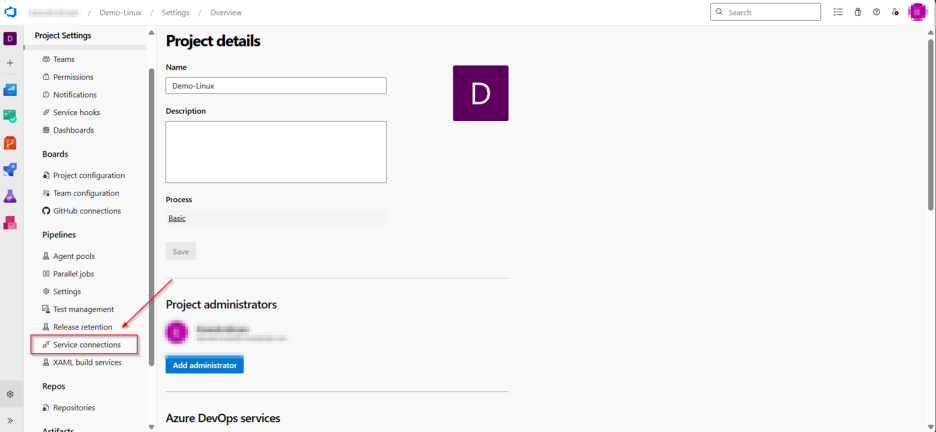
- Click Service Connection.
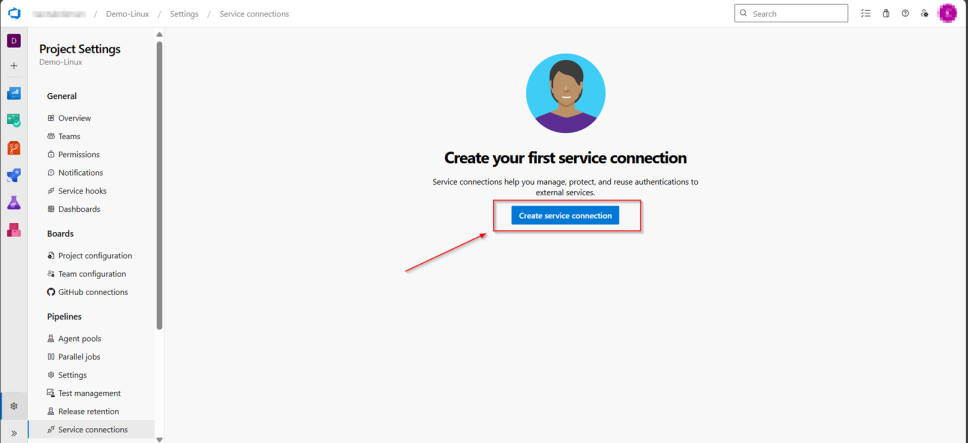
- Click Create service connection.
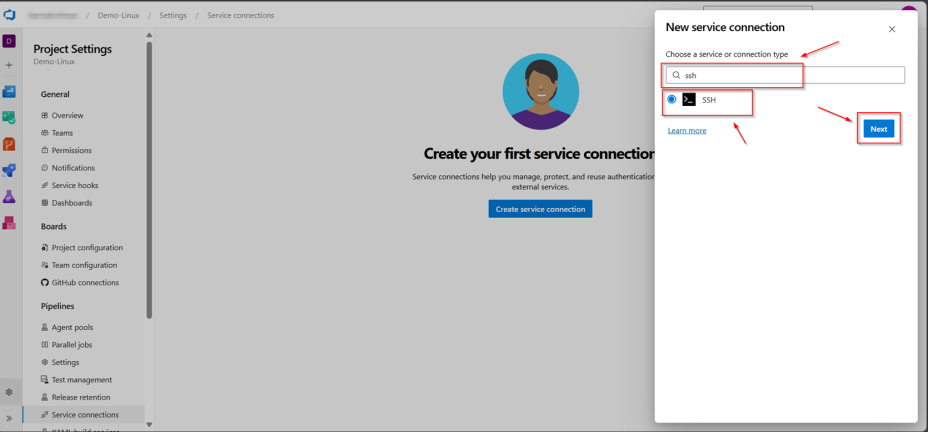
- Search SSH > Choose SSH ? Click Next.
- Now fill in:
- Host—Your VM’s public IP (e.g., 52.123.45.67)
- Port – 22
- Username—The username you used to create the VM
- Password—Choose whichever you used to connect to the VM
- Connection Name—e.g., Demo Service
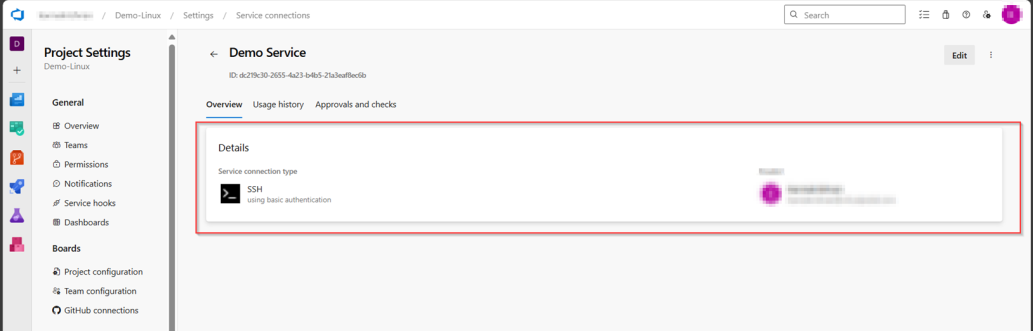
- Now the service connection is created successfully.
Step 11: Create the Release Pipeline
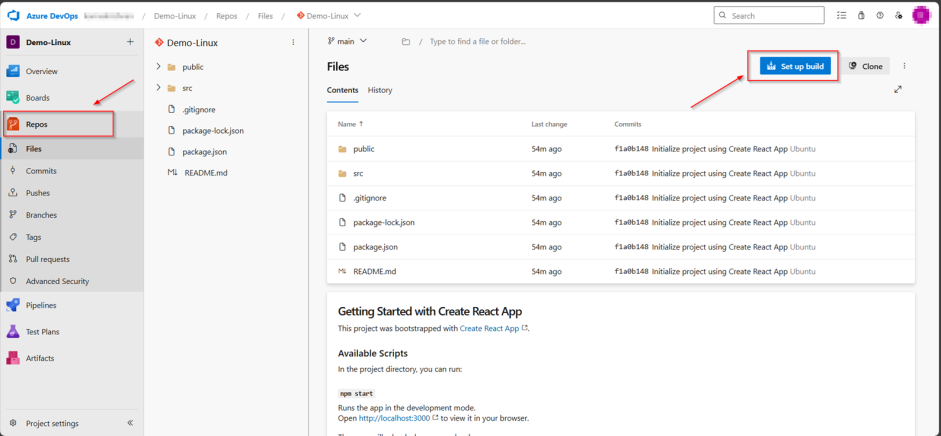
- Go to Azure DevOps ? Click the Repos.
- In the top right, Click set up build.
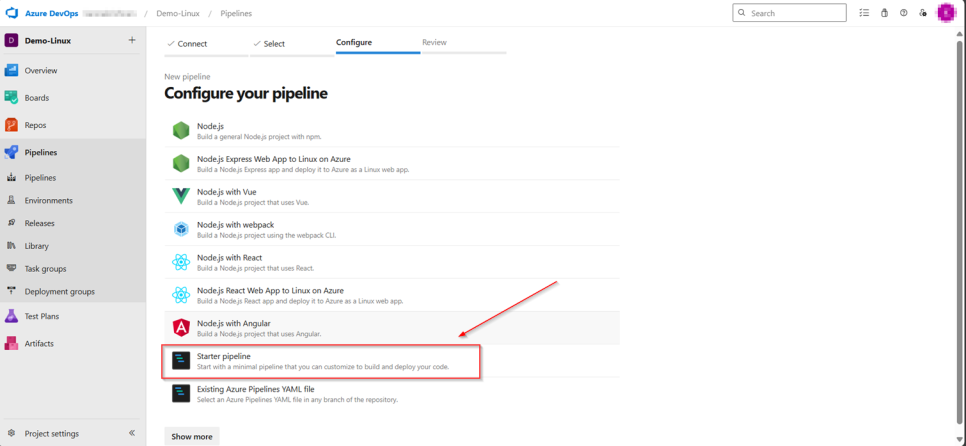
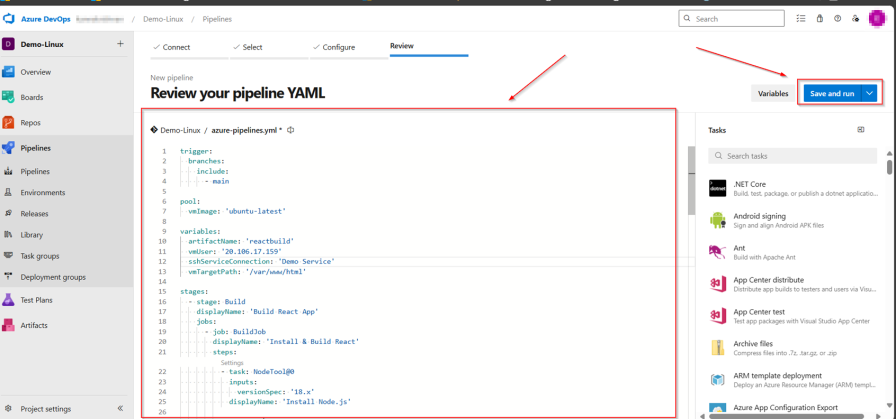
- Click the Starter pipeline and paste the YAML file given below:
trigger:
  branches:
    include:
      - main

pool:
  vmImage: 'ubuntu-latest'

variables:
  artifactName: 'reactbuild'
  vmUser: '20.80.82.189'
  sshServiceConnection: 'Linux'
  vmTargetPath: '/var/www/html'

stages:
  - stage: Build
    displayName: 'Build React App'
    jobs:
      - job: BuildJob
        displayName: 'Install & Build React'
        steps:
          - task: NodeTool@0
            inputs:
              versionSpec: '18.x'
            displayName: 'Install Node.js'

          - script: |
              npm install
              npm run build
            displayName: 'Build React App'

          - task: CopyFiles@2
            inputs:
              SourceFolder: '$(System.DefaultWorkingDirectory)/build'
              Contents: '**'
              TargetFolder: '$(Build.ArtifactStagingDirectory)'
            displayName: 'Prepare files for artifact'

          - task: PublishBuildArtifacts@1
            inputs:
              PathtoPublish: '$(Build.ArtifactStagingDirectory)'
              ArtifactName: 'reactbuild'
              publishLocation: 'Container'
            displayName: 'Publish Artifact'

  - stage: Deploy
    displayName: 'Deploy to Azure Linux VM'
    dependsOn: Build
    jobs:
      - deployment: DeployToVM
        environment: 'Production'
        strategy:
          runOnce:
            deploy:
              steps:
                - download: current
                  artifact: reactbuild  # ? FIXED: This ensures the correct artifact is downloaded

                - task: CopyFilesOverSSH@0
                  inputs:
                    sshEndpoint: 'Linux'
                    sourceFolder: '$(Pipeline.Workspace)/reactbuild'
                    contents: '**'
                    targetFolder: '/home/azureuser/reactdeploy'
                    readyTimeout: '20000'
                  displayName: 'Copy React Build to Linux VM'

                - task: SSH@0
                  inputs:
                    sshEndpoint: 'Linux'
                    runOptions: 'inline'
                    inline: |
                      sudo rm -rf /var/www/html/*
                      sudo cp -r /home/azureuser/reactdeploy/* /var/www/html/
                      sudo chown -R www-data:www-data /var/www/html
                      sudo systemctl restart nginx
                    readyTimeout: '20000'
                  displayName: 'Restart Nginx'
Please change the your VM Ip and Service connection name in the YAML file
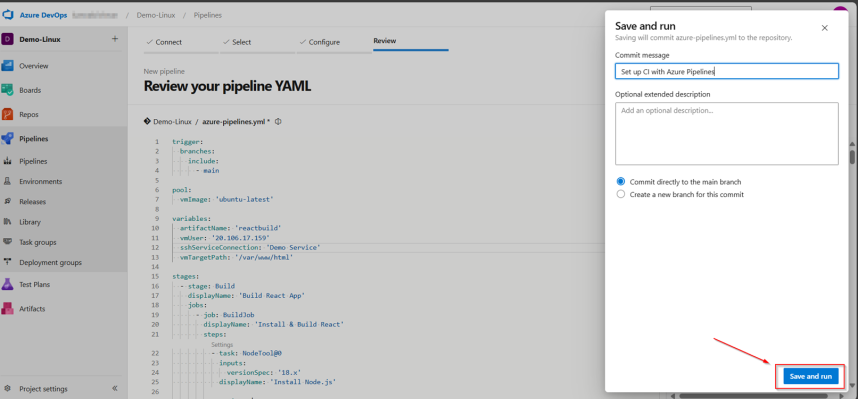
- Click Save and run > Save and run.
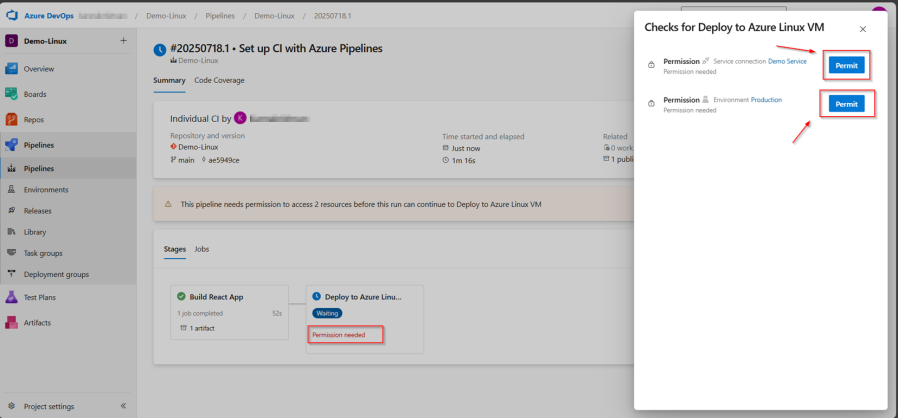
- Once Build is completed, it automatically deploys. Before deploying, it asks permission to give a permit option. It will take 2–3 minutes to deploy.
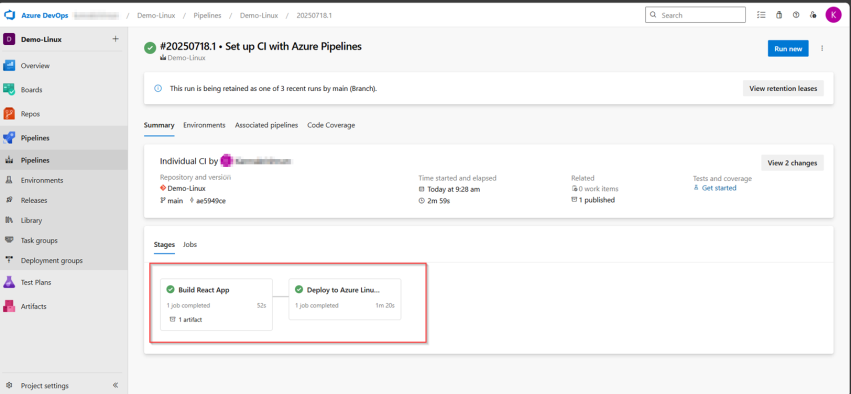
- Now build and deploy is completed.
- Now go to the browser and enter the IP. It will show the React page again, not “Hello from React!”
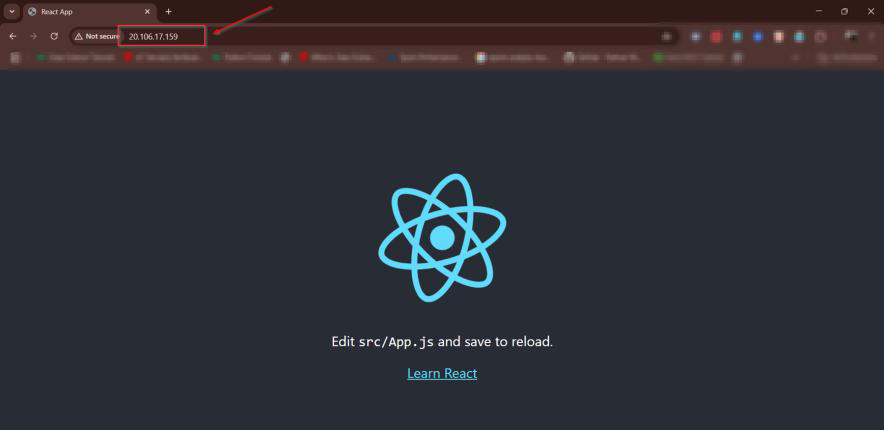
Step 12: To fix this “Hello from React!” (Push git commit)
- Go to VS Code, and inside the VM, follow these commands:
git add .

git commit -m "Updated homepage message"

git pull origin main –rebase

git push origin main
Now git commit is successfully completed.
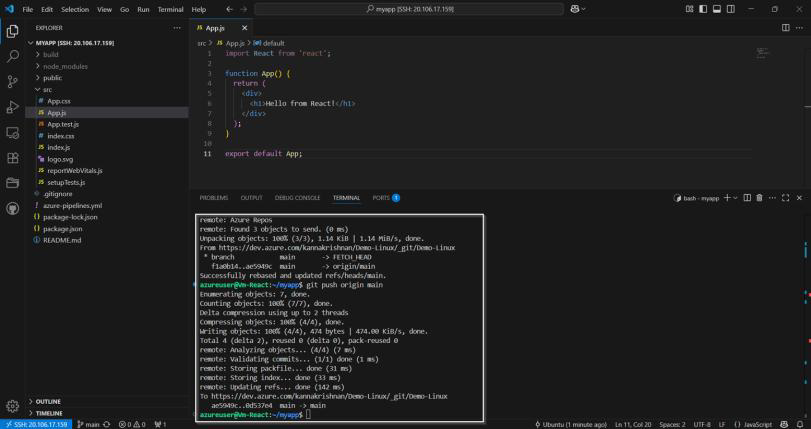
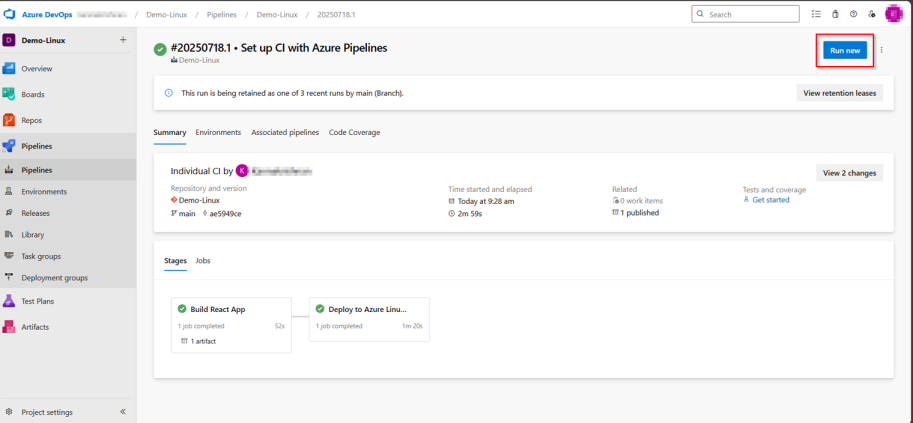
- Rerun the build and deploy.
- Go to the pipeline. At the top right, click the Run new button, and then click Run.
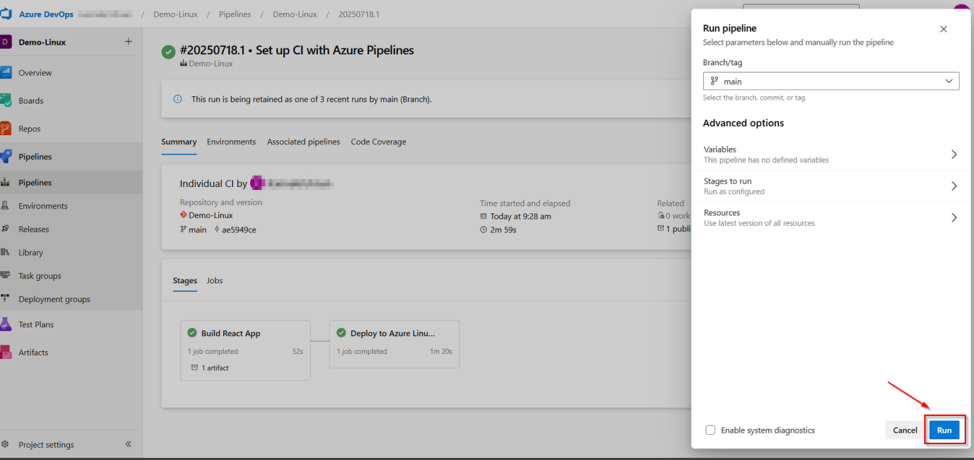
- Now build and deploy is successfully completed.
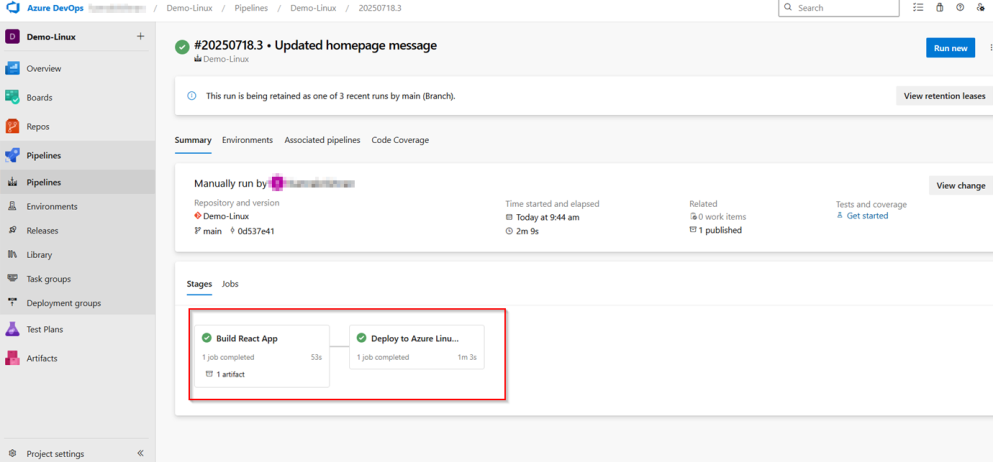
- Now refresh the browser; it will show “Hello from React!”

Get new Microsoft 365 and Azure guides from Azure365Pro first in Google.