Send an email with a PDF attachment from SharePoint using Power Automate

Introduction:

This guide explains how to automatically send an email with a PDF file stored in SharePoint using Microsoft Power Automate. This can help teams automate document delivery like invoices, reports, or contracts without manual work. It’s designed for beginners with basic Microsoft 365 access.

Requirements:

  • A Microsoft 365 account.
  • A PDF file stored in SharePoint. (e.g., in a Document Library)
  • Access to Outlook. (Office 365 email)

Step 1: Open Power Automate

  1. Go to https://make.powerautomate.com.
  1. Sign in with your Microsoft 365 account.

Step 2: Create a New Flow

  1. Click on Create in the left-hand menu.
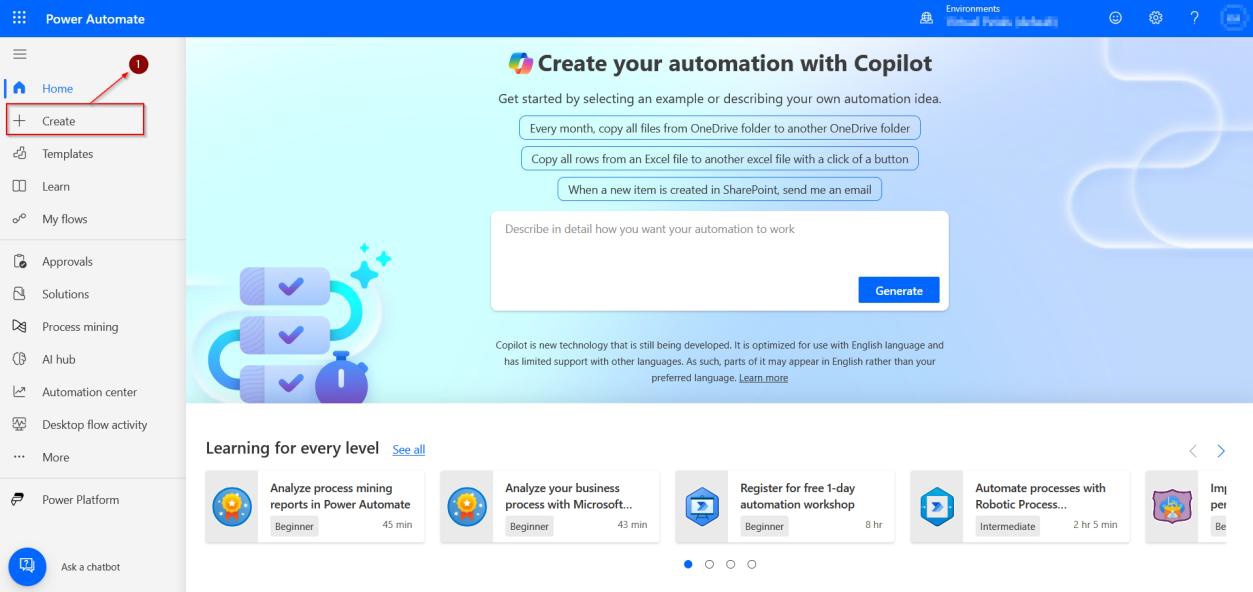
Screenshot – Step 2: Create a New Flow: Click on Create in the left-hand menu.
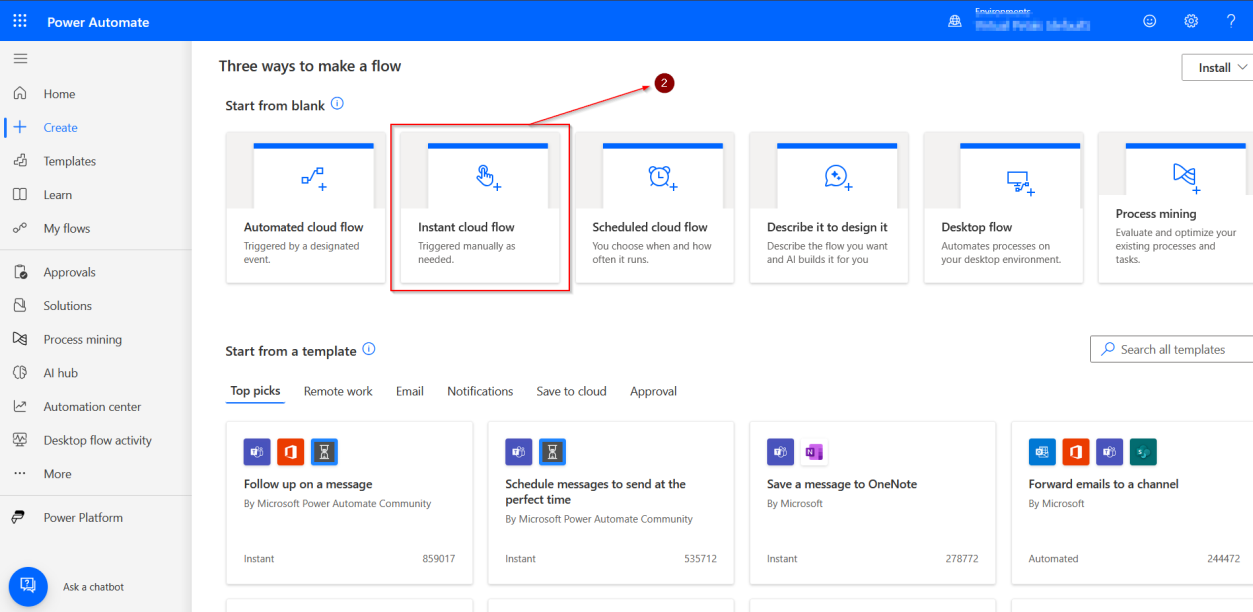
  1. Select Instant Cloud Flow.
Screenshot – Step 2: Create a New Flow: Select Instant Cloud Flow.
  1. Give your flow a name. (e.g., “Send PDF Email”)
  1. Choose Manually trigger a flow and click Create.
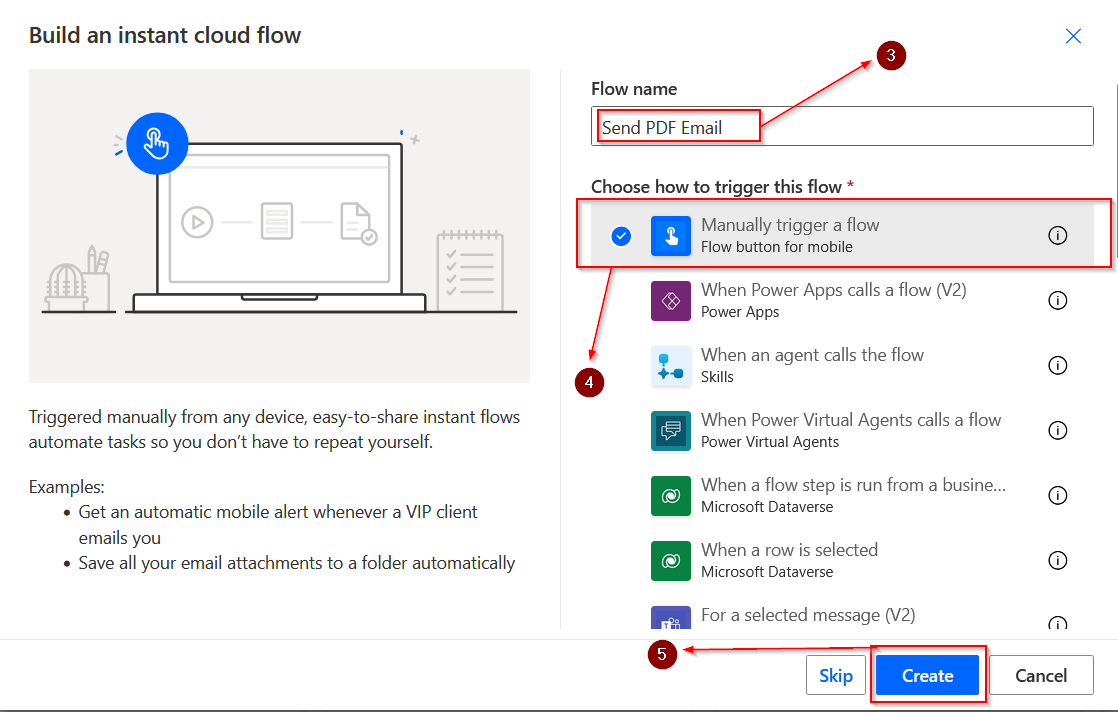
Screenshot – Step 2: Create a New Flow: Choose Manually trigger a flow and click Create.

Step 3: Get the File from SharePoint

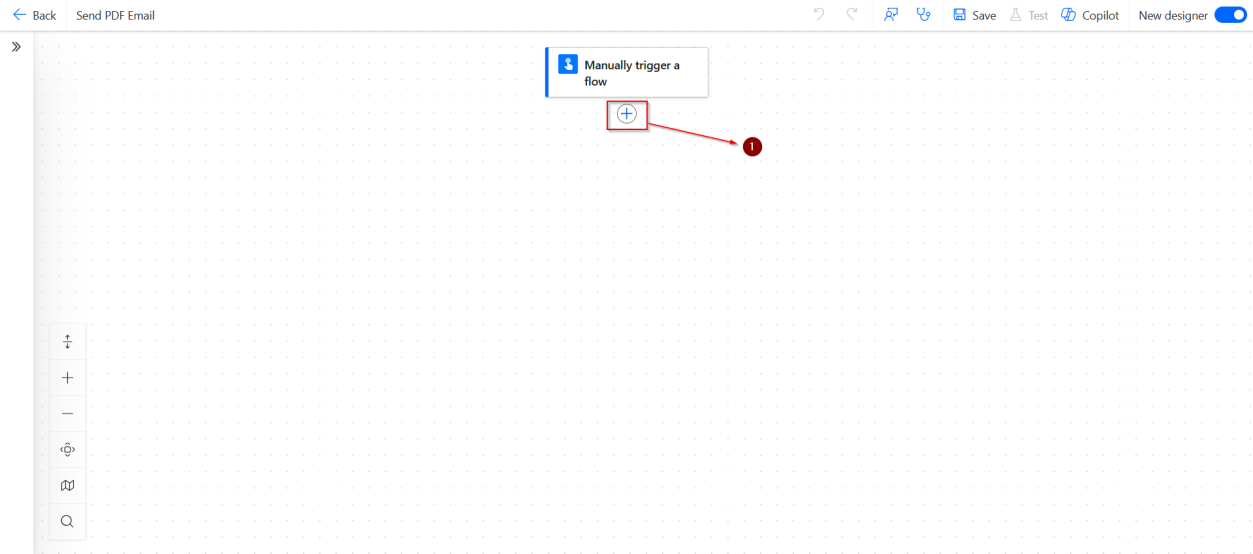
  1. Click + New Step.
Screenshot – Step 3: Get the File from SharePoint: Click + New Step.
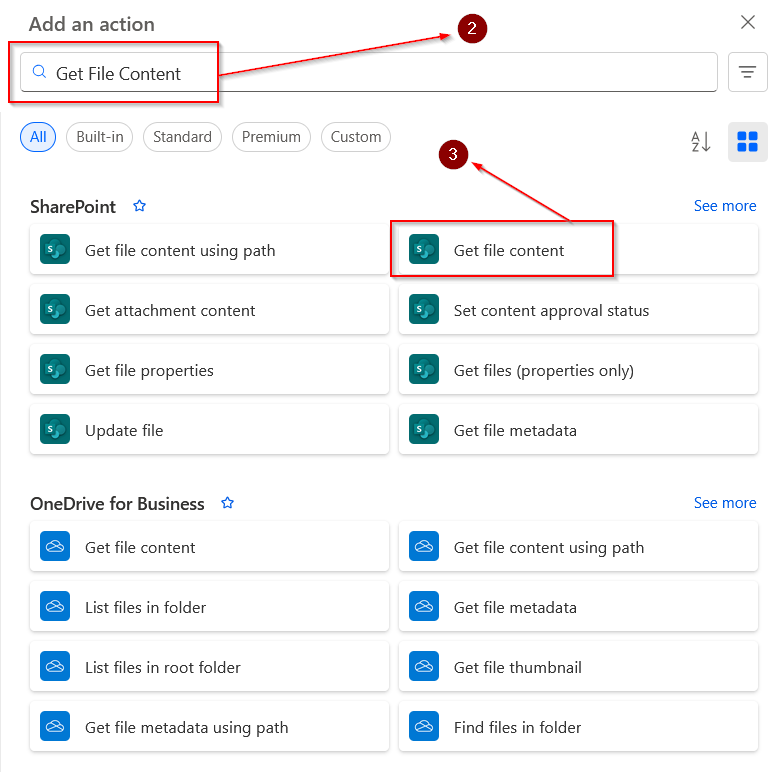
  1. Search for Get file content.
  1. Select SharePoint—Get file content.
Screenshot – Step 3: Get the File from SharePoint: Select SharePoint—Get file content.
  1. Fill in the details:
  • Site Address: Choose your SharePoint site.
  • File Identifier: Click the folder icon to browse and select your PDF file.
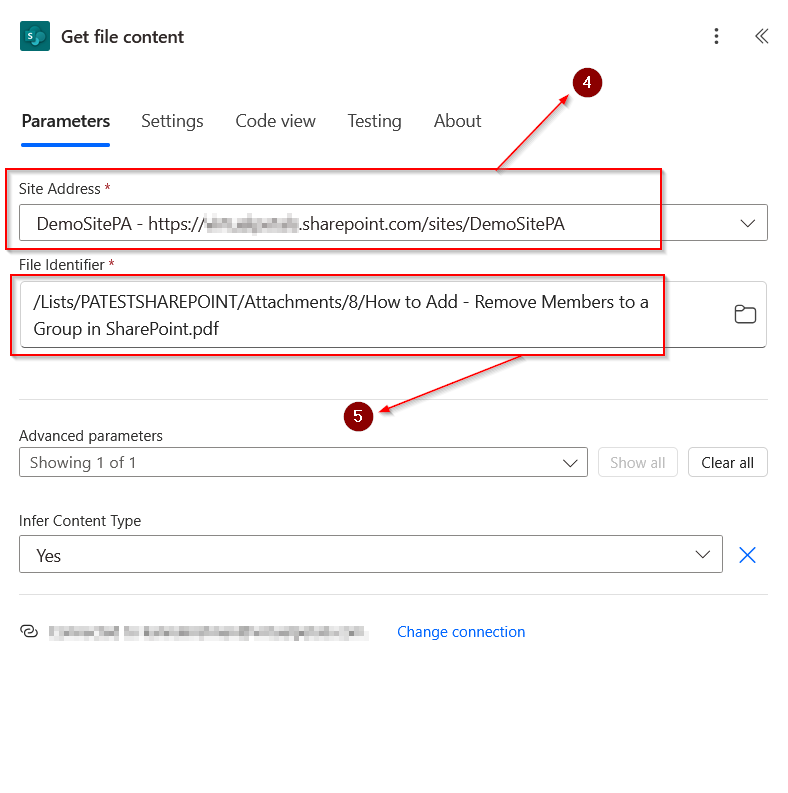
Screenshot – Step 3: Get the File from SharePoint: File Identifier: Click the folder icon to browse and select your PDF file.

Step 4: Send an Email with the File Attached

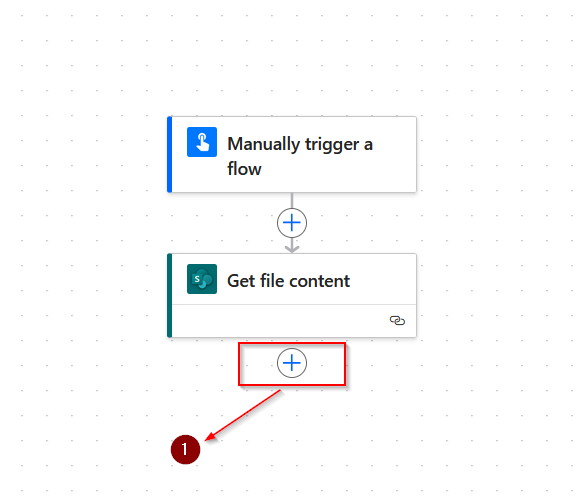
  1. Click + New Step.
Screenshot – Step 4: Send an Email with the File Attached: Click + New Step.
  1. Search for Send an email (V2).
  1. Select Office 365 Outlook—Send an email (V2)
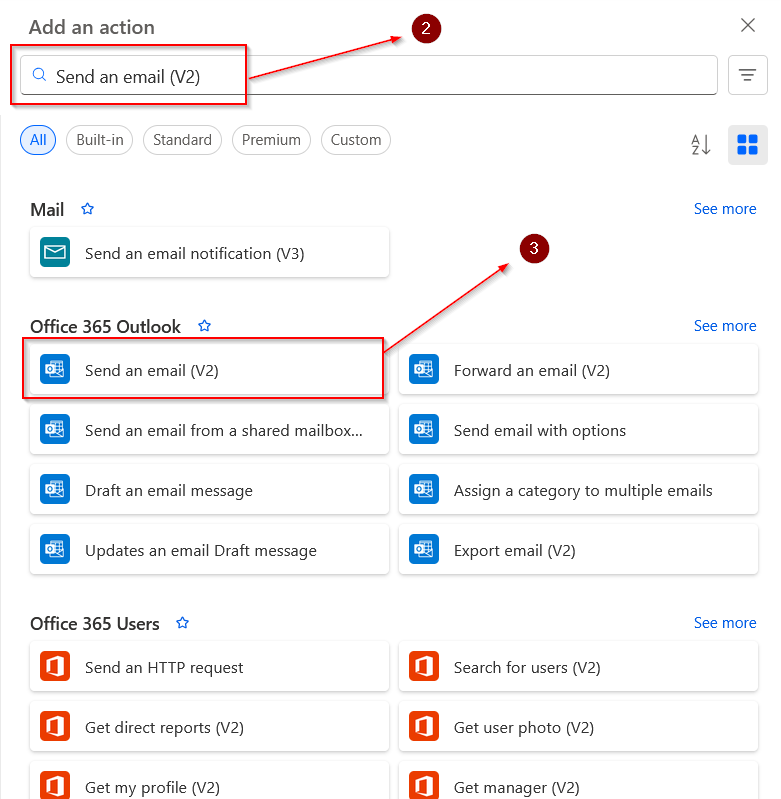
Screenshot – Step 4: Send an Email with the File Attached: Select Office 365 Outlook—Send an email (V2)
  1. Fill out the fields:
  • To: Enter the recipient’s email address.
  • Subject: For example, “Here is your PDF”.
  • Body: Write your message (e.g., “Please find the attached document.”)
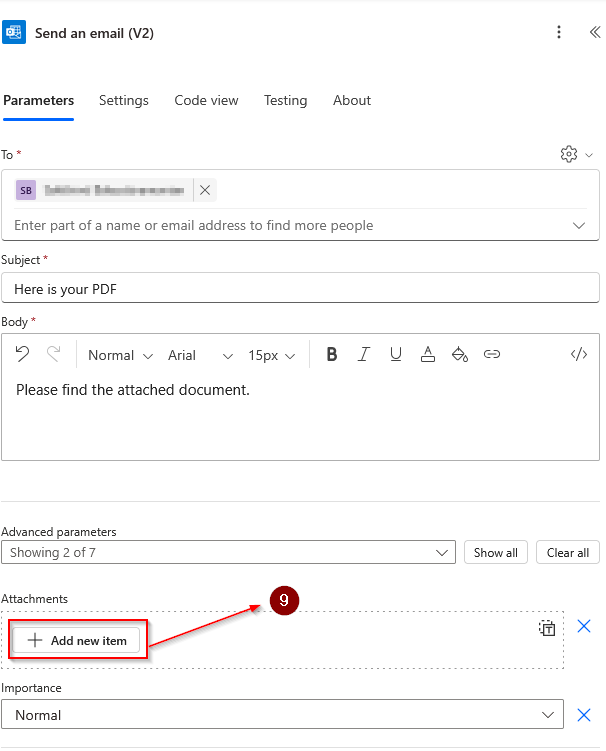
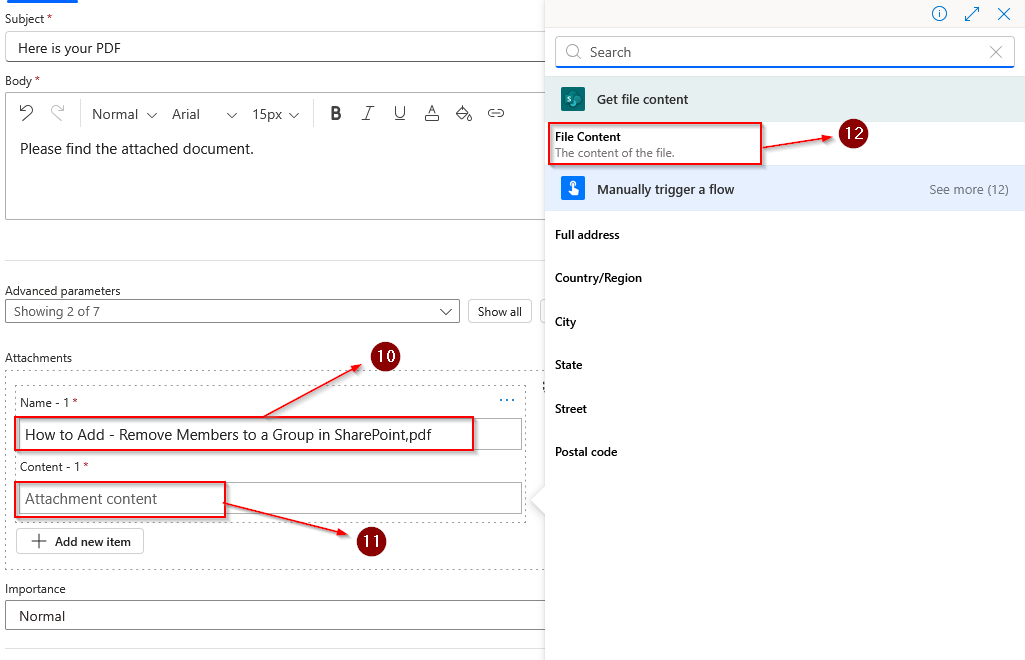
  • Attachments Name: Enter the name of the file (e.g., invoice.pdf)
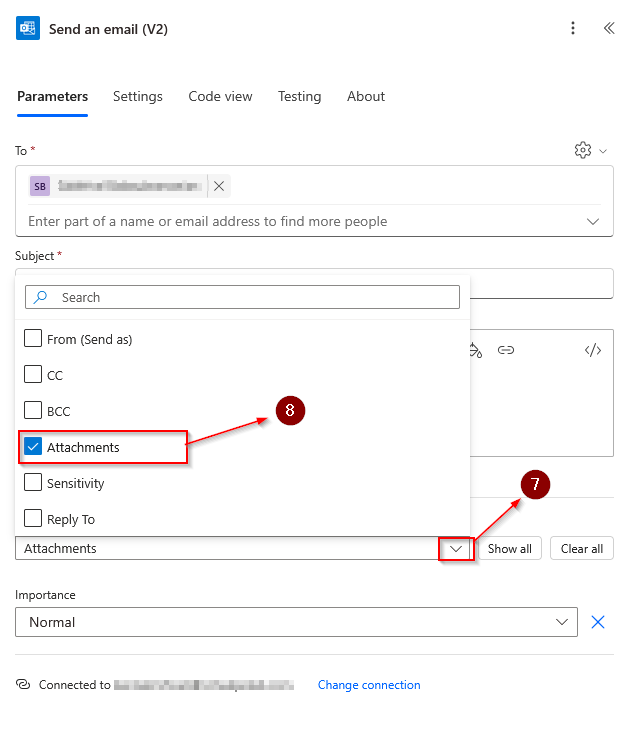
  • Attachments Content: Click and select File Content from the dynamic content panel.
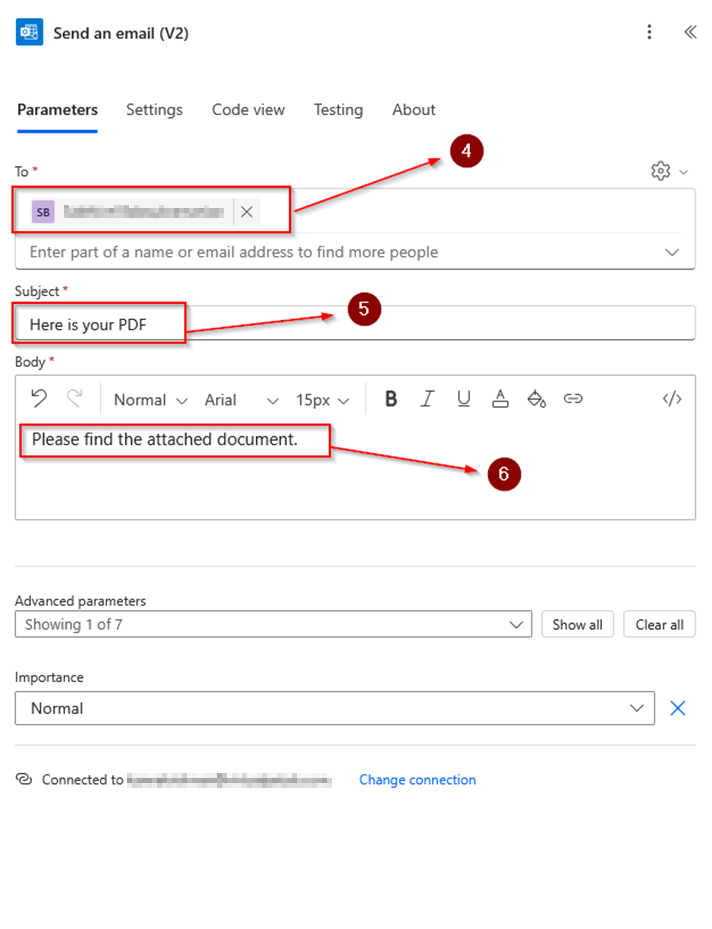
Screenshot – Step 4: Send an Email with the File Attached: Attachments Content: Click and select File Content from the dynamic content…
Screenshot – Step 4: Send an Email with the File Attached: Attachments Content: Click and select File Content from the dynamic content… (2)
Screenshot – Step 4: Send an Email with the File Attached: Attachments Content: Click and select File Content from the dynamic content… (3)
Screenshot – Step 4: Send an Email with the File Attached: Attachments Content: Click and select File Content from the dynamic content… (4)

Step 5: Save and Test Your Flow

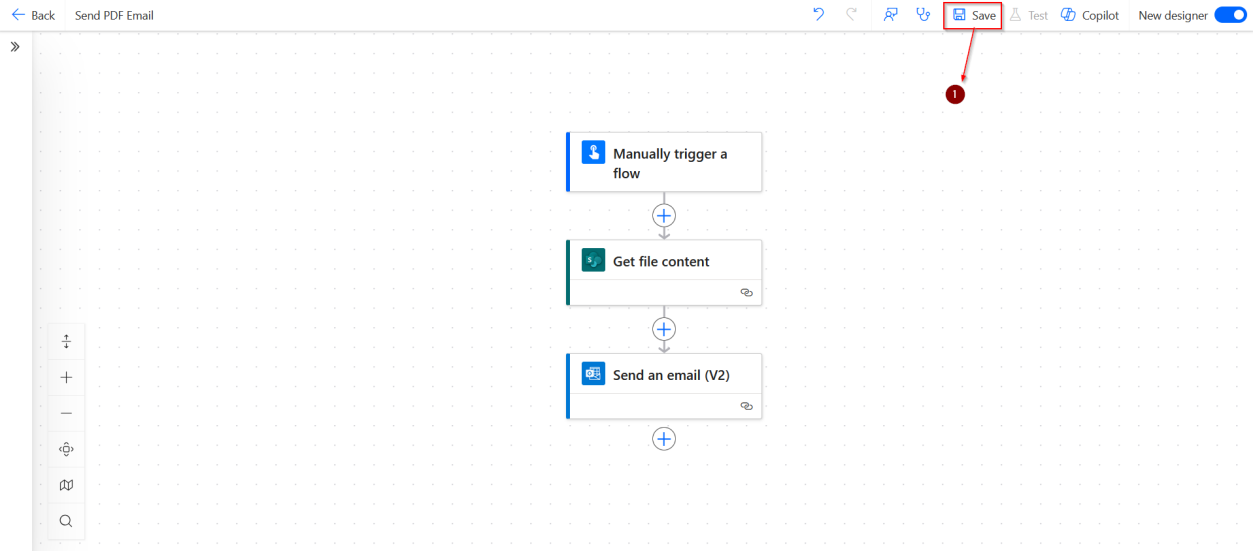
  1. Click Save in the top-right corner.
Screenshot – Step 5: Save and Test Your Flow: Click Save in the top-right corner.
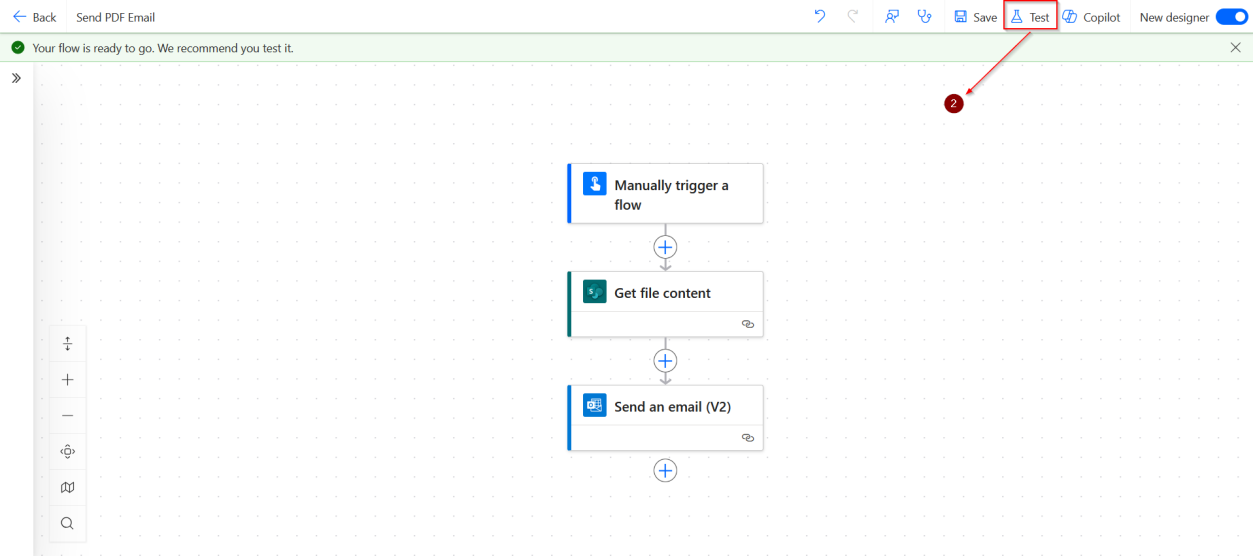
  1. Click Test and select Manually.
Screenshot – Step 5: Save and Test Your Flow: Click Test and select Manually.
  1. Run the flow and check your inbox to see if the email with the PDF arrived.
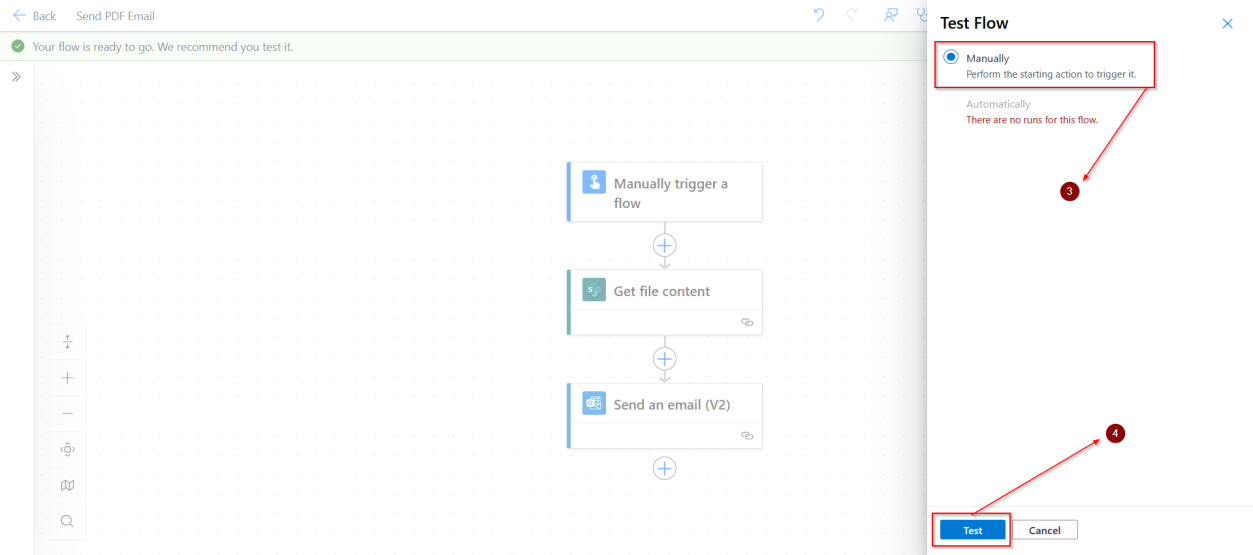
Screenshot – Step 5: Save and Test Your Flow: Run the flow and check your inbox to see if the email with the PDF arrived.
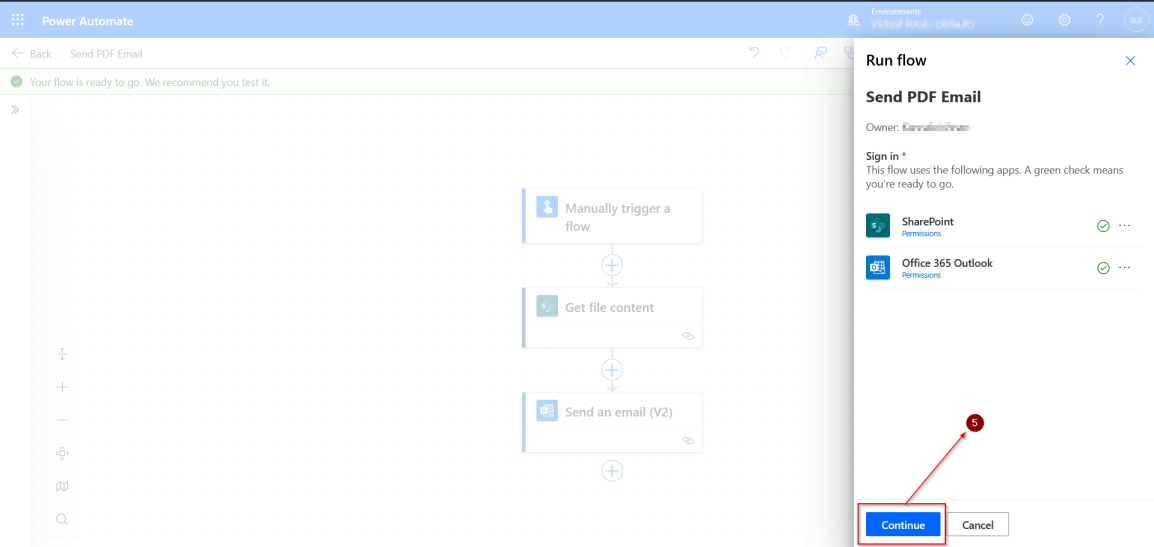
Screenshot – Step 5: Save and Test Your Flow: Run the flow and check your inbox to see if the email with the PDF arrived. (2)
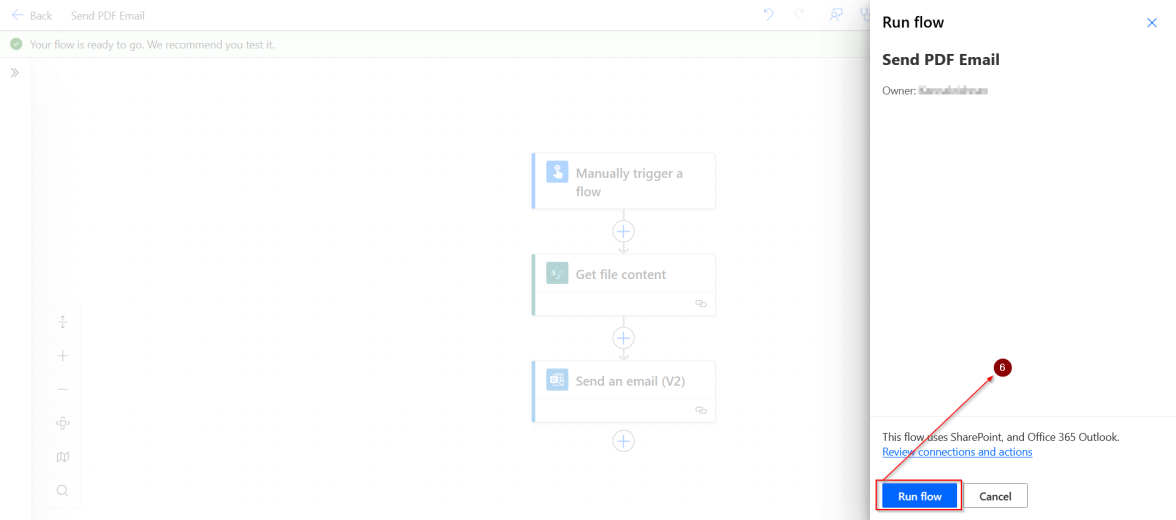
Screenshot – Step 5: Save and Test Your Flow: Run the flow and check your inbox to see if the email with the PDF arrived. (3)
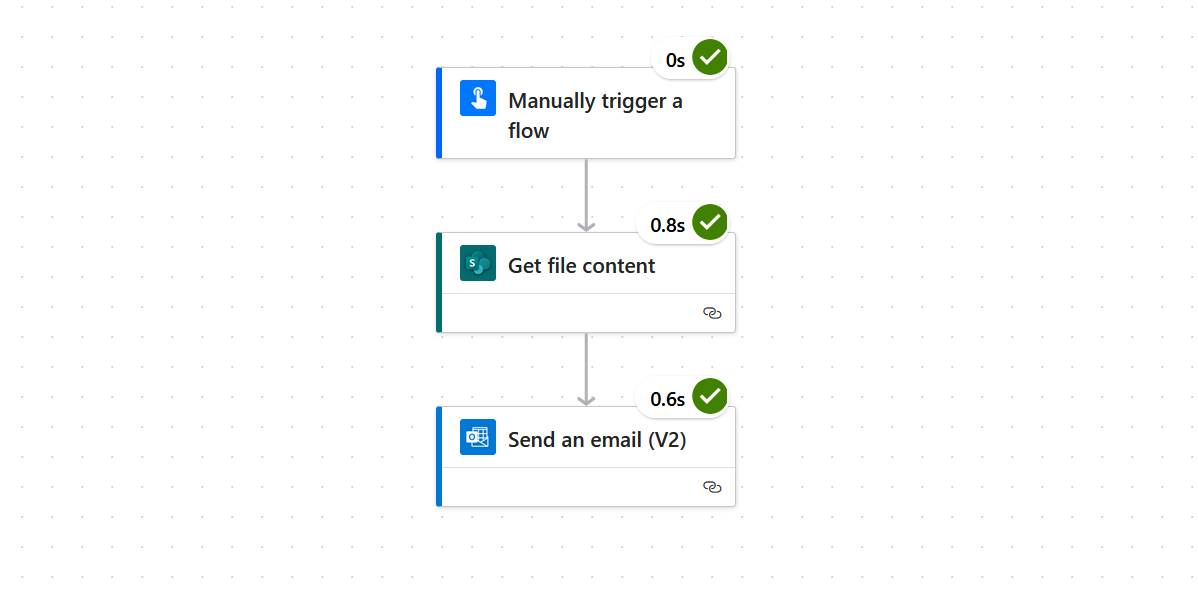
Screenshot – Step 5: Save and Test Your Flow: Run the flow and check your inbox to see if the email with the PDF arrived. (4)
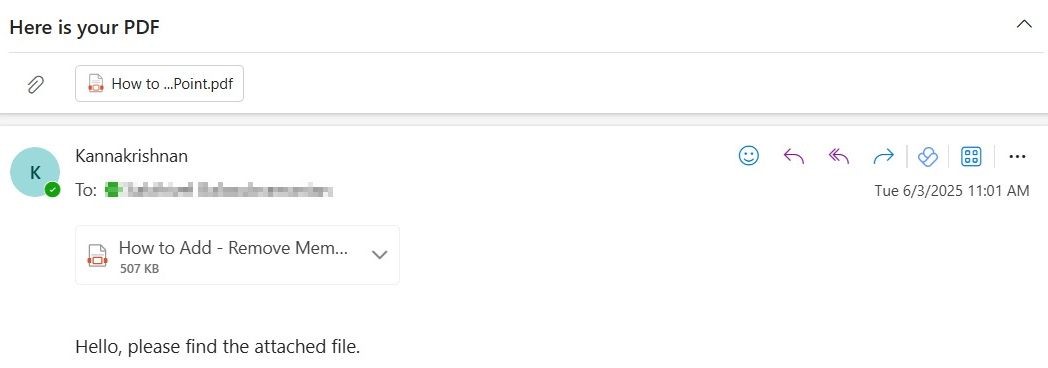
Screenshot – Step 5: Save and Test Your Flow: Run the flow and check your inbox to see if the email with the PDF arrived. (5)

Conclusion

You have now created a Power Automate flow that sends a PDF file stored in SharePoint as an email attachment. This kind of automation can save you time and reduce manual errors in routine tasks.

Tips and Troubleshooting

  1. Ensure the file path in SharePoint is correct and accessible.
  1. If your flow fails, check the connection to SharePoint and Outlook.
  1. Use dynamic file names and loops if you want to automate sending multiple files

Get new Microsoft 365 and Azure guides from Azure365Pro first in Google.

Kannakrishnan Arumugasamy
As a passionate and skilled Microsoft Cloud Engineer, I specialize in architecting, deploying, and managing cloud-based solutions on the Azure platform. With a background in data science and a deep interest in cloud technologies, I focus on building scalable, secure, and efficient cloud environments to support business transformation.

Related Articles

LEAVE A REPLY

Please enter your comment!
Please enter your name here